Introduction to Inventory Management (As Explained in Training)
Before getting into the Oracle instance and starting the setups, it is important to first understand what exactly inventory management is.
Inventory management is a core module in an ERP system. It plays a critical role in helping organizations track, control, and manage their stock efficiently.
This module allows businesses to record every movement of inventory, including:
- Purchasing goods
- Receiving items into stock
- Issuing items for production or sales
- Transferring inventory between locations
- Performing adjustments
- Conducting physical stock counts
The primary objective of inventory management is to ensure the following:
- The right quantity of inventory
- At the right time
- At the right location
By doing this, organizations can:
- Avoid stock-outs
- Reduce excess inventory
- Minimize operational costs
- Ensure smooth business operations
After understanding this, we now proceed to the system and begin the end-to-end setup of inventory management in Oracle Cloud.
Starting the Setup in Oracle Instance
The trainer now shares the screen and begins working inside the Oracle Cloud instance.
We will start performing complete inventory setups step-by-step.
User Roles and Data Access (Important Configuration)
Before proceeding further with inventory transactions, it is important to understand how users, roles, and data access work in the system.
Why This Is Required
In a real-time environment:
- Multiple users work simultaneously
- Different users perform different tasks
- Access must be controlled and synchronized
For example:
- Some users create transactions
- Some assign roles
- Some manage data access
To ensure everything works properly and in sync, Oracle provides a program.
Running “User and Role Synchronization Process”
To synchronize roles and data access across users:
Step-by-Step Action:
- Navigate to the Scheduled Processes / Program section
- Select the program:
Run User and Role Synchronization Process
- Click on Submit
What Happened in Training
When the trainer tried to submit the process
The system threw an error:
“One or more requests are currently pending for definition.”
Reason:
The program was already scheduled in the backend
It is likely running on a frequency basis automatically
Action Taken:
The trainer clicked on “Cancel.”
No need to submit again
Understanding Role-Based Access
Not all users should have access to everything.
Key Concept:
- Access is role-based
- Roles are assigned based on job responsibilities
Examples:
Inventory Users
Can perform inventory-related transactions
Buyers
Can work on purchase orders
Important Rule:
Only assign:
- Required roles
- Required data access
This ensures:
- Security
- Proper segregation of duties
- Controlled system usage
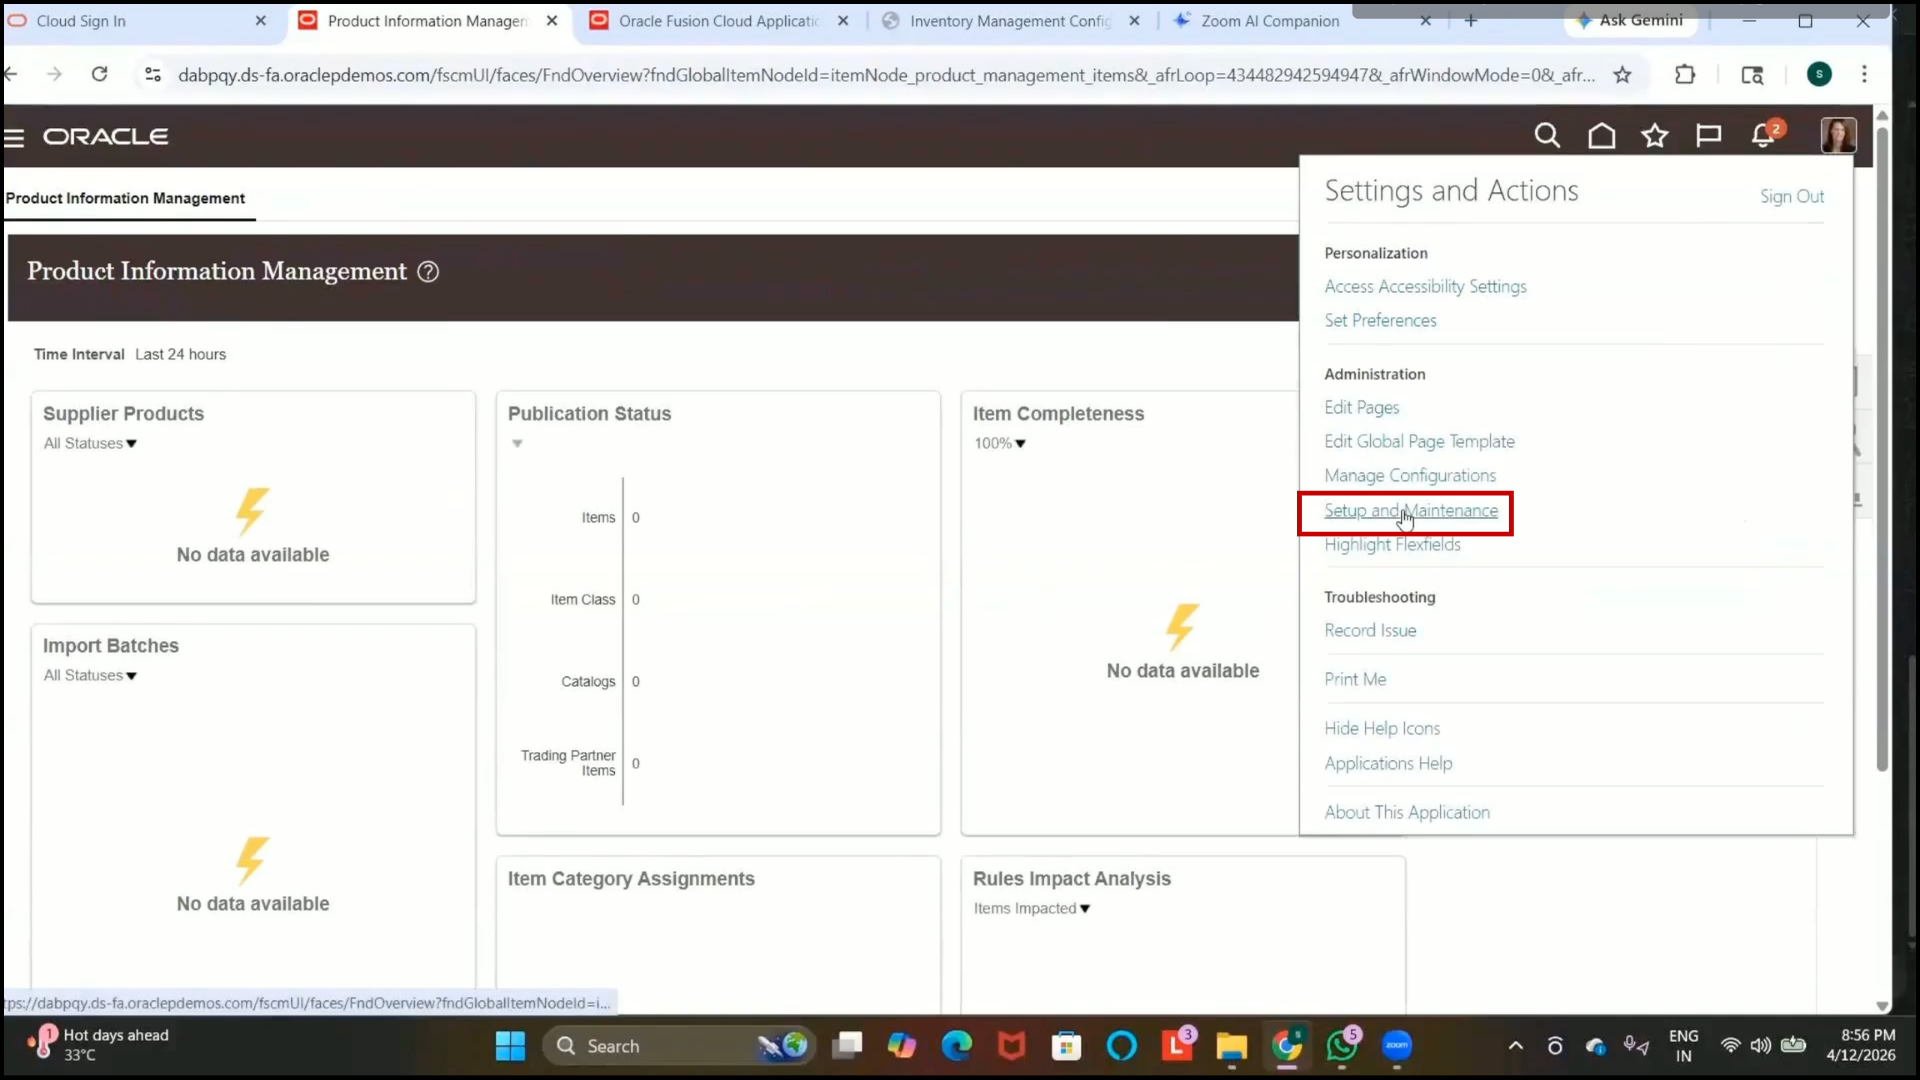
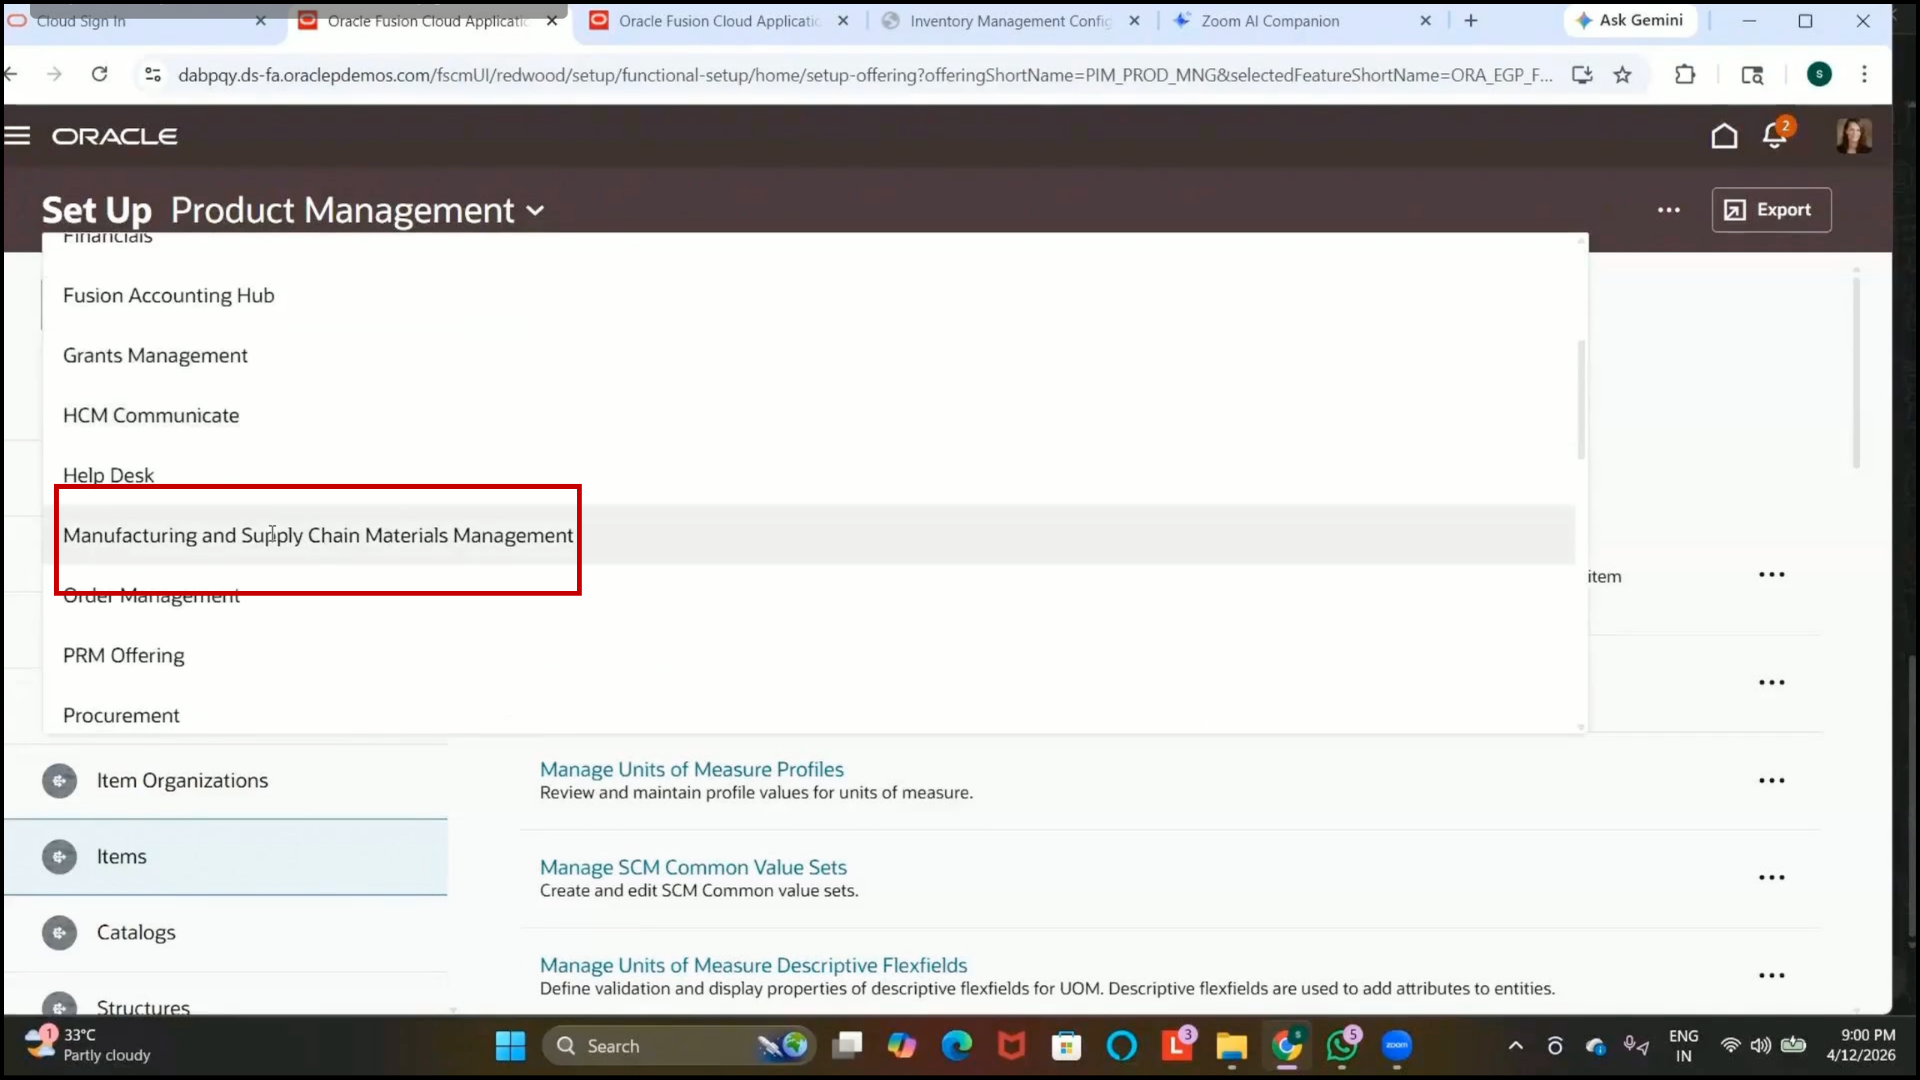
Steps to Create Inventory Transaction Reasons
Step 118: Navigate to Setup and Maintenance
1. Open the Navigator.
2. Go to:
Supply Chain Management → Setup and Maintenance
Step 119: Search for the Task
1. In the setup search bar, search for:
2. Inventory Transaction Reasons
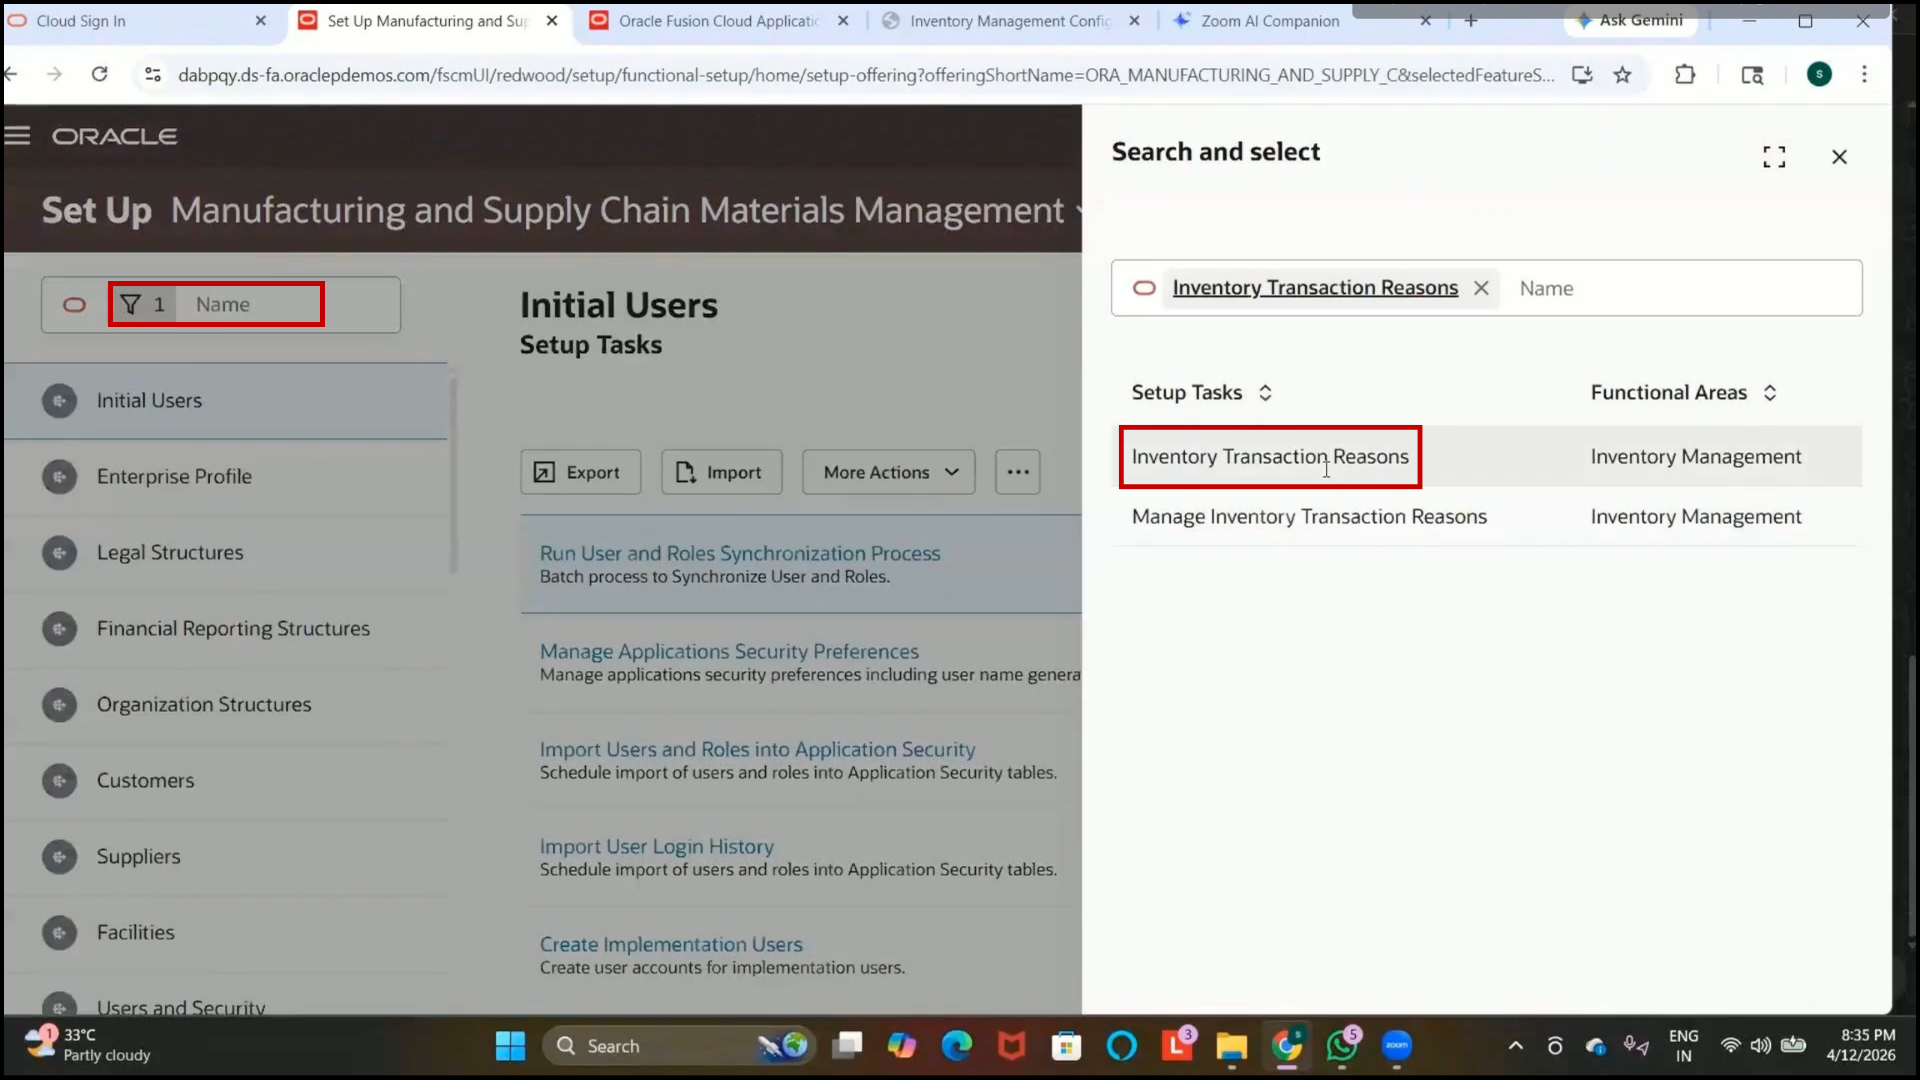
3. Open the task.
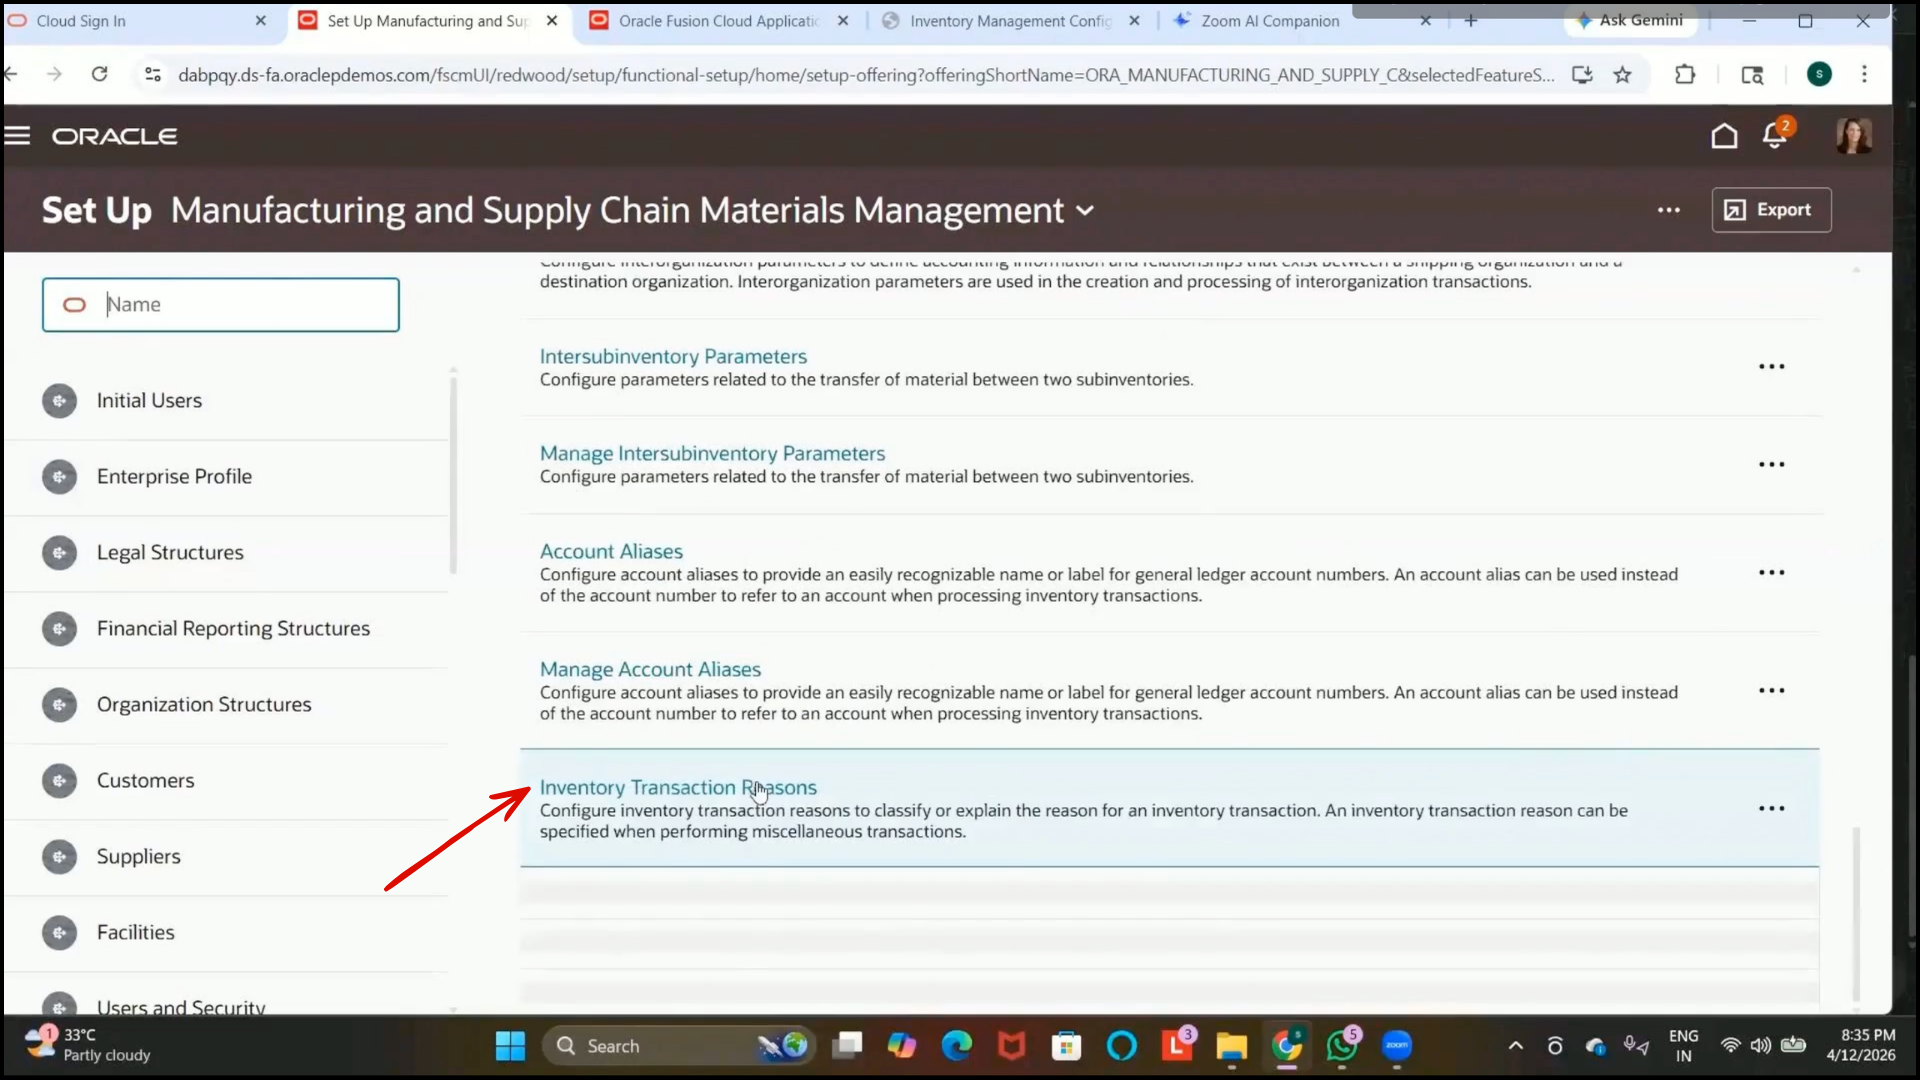
Step 120: Review Existing Transaction Reasons
1. The page displays previously created inventory transaction reasons.
2. Existing examples such as “Damaged Goods” may already be available.
Step 121: Create a New Transaction Reason
1. Click on Create.
2. Enter the Reason Name:
3. Damaged Item to Supplier Return
4. Enter the description as required.
5. Select the Start Date.
Step 122: Select the Transaction Type
1. Choose the appropriate transaction type from the list.
2. In this example, select:
3. Supplier Returns
4. Understanding Transaction Types
5. Different transaction reason types are available for different inventory activities, such as
6. Cycle Count Discrepancy
7. Supplier Returns
8. Inventory Adjustments
9. The selected reason becomes available only for the chosen transaction type.
10. Additional Information
11. Extra transaction types can be added through Inventory Lookup Values.
12. To add additional lookup values:
13. Navigate to the Inventory Lookups setup.
14. Add new lookup values for the required transaction reason type.
Step 123: Save the Transaction Reason
1. Click on Create.
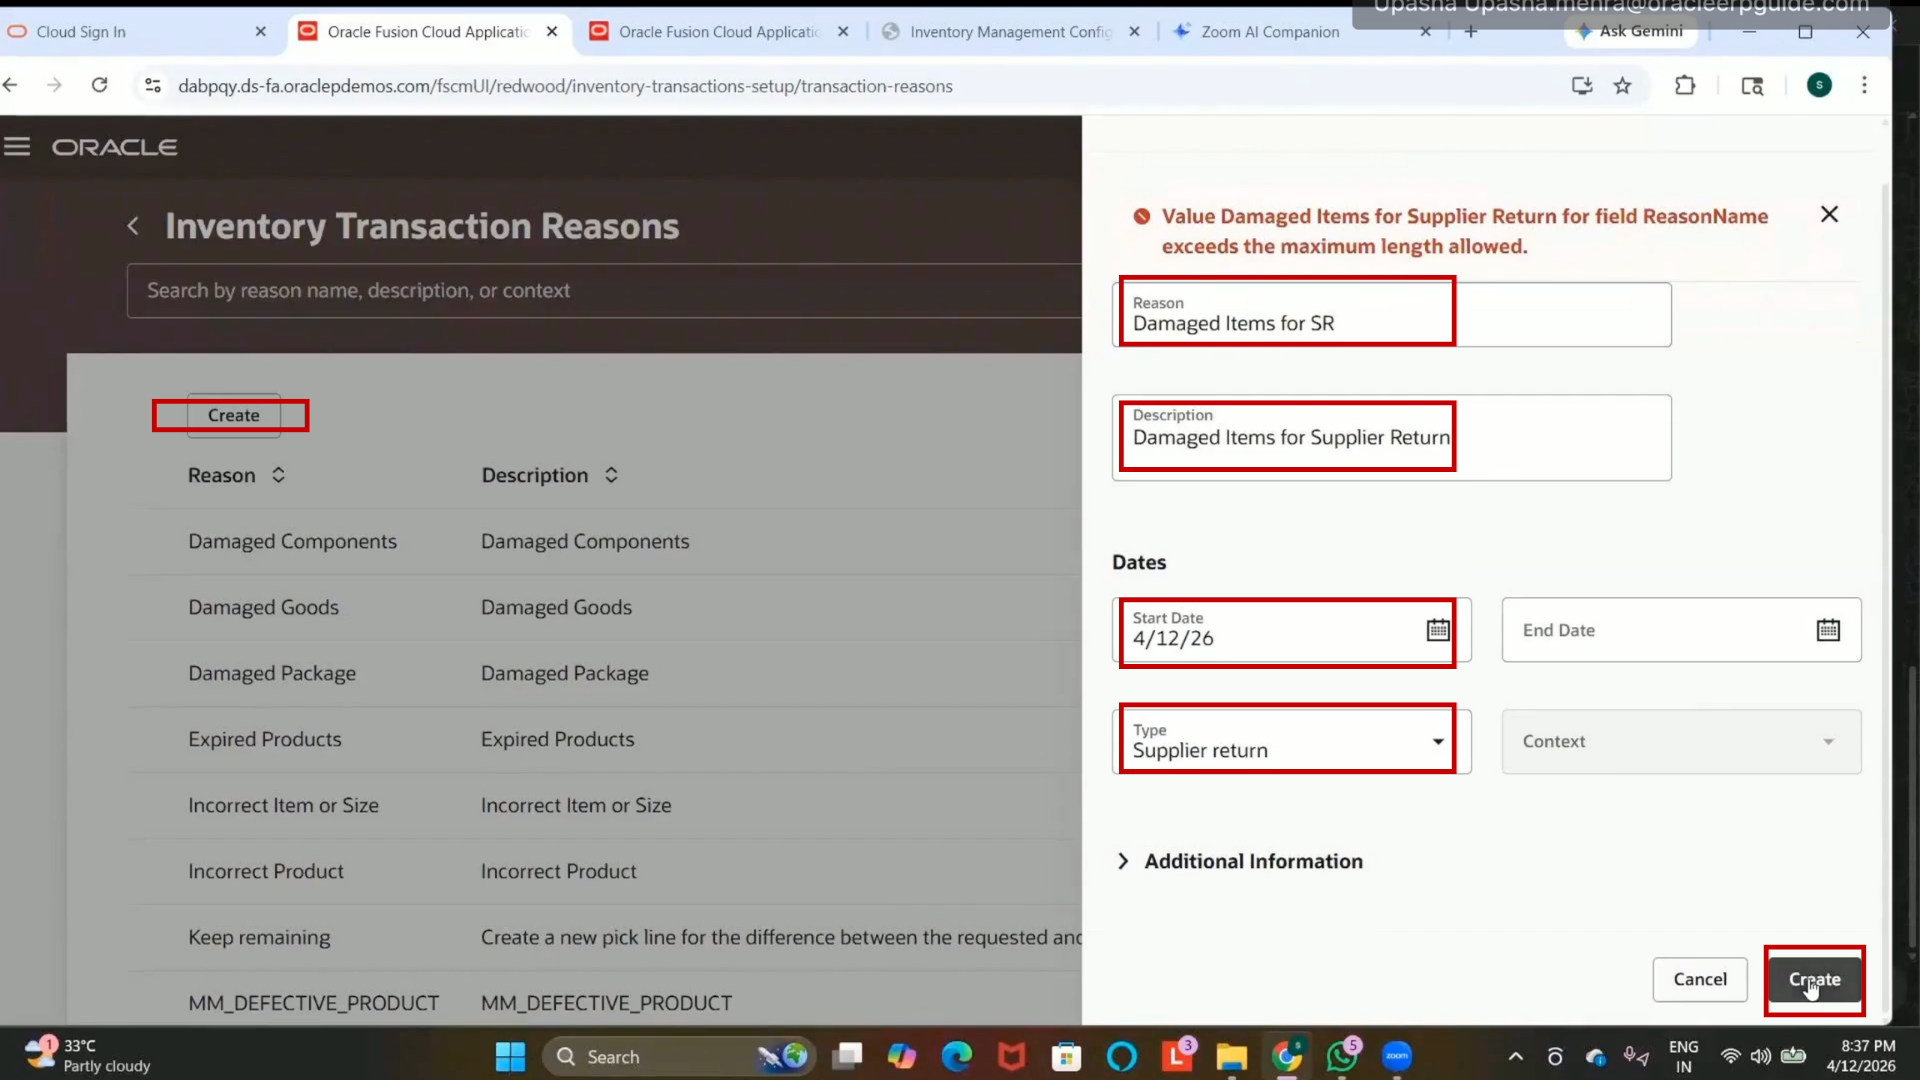
2. The new inventory transaction reason will be created successfully.
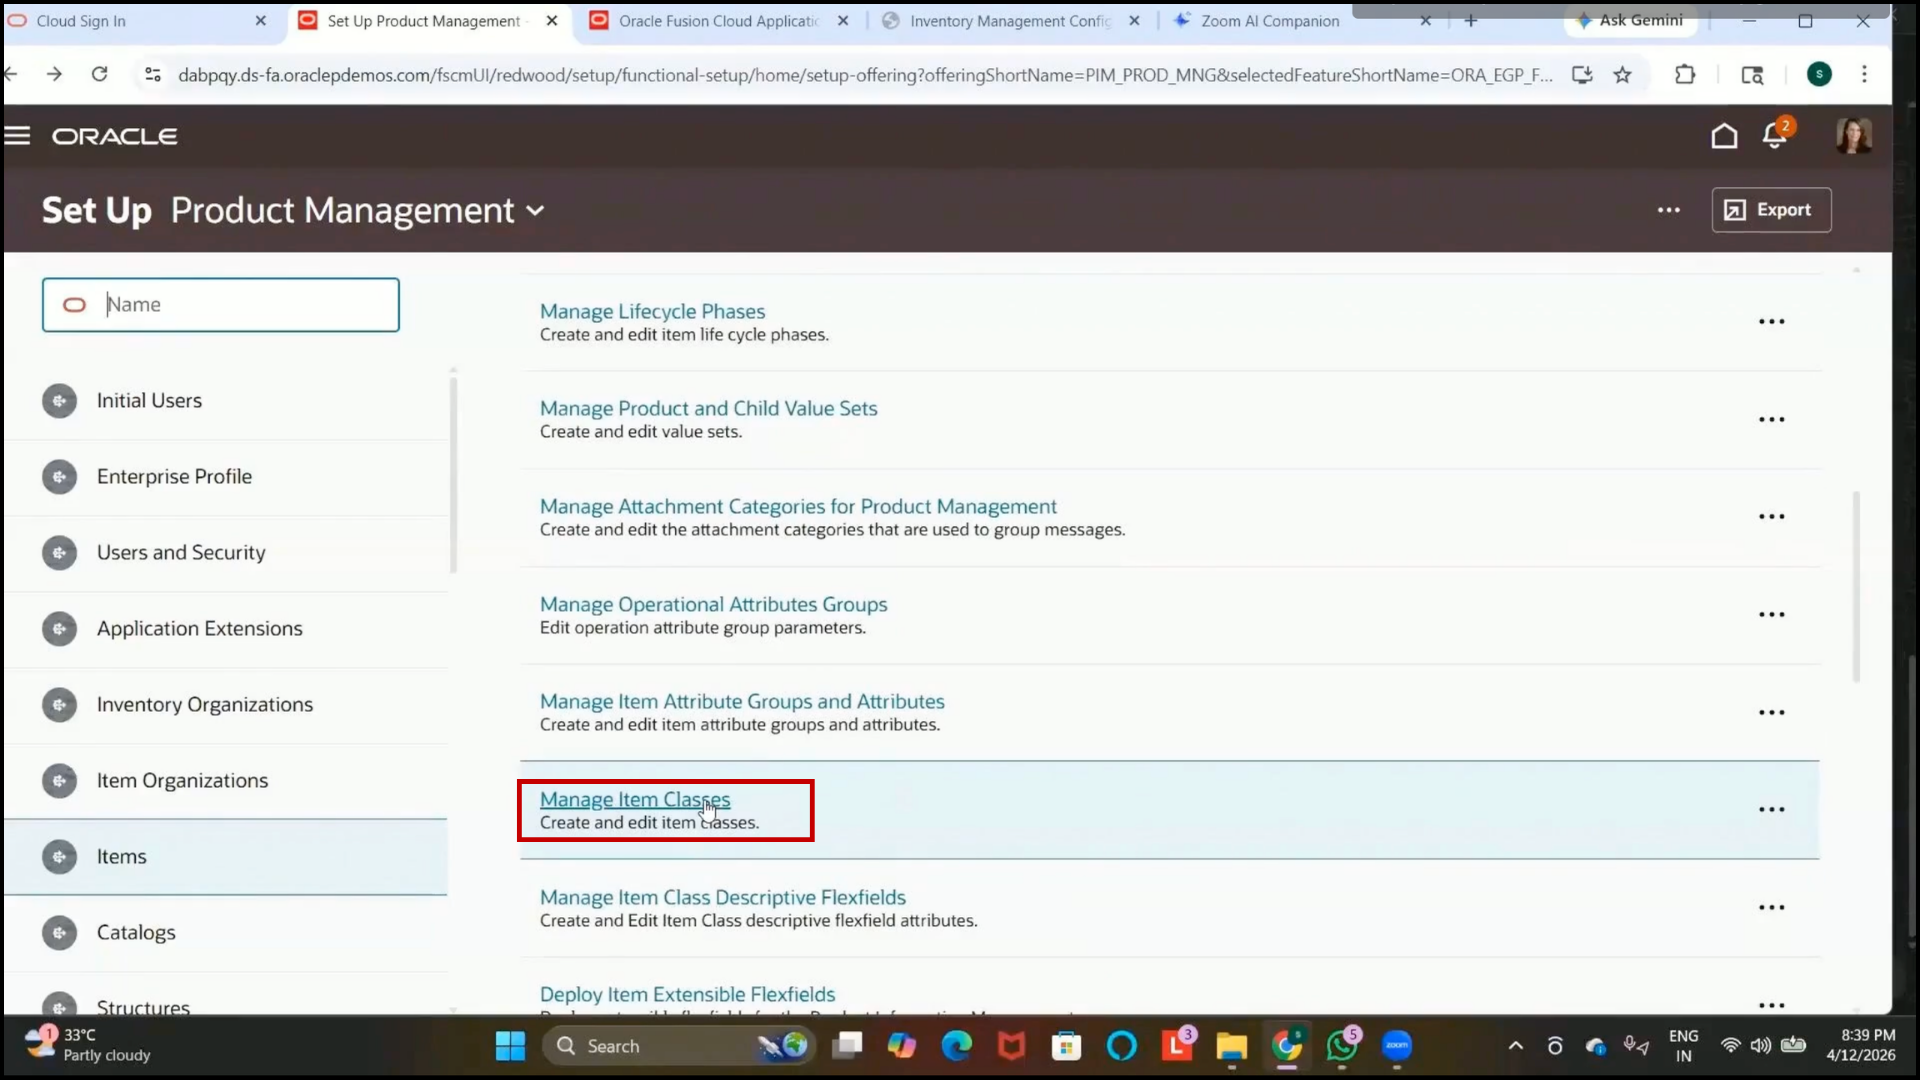
Step 124: Navigate to Manage Item Classes
1. Open Setup and Maintenance.
2. Navigate to:
Product Management
3. Search for:
Manage Item Classes
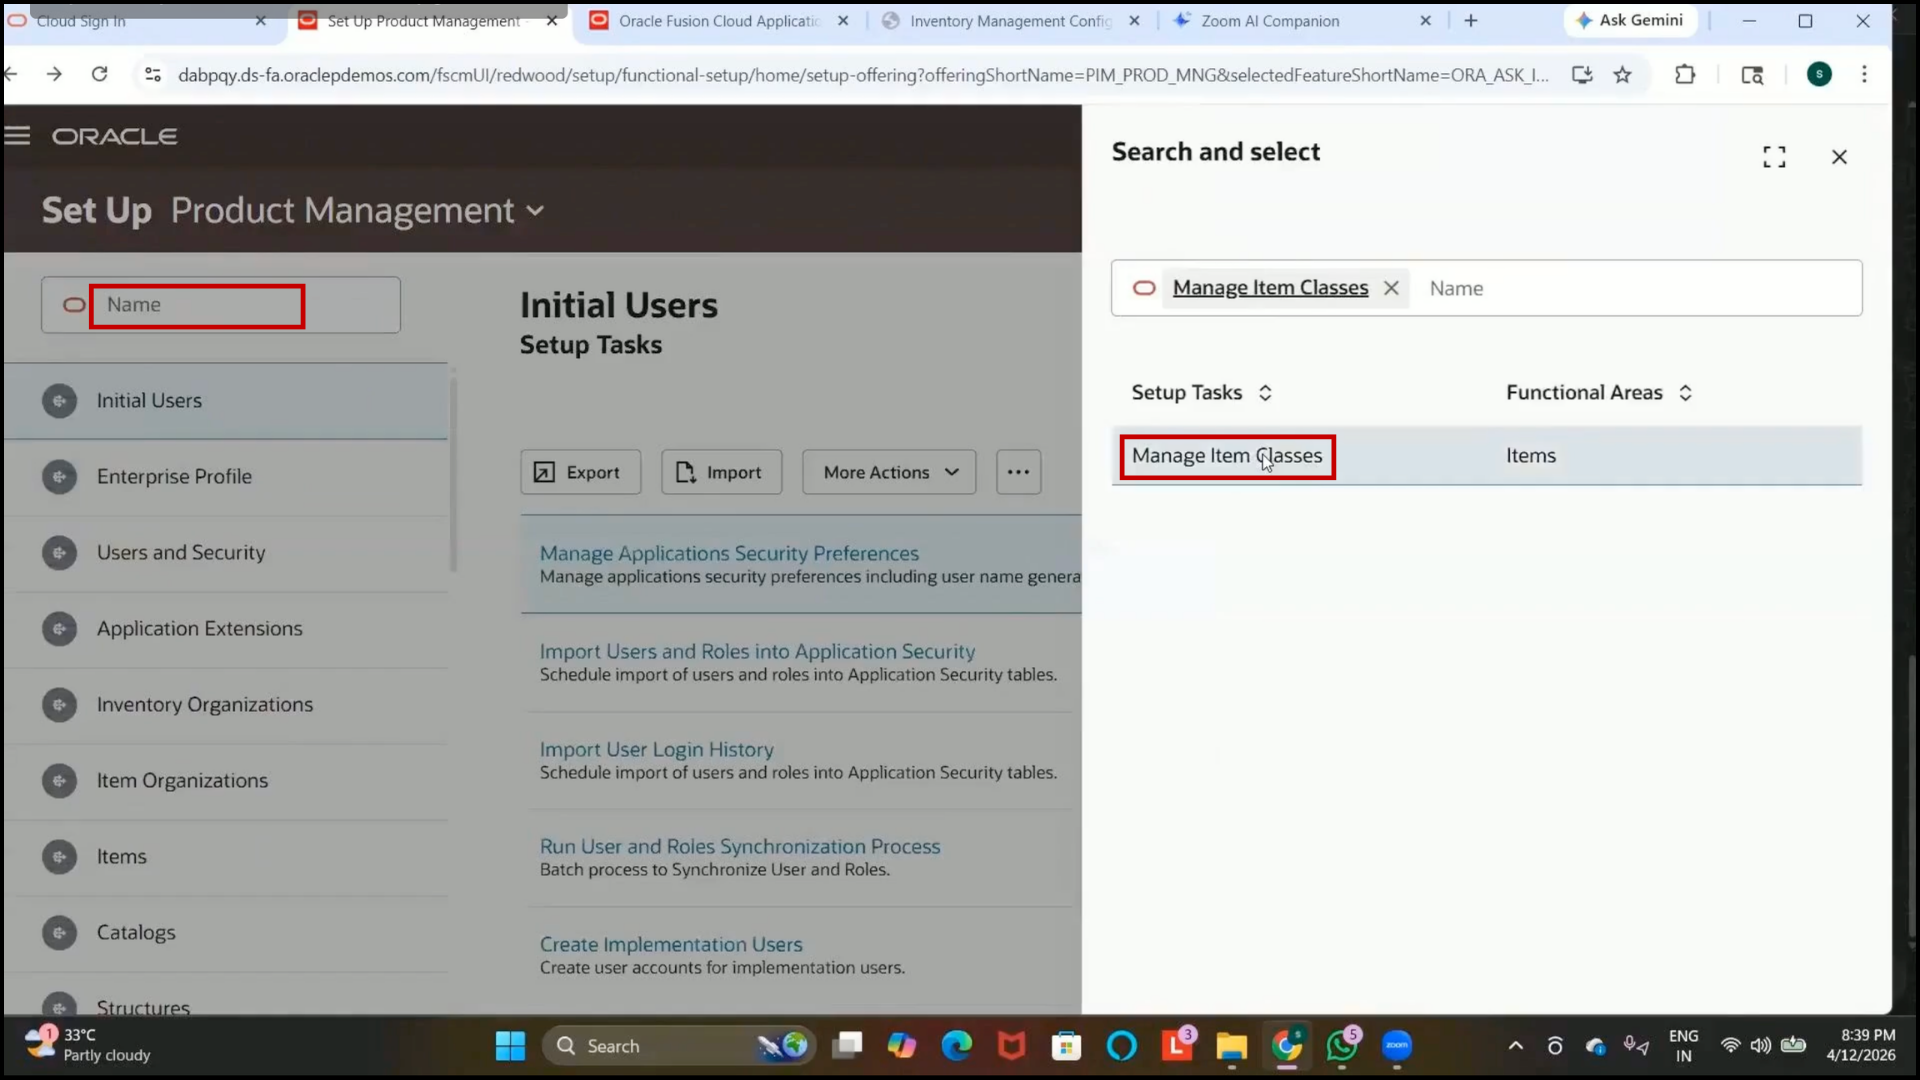
4. Open the Manage Item Classes setup.
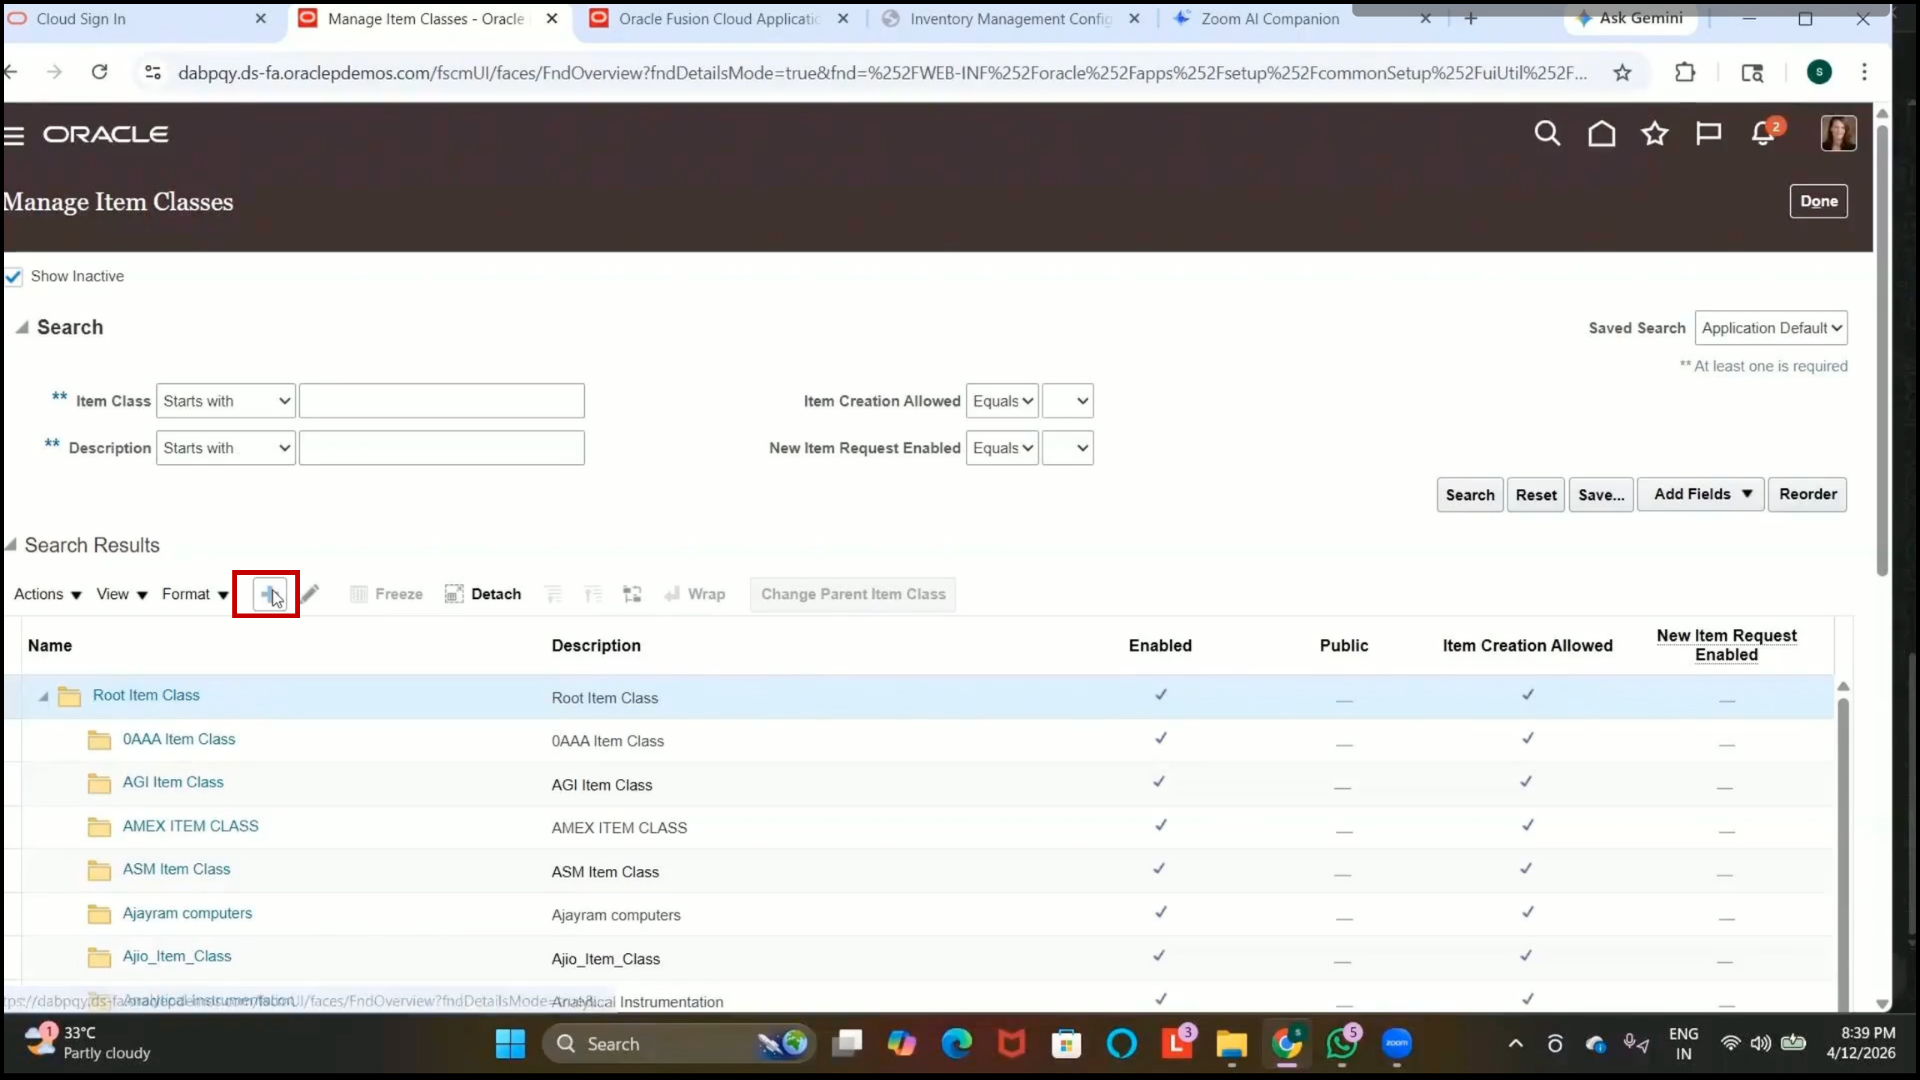
Step 125: Understand the Purpose of Item Classes
1. Item classes are used to group items that share the same characteristics.
Example:
2. Shirts can belong to one item class.
3. Trousers can belong to another item class.
4. Vests can belong to a separate item class.
5. Different item classes are created based on business requirements and product characteristics.
Step 126: Review the Root Item Class
1. In the Manage Item Classes page, review the existing Root Item Class.
2. The Root Item Class acts as the parent item class for all other item classes.
3. All newly created item classes must be created under the Root Item Class.
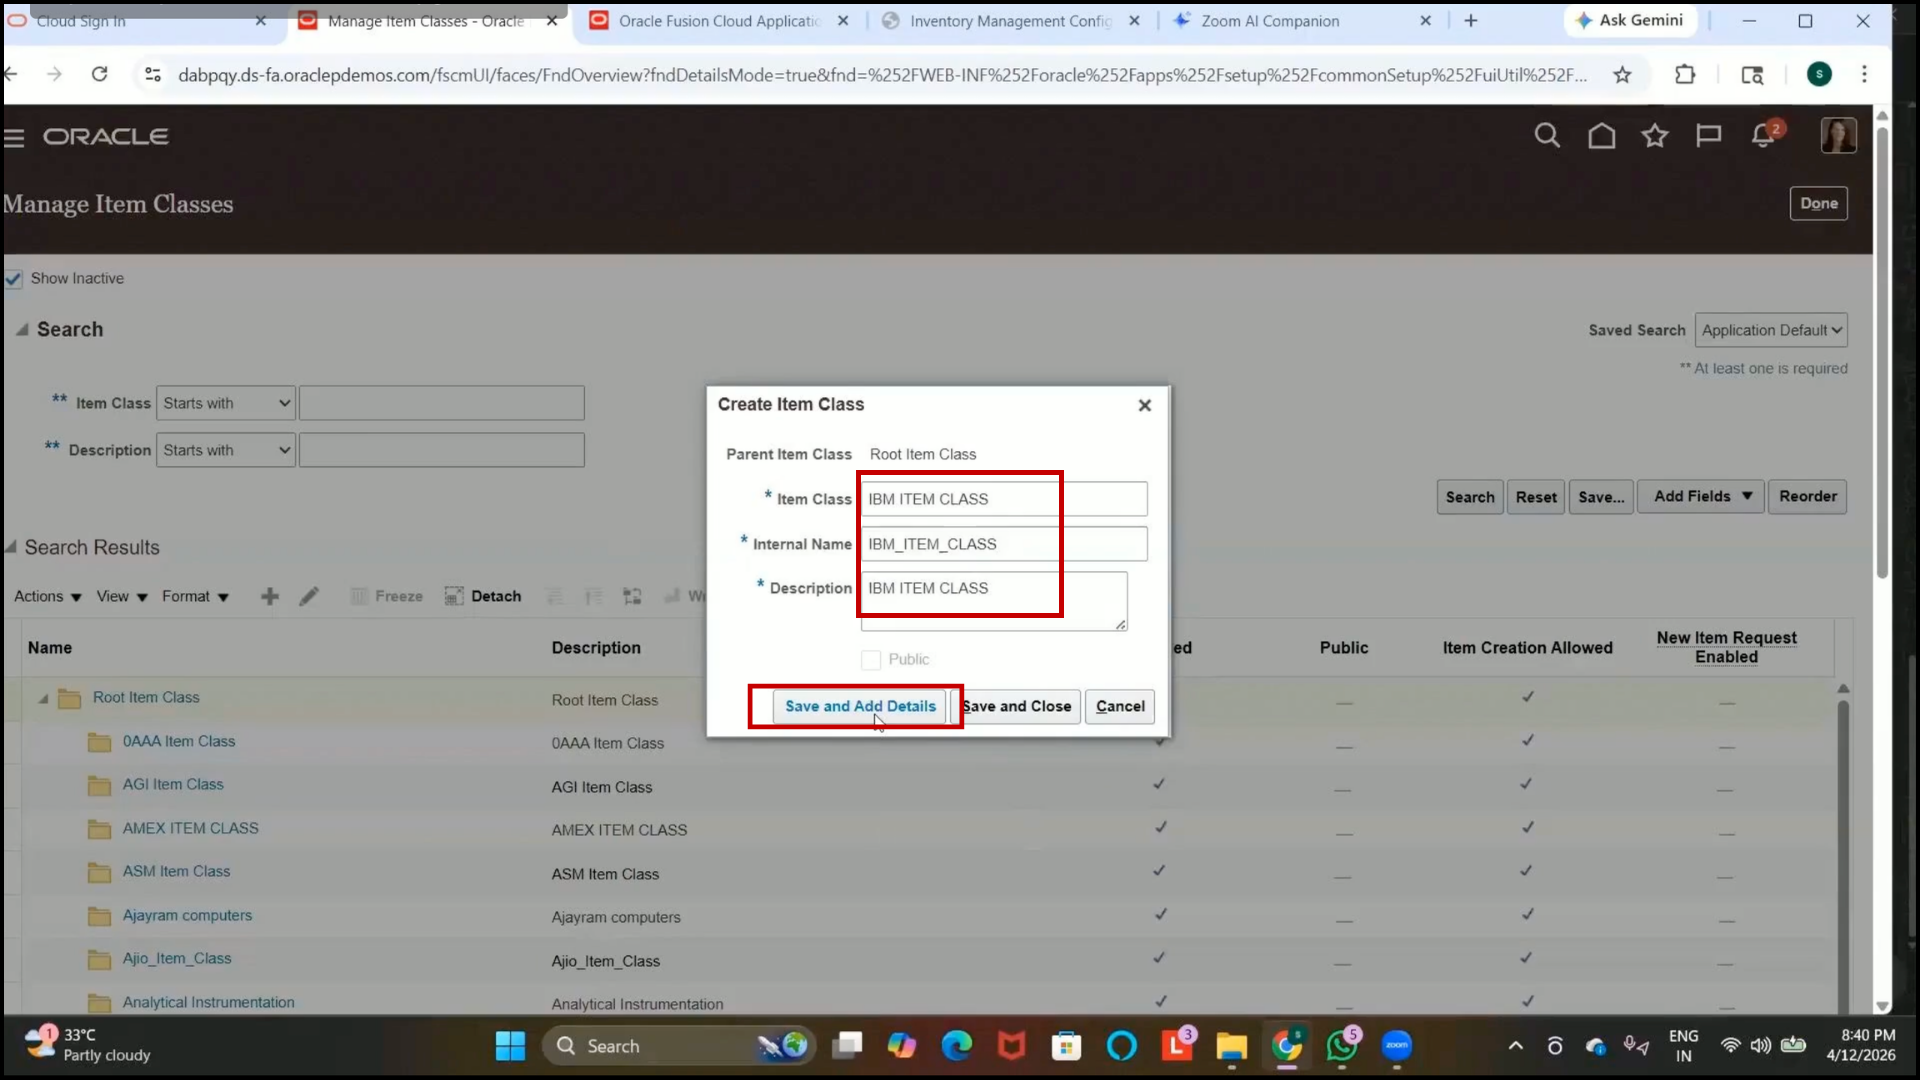
Step 127: Create a New Item Class
1. Click on Create.
2. Enter the Item Class Name:
IBM Item Class
3. Verify the internal name.
4. The value may populate automatically.
5. Enter the description.
6. Click on Save and Add Details.
Step 128: Review Item Management Configurations
1. Navigate to the Item Management section.
2. Review the available advanced setup configurations.
3. These configurations can control:
4. Item description format
5. Automatic item number generation
6. Item creation rules
7. Example:
8. Restrict item descriptions to uppercase only.
9. Automatically generate item numbers during item creation.
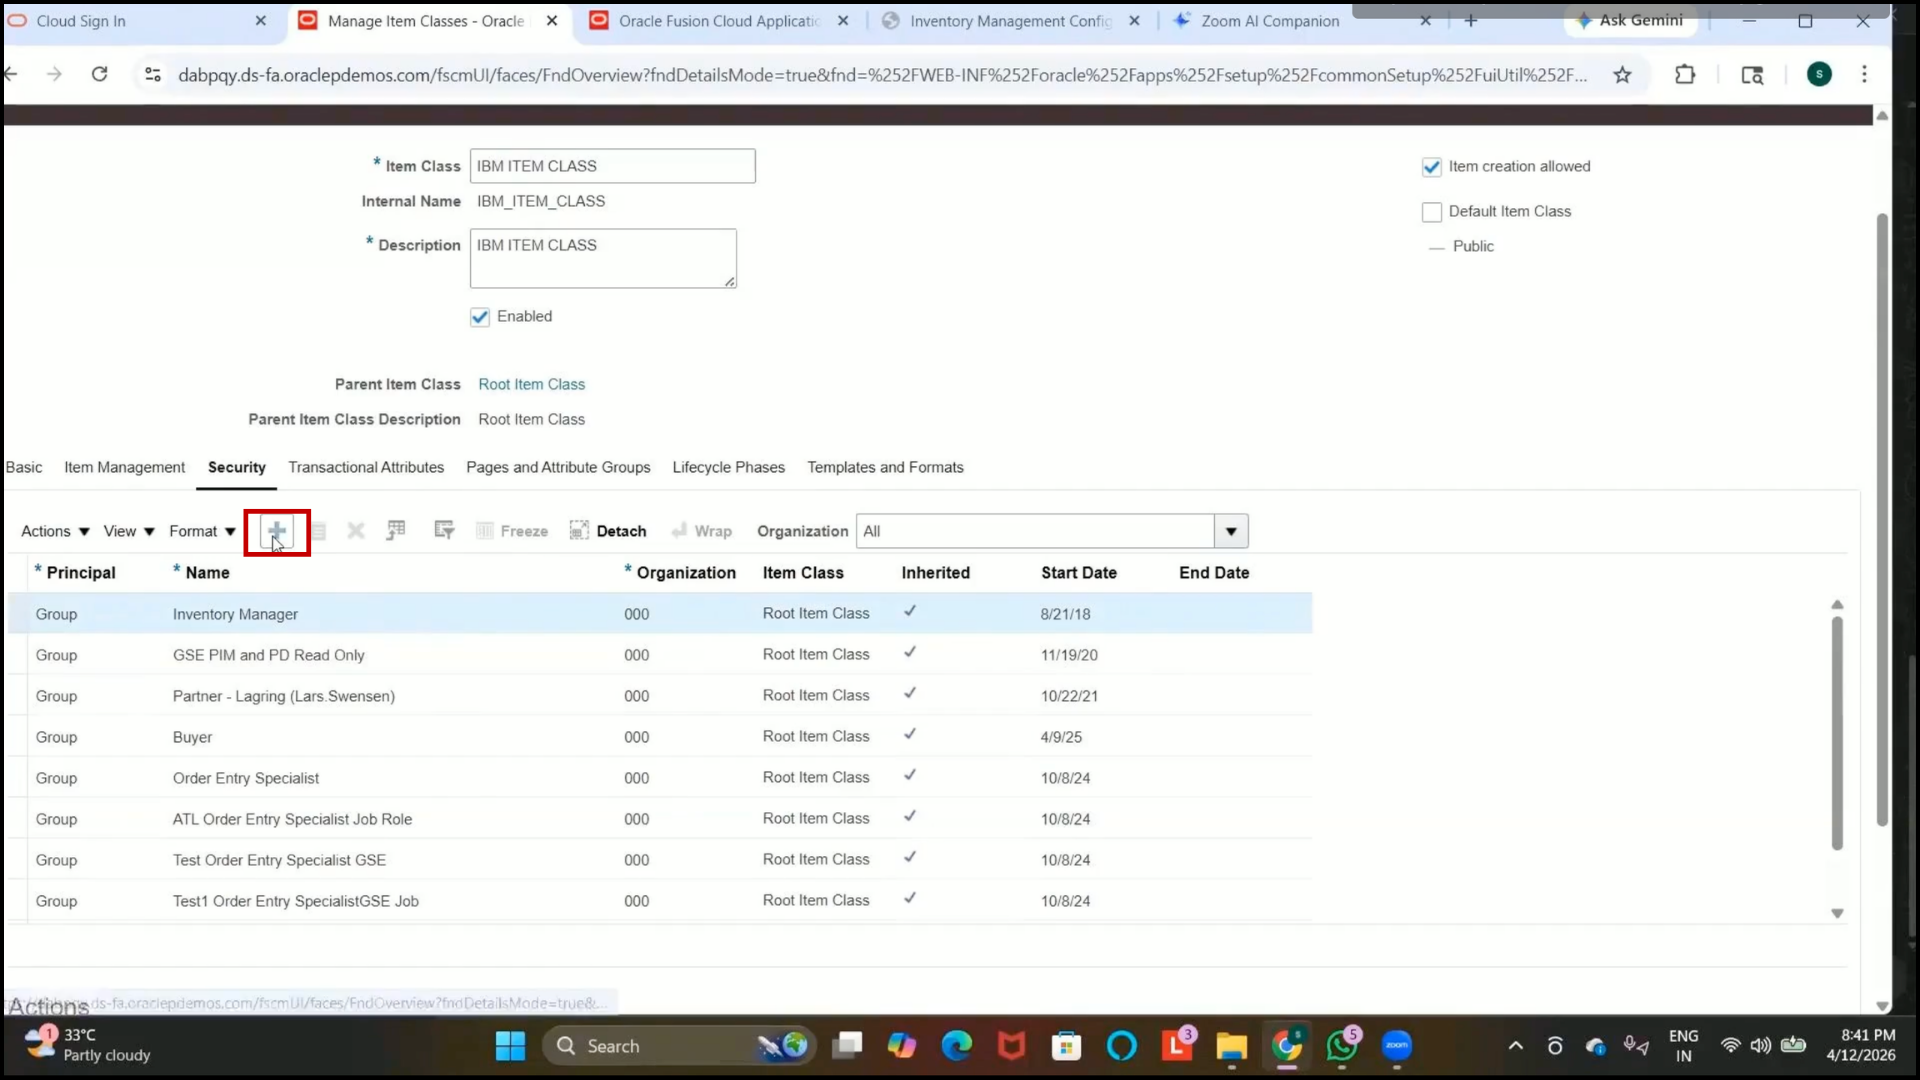
Step 129: Open the Security Tab
1. Navigate to the Security tab.
2. This section is used to provide access to users or roles for the item class.
Step 130: Understand Item Class Security Access
1. Security settings define which users can:
2. Create items
3. Edit item attributes
4. Manage items within the selected item class
5. Access can be provided using:
6. Roles
7. Individual Users
Step 131: Assign Access by Role or Person
1. Select the required access type.
2. To provide access using a role:
3. Select Role.
4. Choose the required role, such as Inventory Manager.
5. To provide access to a specific user:
6. Select Person.
7. Choose the required user ID.
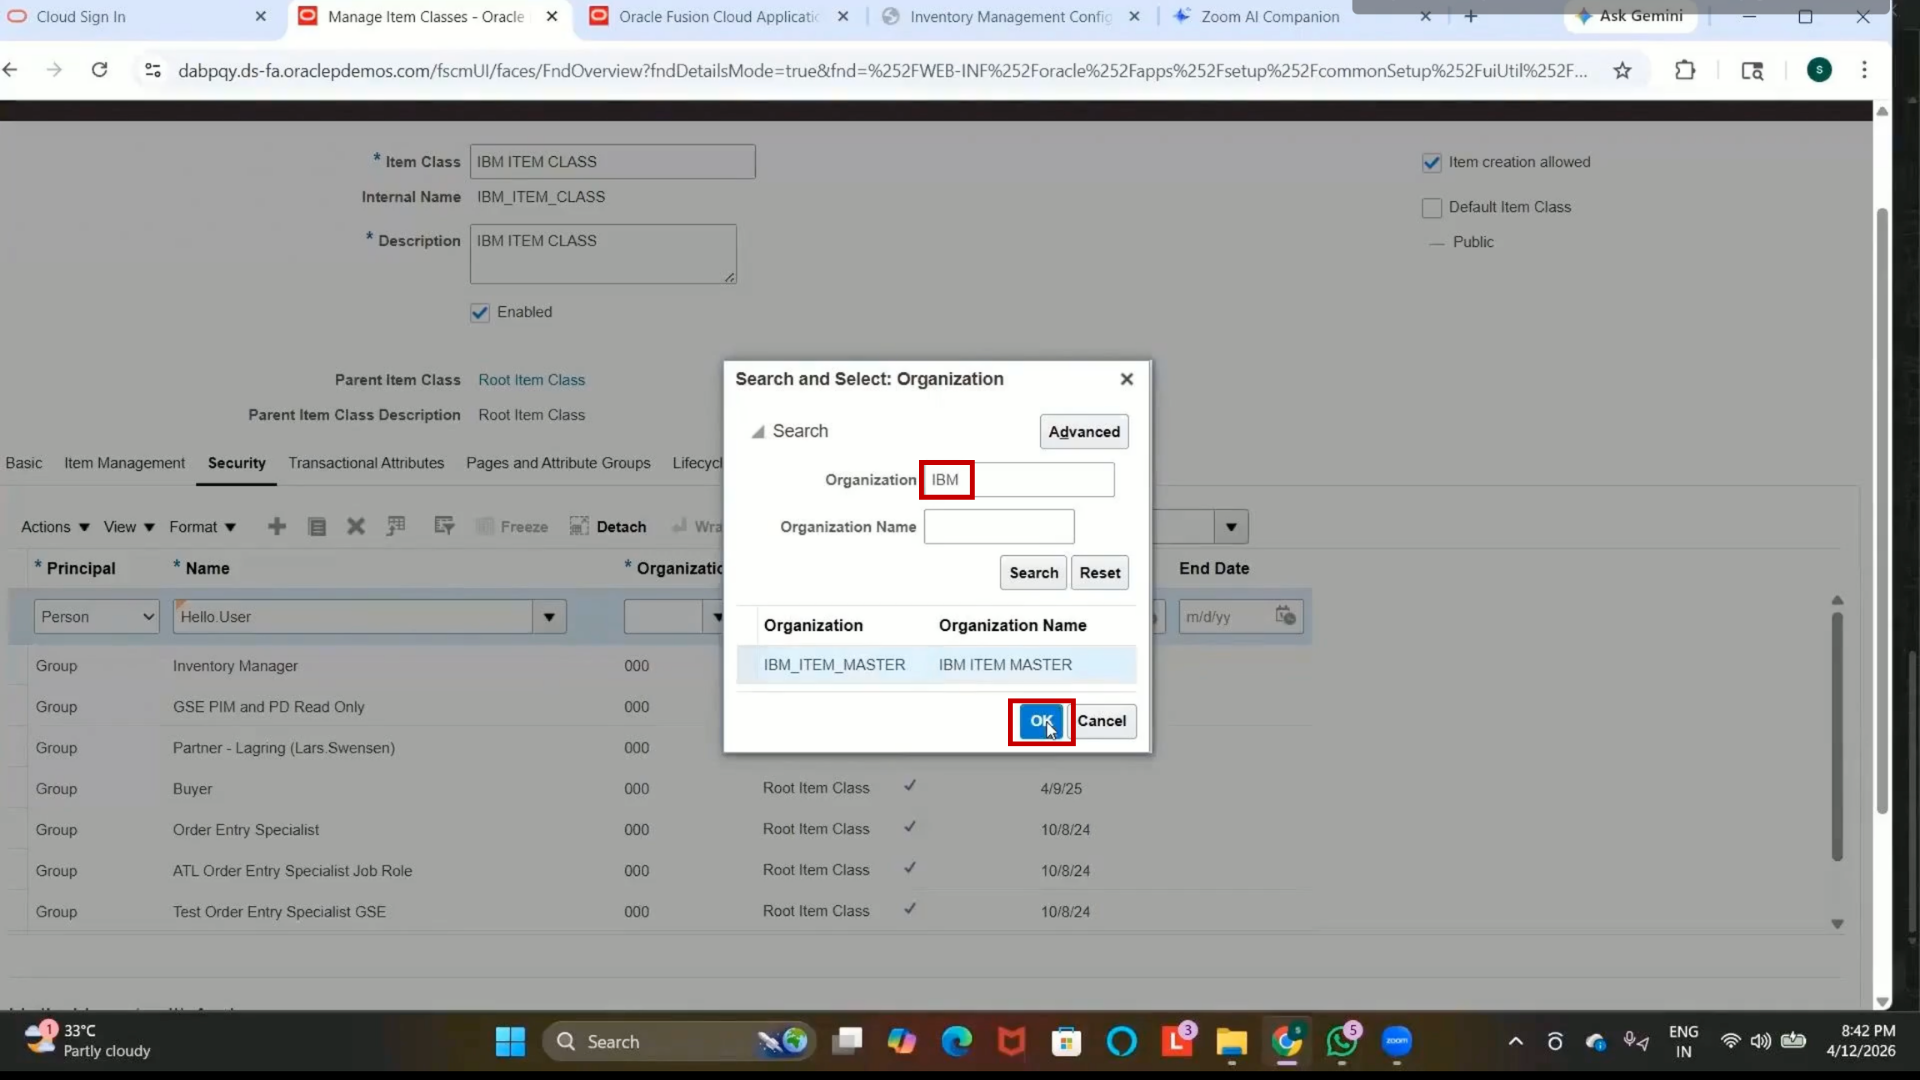
Step 132: Select the Organization
1. Select the organization where the user can create and edit items.
2. Choose the Item Master Organization created earlier.
3. Example:
Item Master App
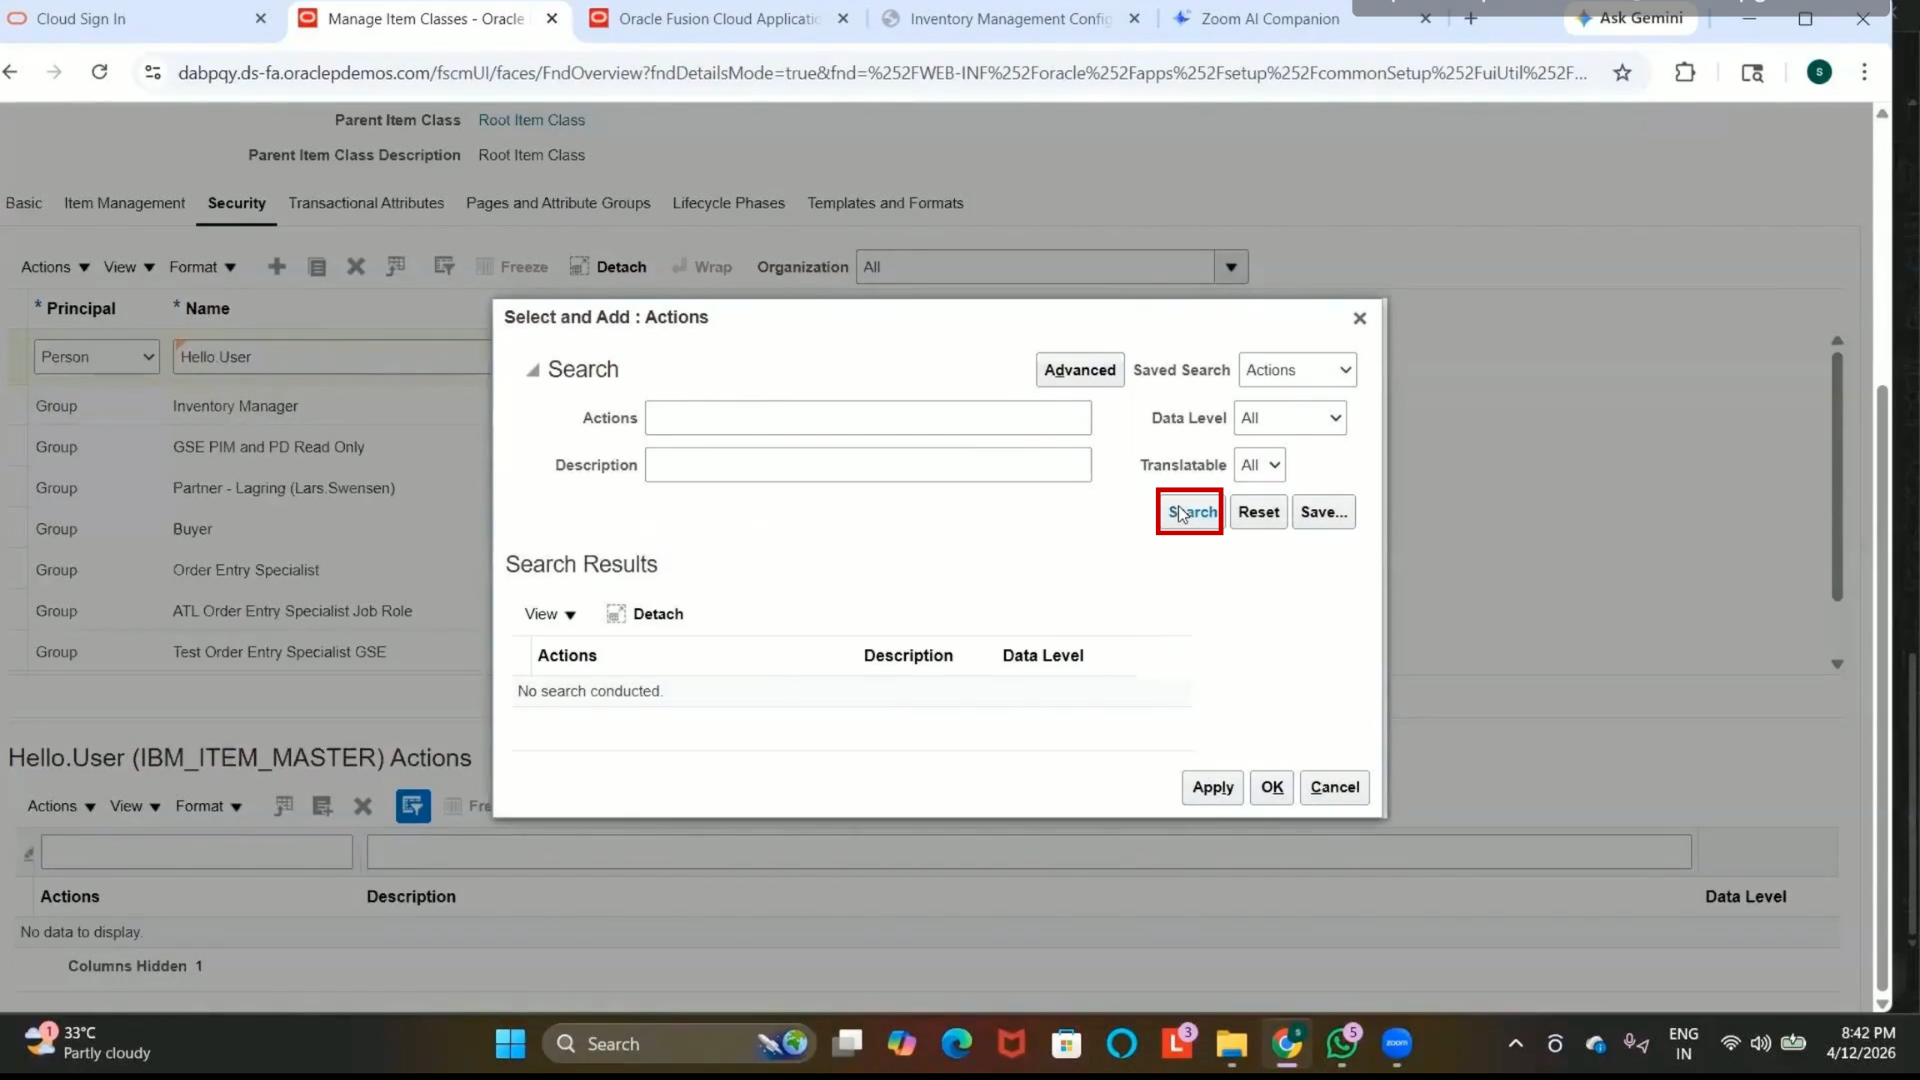
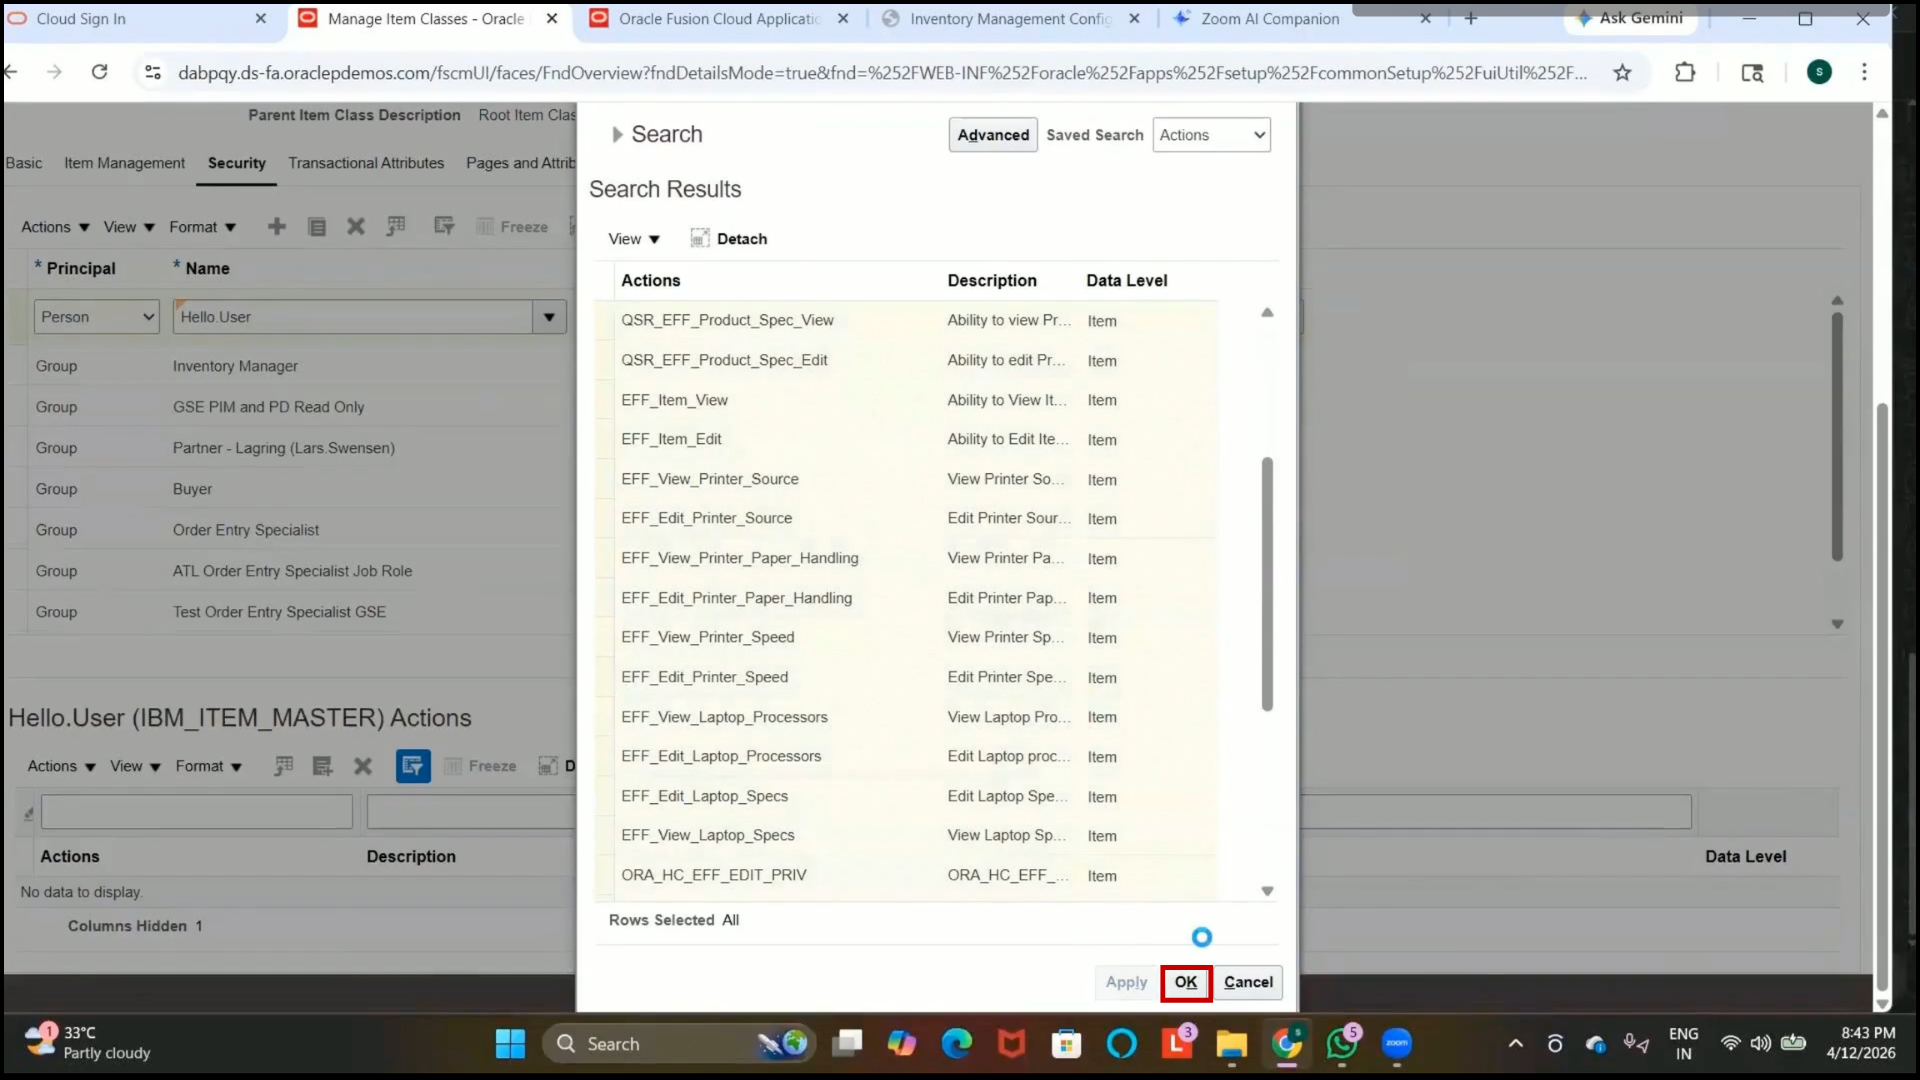
Step 133: Assign User Privileges
1. Click on the Plus (+) icon.
2. Select the required privileges for the user.
3. Privileges may include:
4. Item creation
5. Item editing
6. Attribute management
7. Select the required actions.
8. Click on Apply.
9. Click on OK.
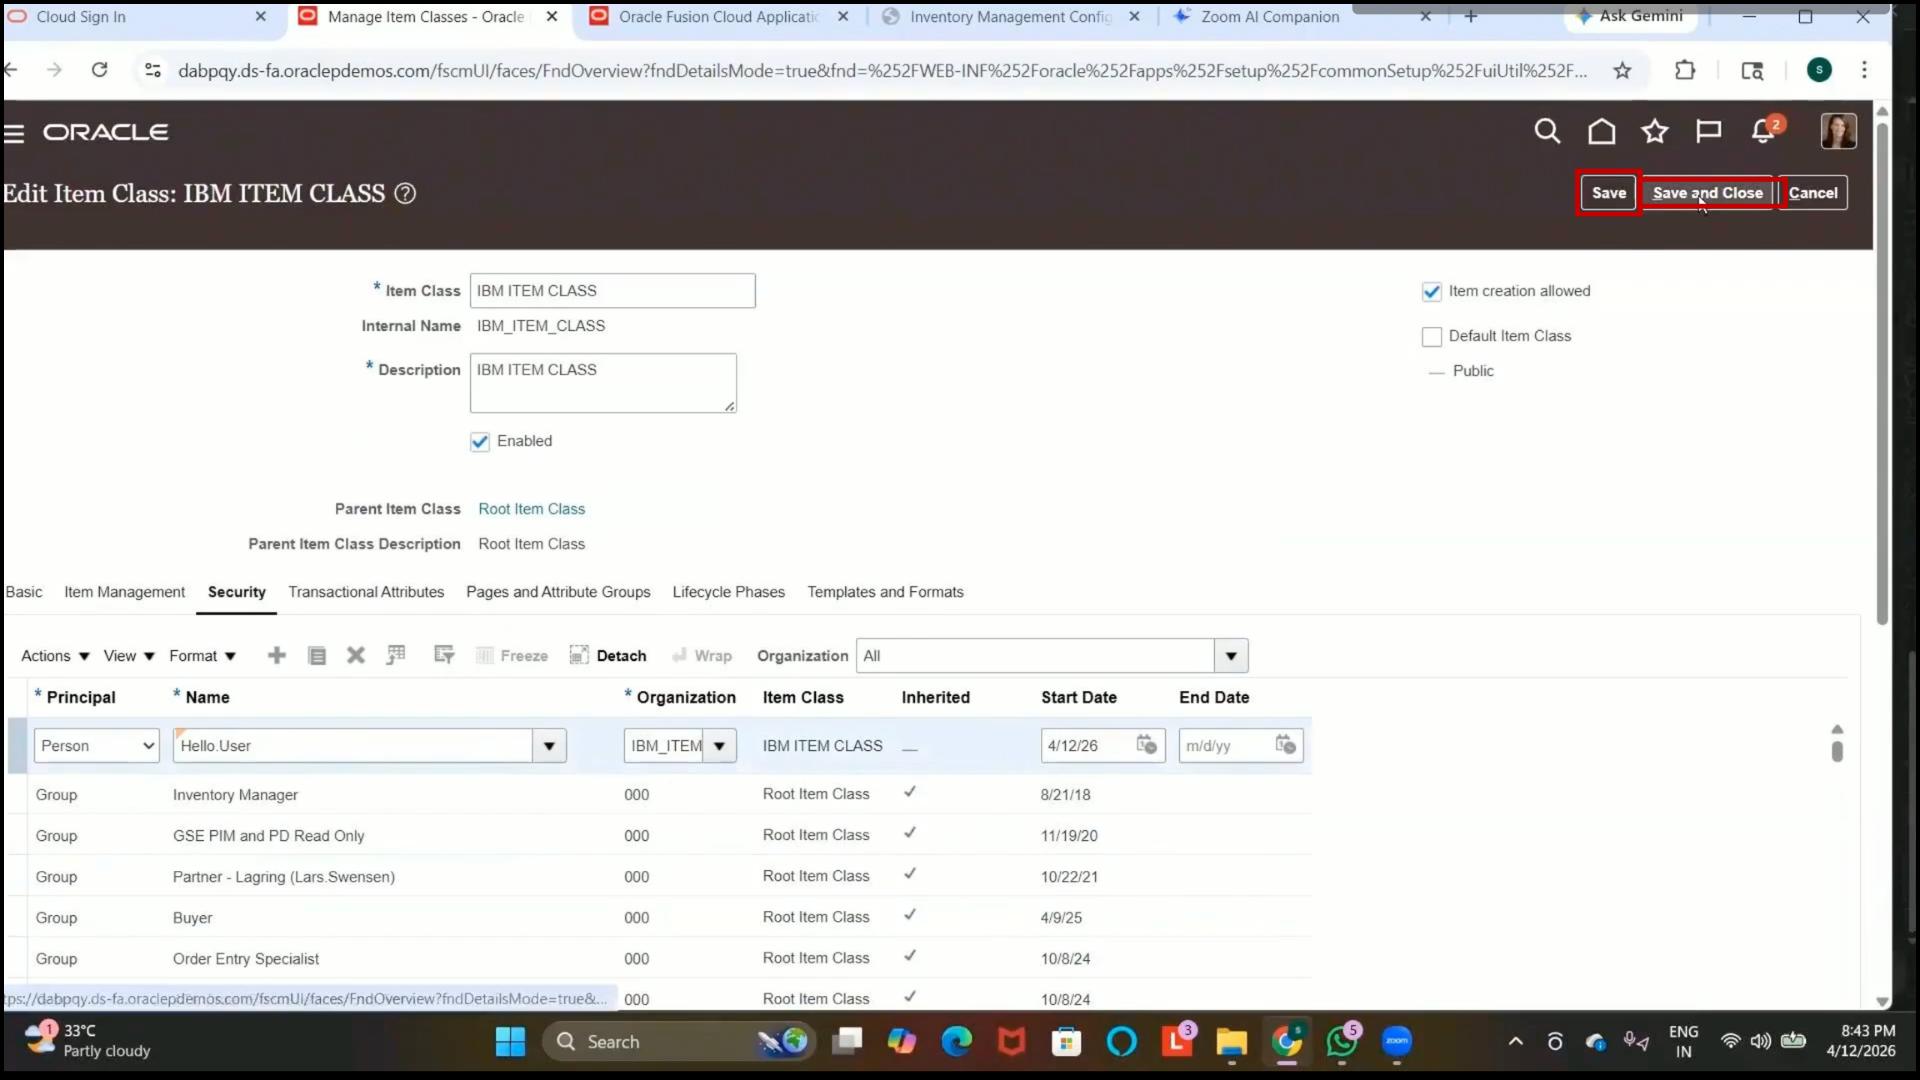
Step 134: Save the Item Class
1. Click on Save.
2. The system runs a background process to update the setup details.
3. Click on Save and Close.
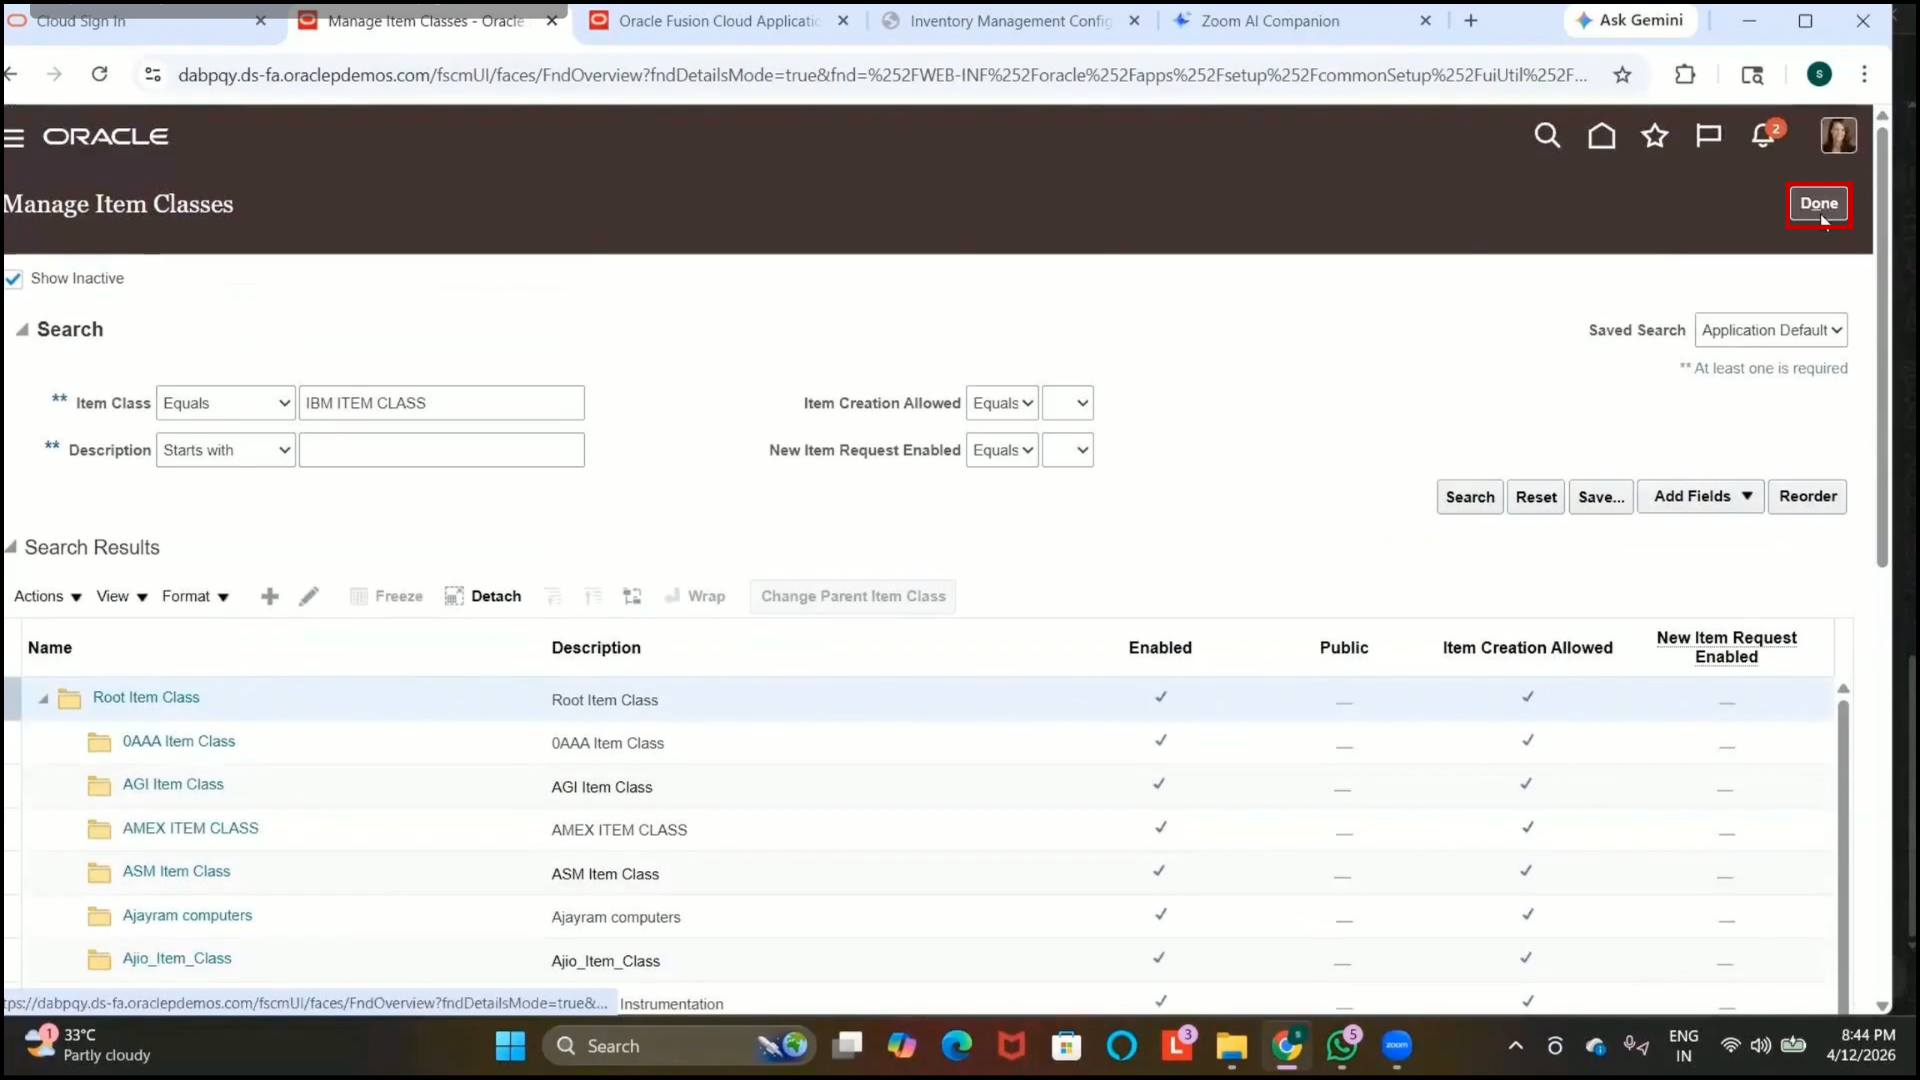
Step 135: Verify the Item Class Creation
1. Search for the created item class:
IBM Item Class
2. Verify that the item class is successfully created.
3. Click Save, Save and Close
4. Click Done
Step 136: Result
1. The item class setup is now completed.
2. Users with assigned access can now:
3. Create items
4. Edit item attributes
5. Manage items within the assigned organization and item class.
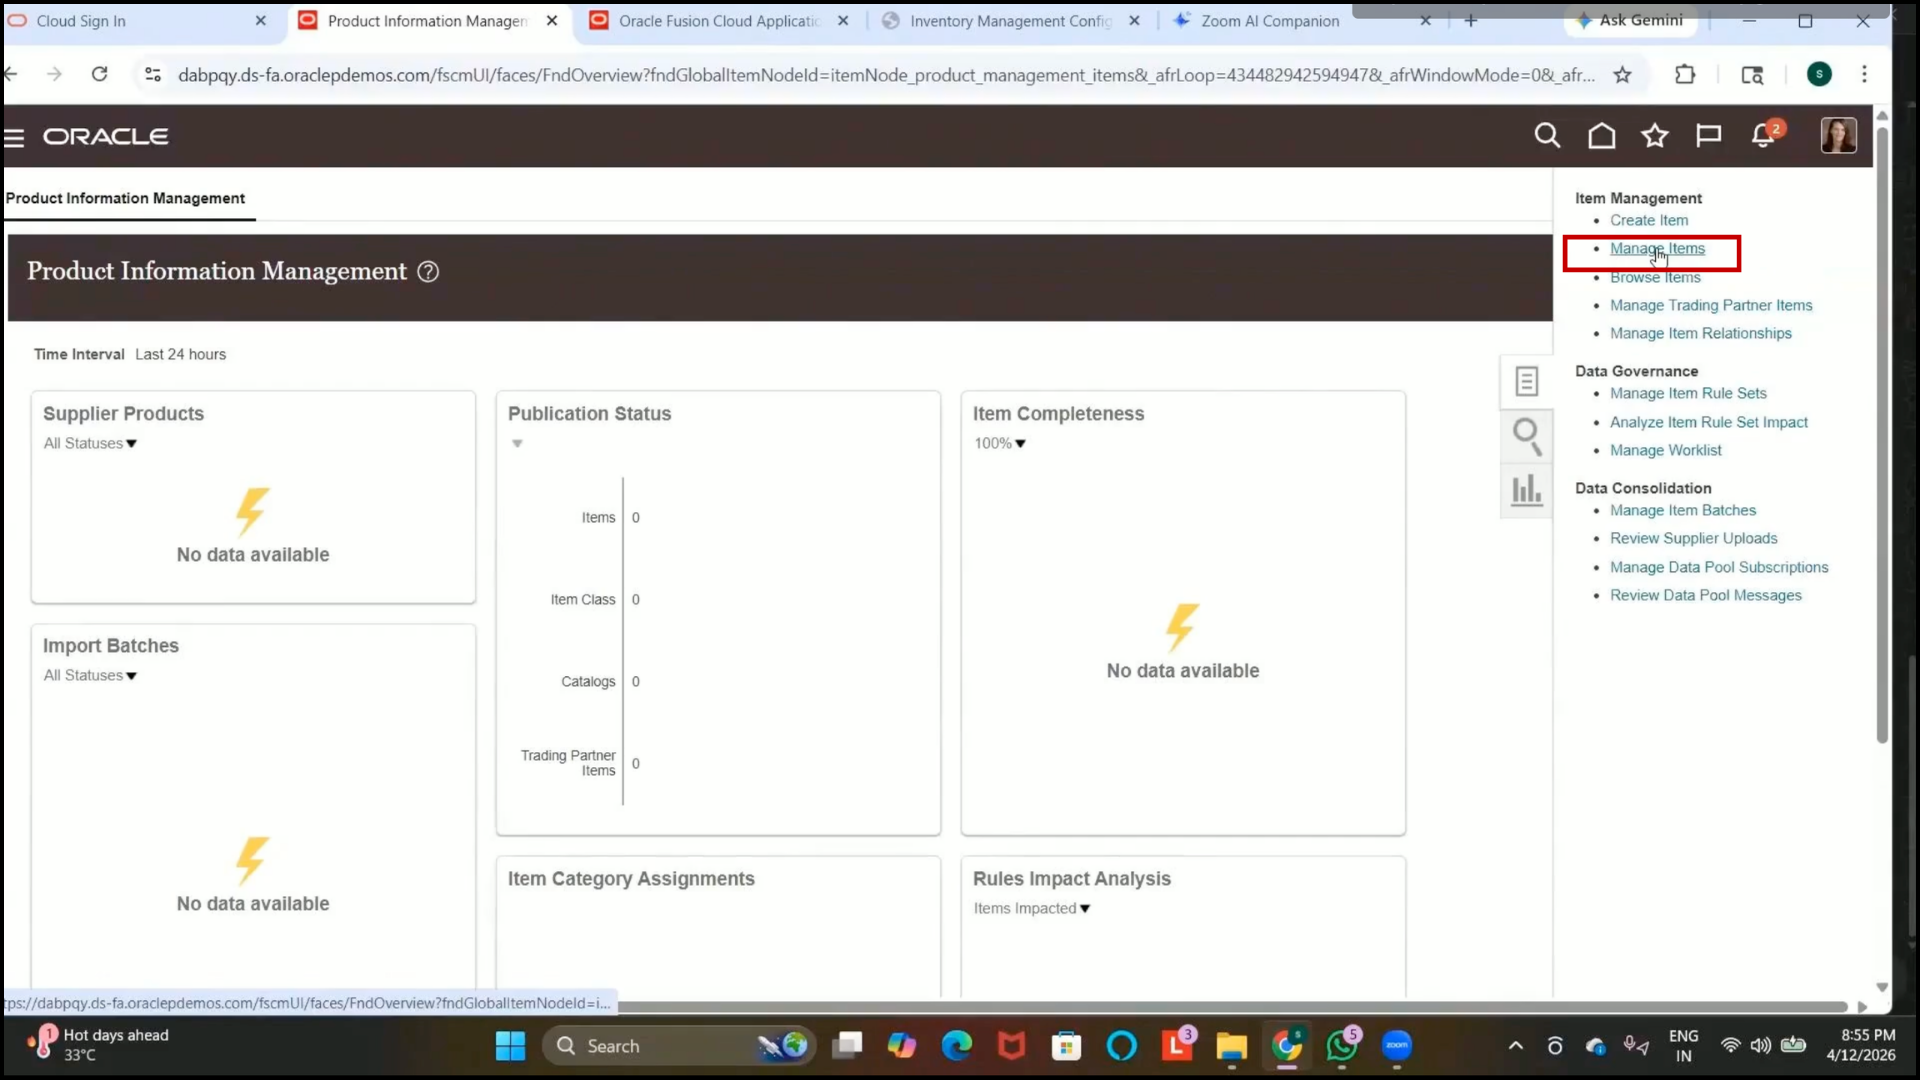
Step 137: Navigate to Product Information Management
1. Open the Navigator.
2. Go to:
Product Management → Product Information Management
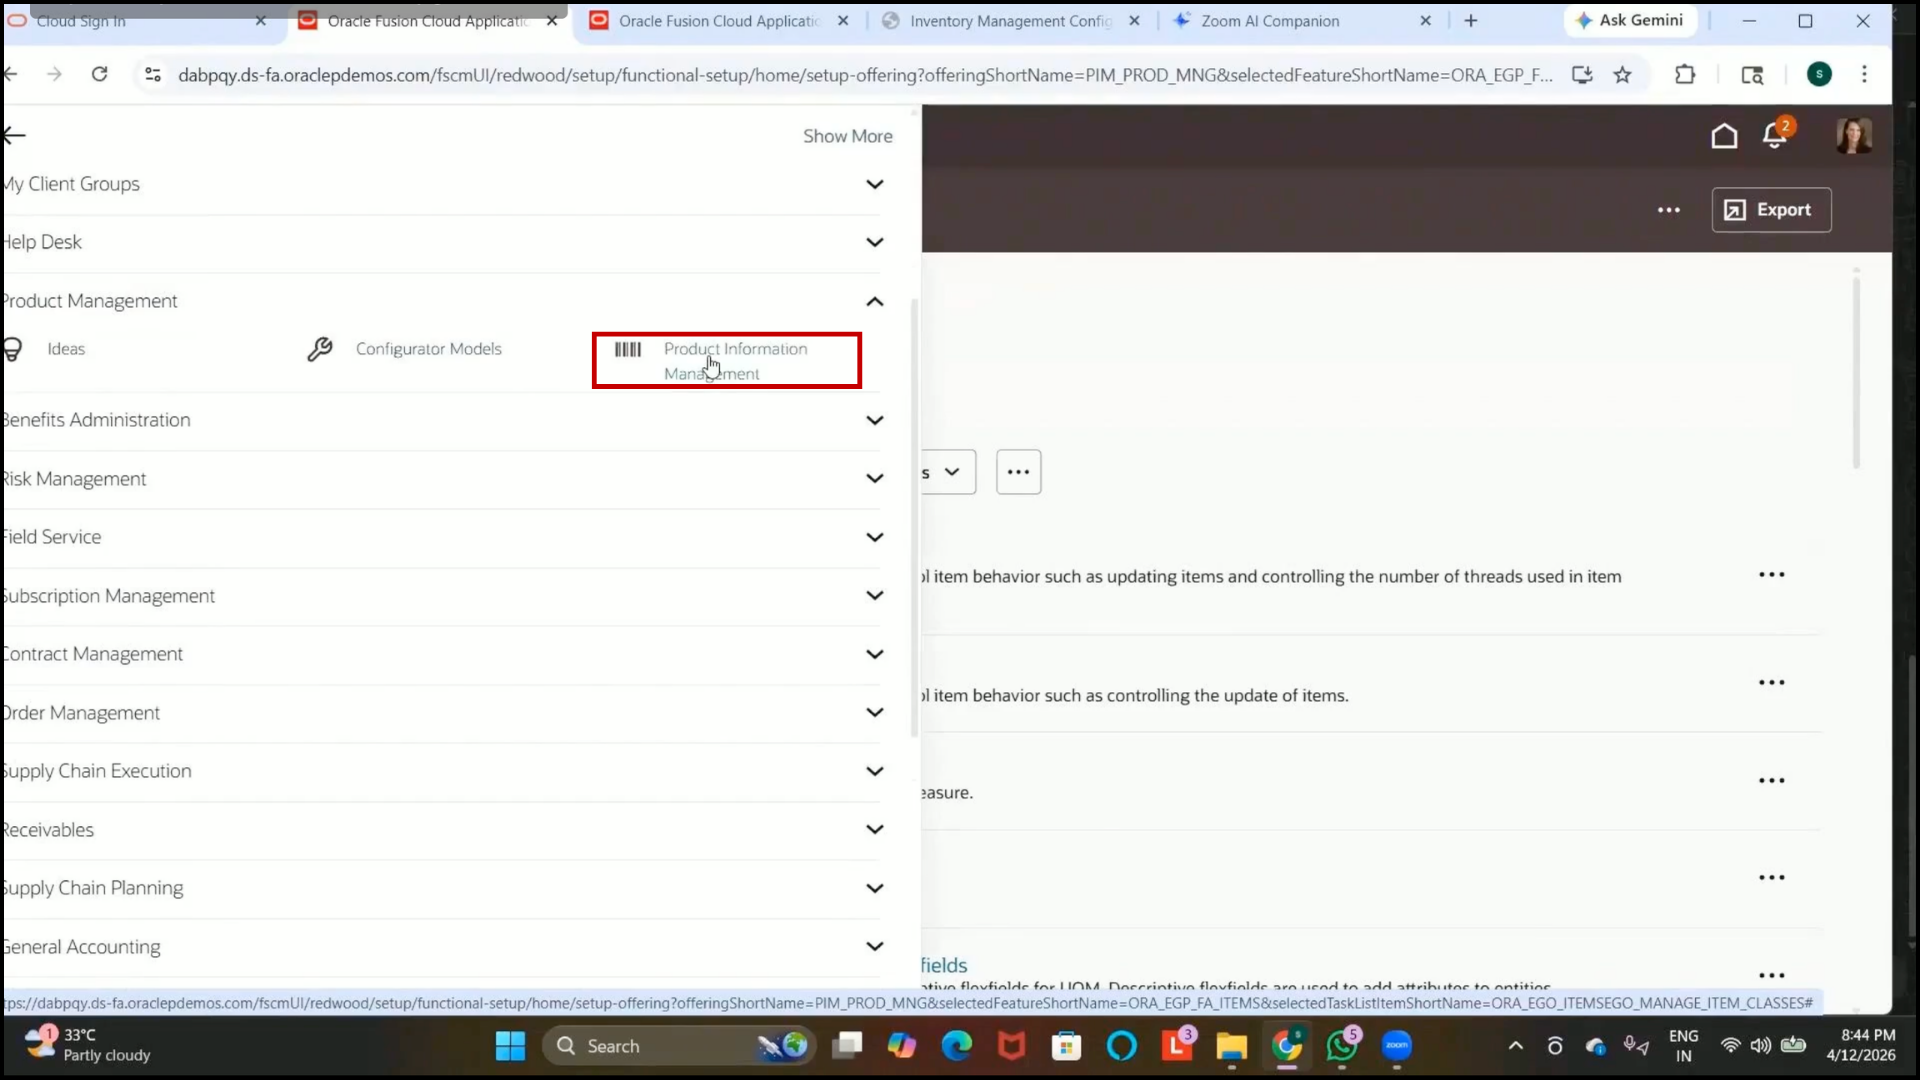
3. Open the Item Management infolet.
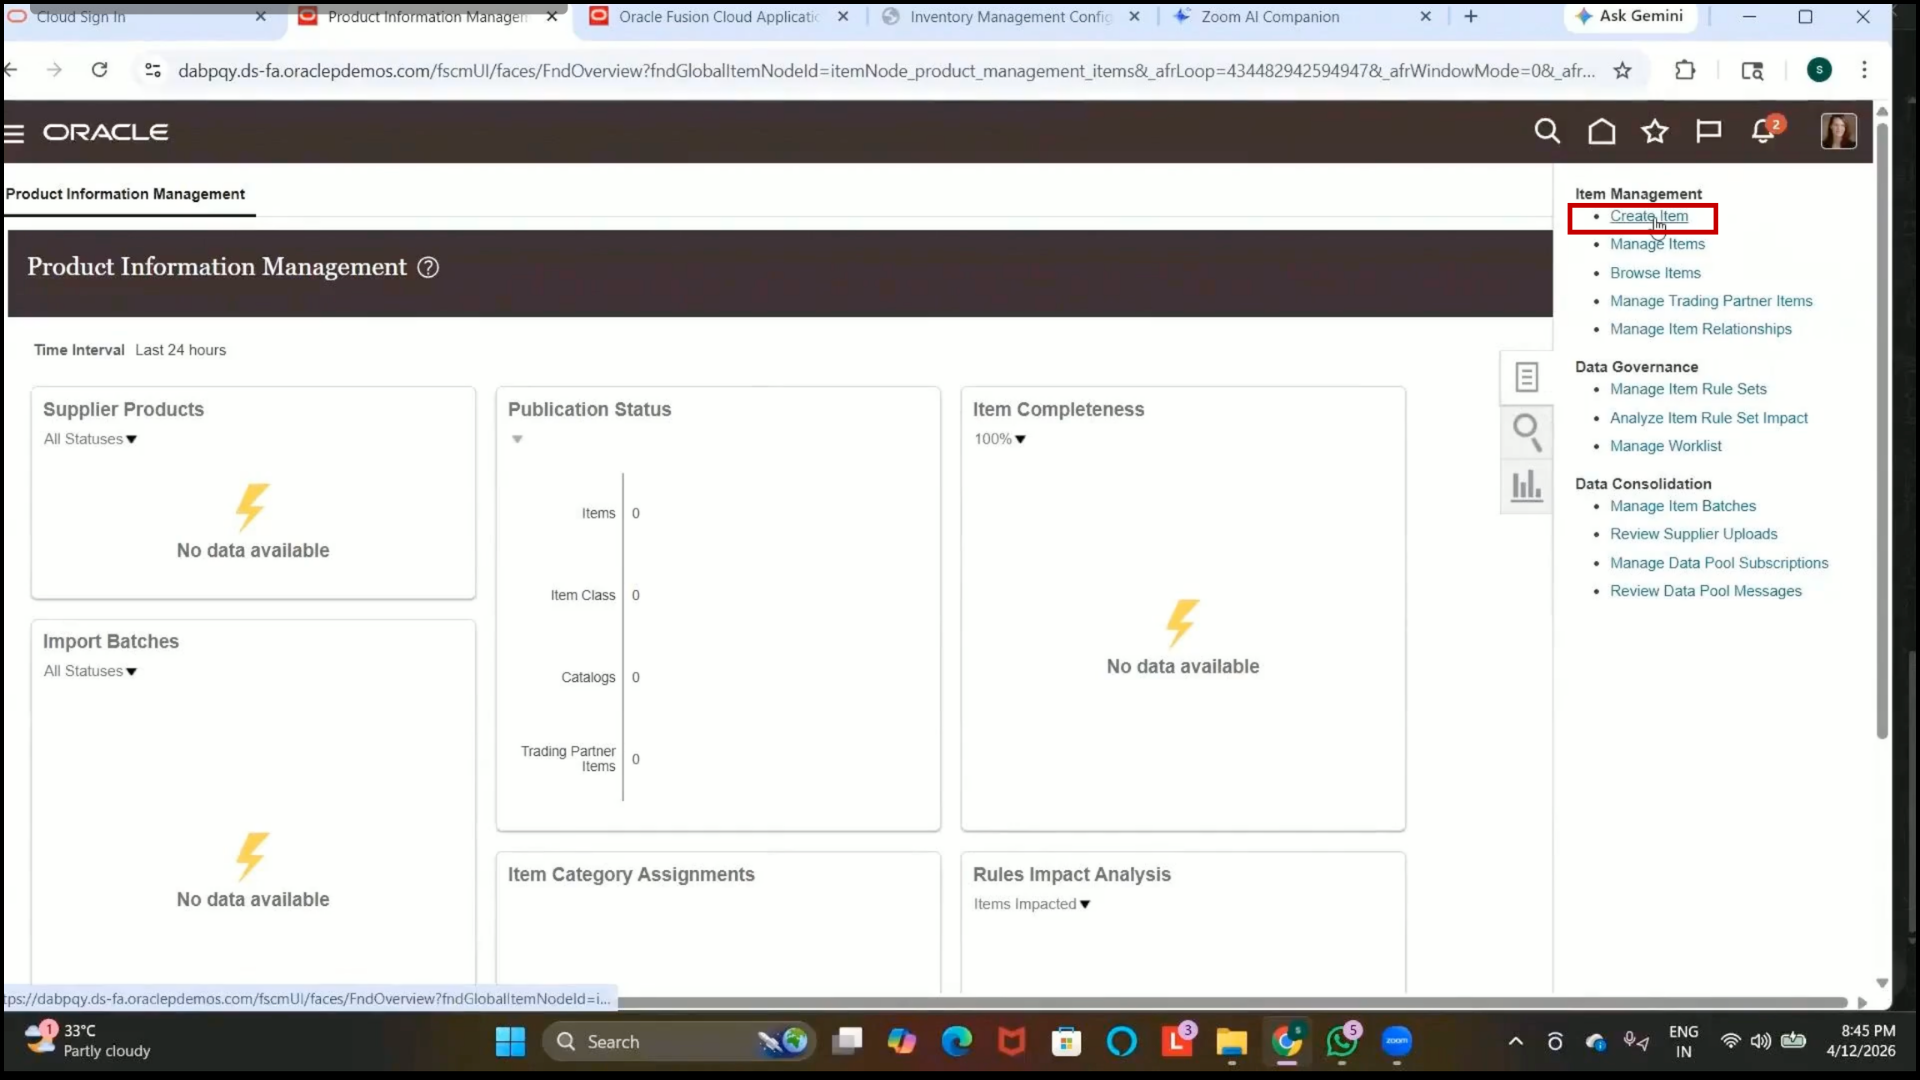
Step 138: Open Create Item Page
1. Click on the Tasks icon.
2. Select:
Create Item
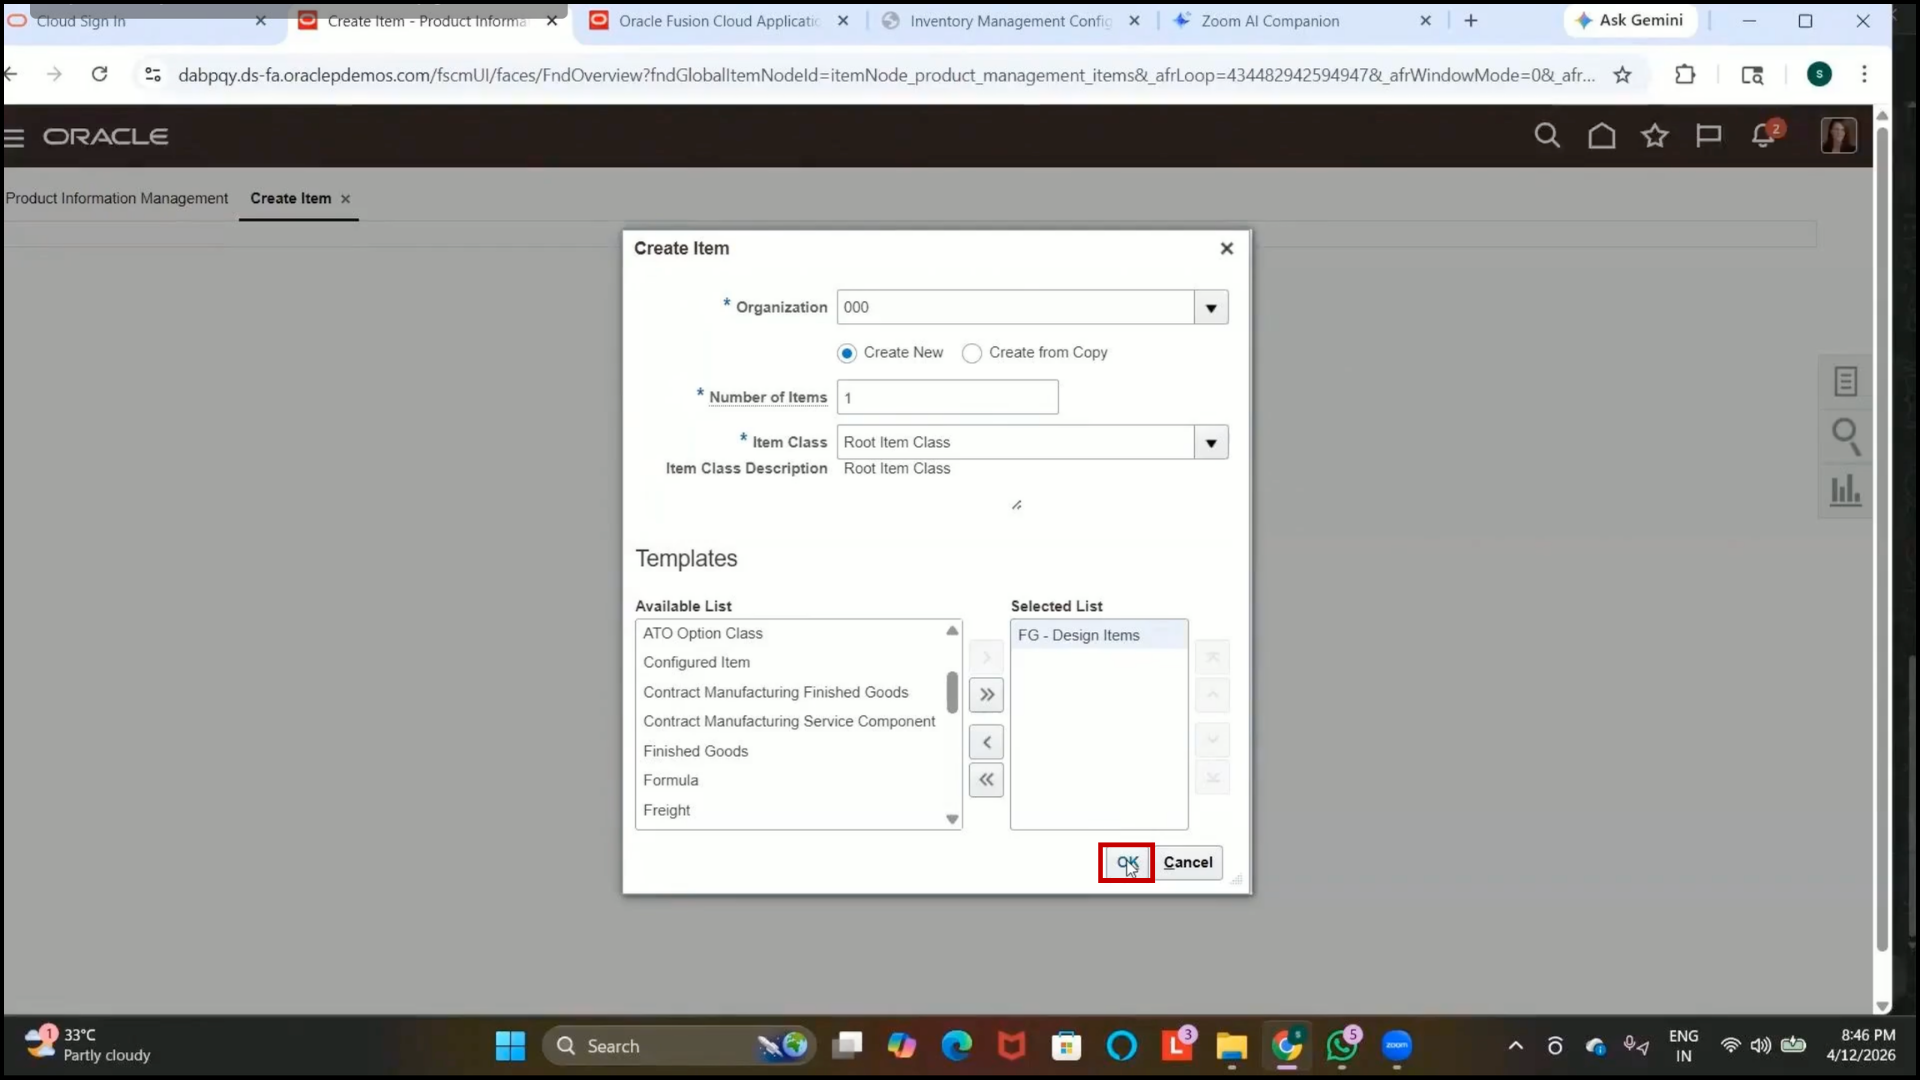
Step 139: Select the Item Master Organization
1. Select the Item Master Organization.
2. Example:
Operations Item Master Org
All items must first be created in the Item Master Organization before assigning them to individual inventory organizations.
Step 140: Select the Item Class
1. Select the item class.
2. Example:
Root Item Class
Step 141: Select an Item Template
1. Select the required item template.
2. Example:
Design Items
3. Item templates automatically default predefined item attributes.
This reduces manual effort during item creation.
Step 142: Confirm Template Selection
1. Review the selected template details.
2. Click on OK.
Step 143: Enter Basic Item Details
1. Enter the Item Name.
2. Example:
Internal Item
3. Enter the description.
4. Example:
Internal Item
Step 144: Set the Item Status
1. Select the item status.
2. Choose:
Active
3. Active items can be used in inventory transactions.
4. Inactive or obsolete items cannot be used in transactions.
Step 145: Select the Lifecycle Phase
1. Select the lifecycle phase for the item.
2. Available phases may include
3. Design
4. Production
5. Active
6. Obsolete
7. Select:
Active
Step 146: Select the User Item Type
1. Select the User Item Type.
2. Available item types may include:
3. Finished Good
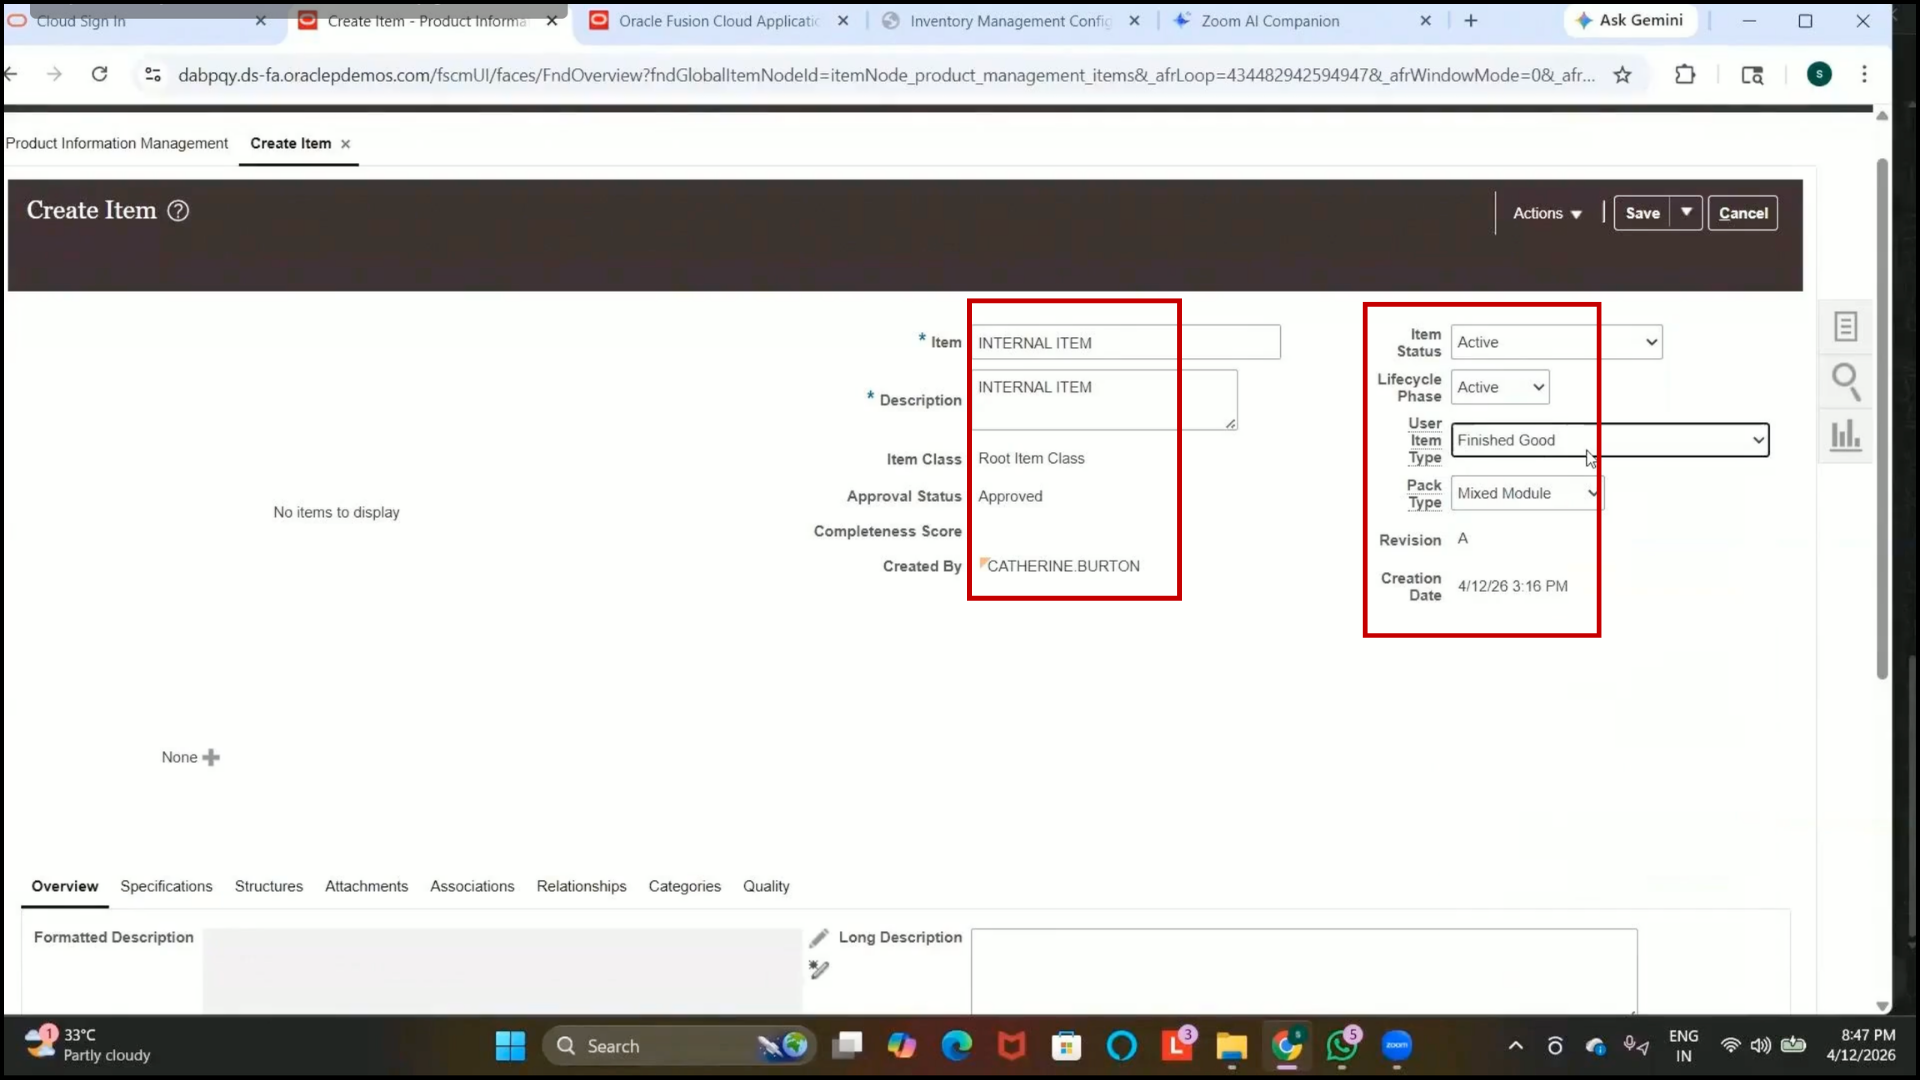
4. Equipment
5. Kit Item
6. Model Item
7. Select:
Finished Good(s)
Step 147: Select the Unit of Measure
1. Select the unit of measure for the item.
2. Example:
Each
This defines how the item quantity will be measured.
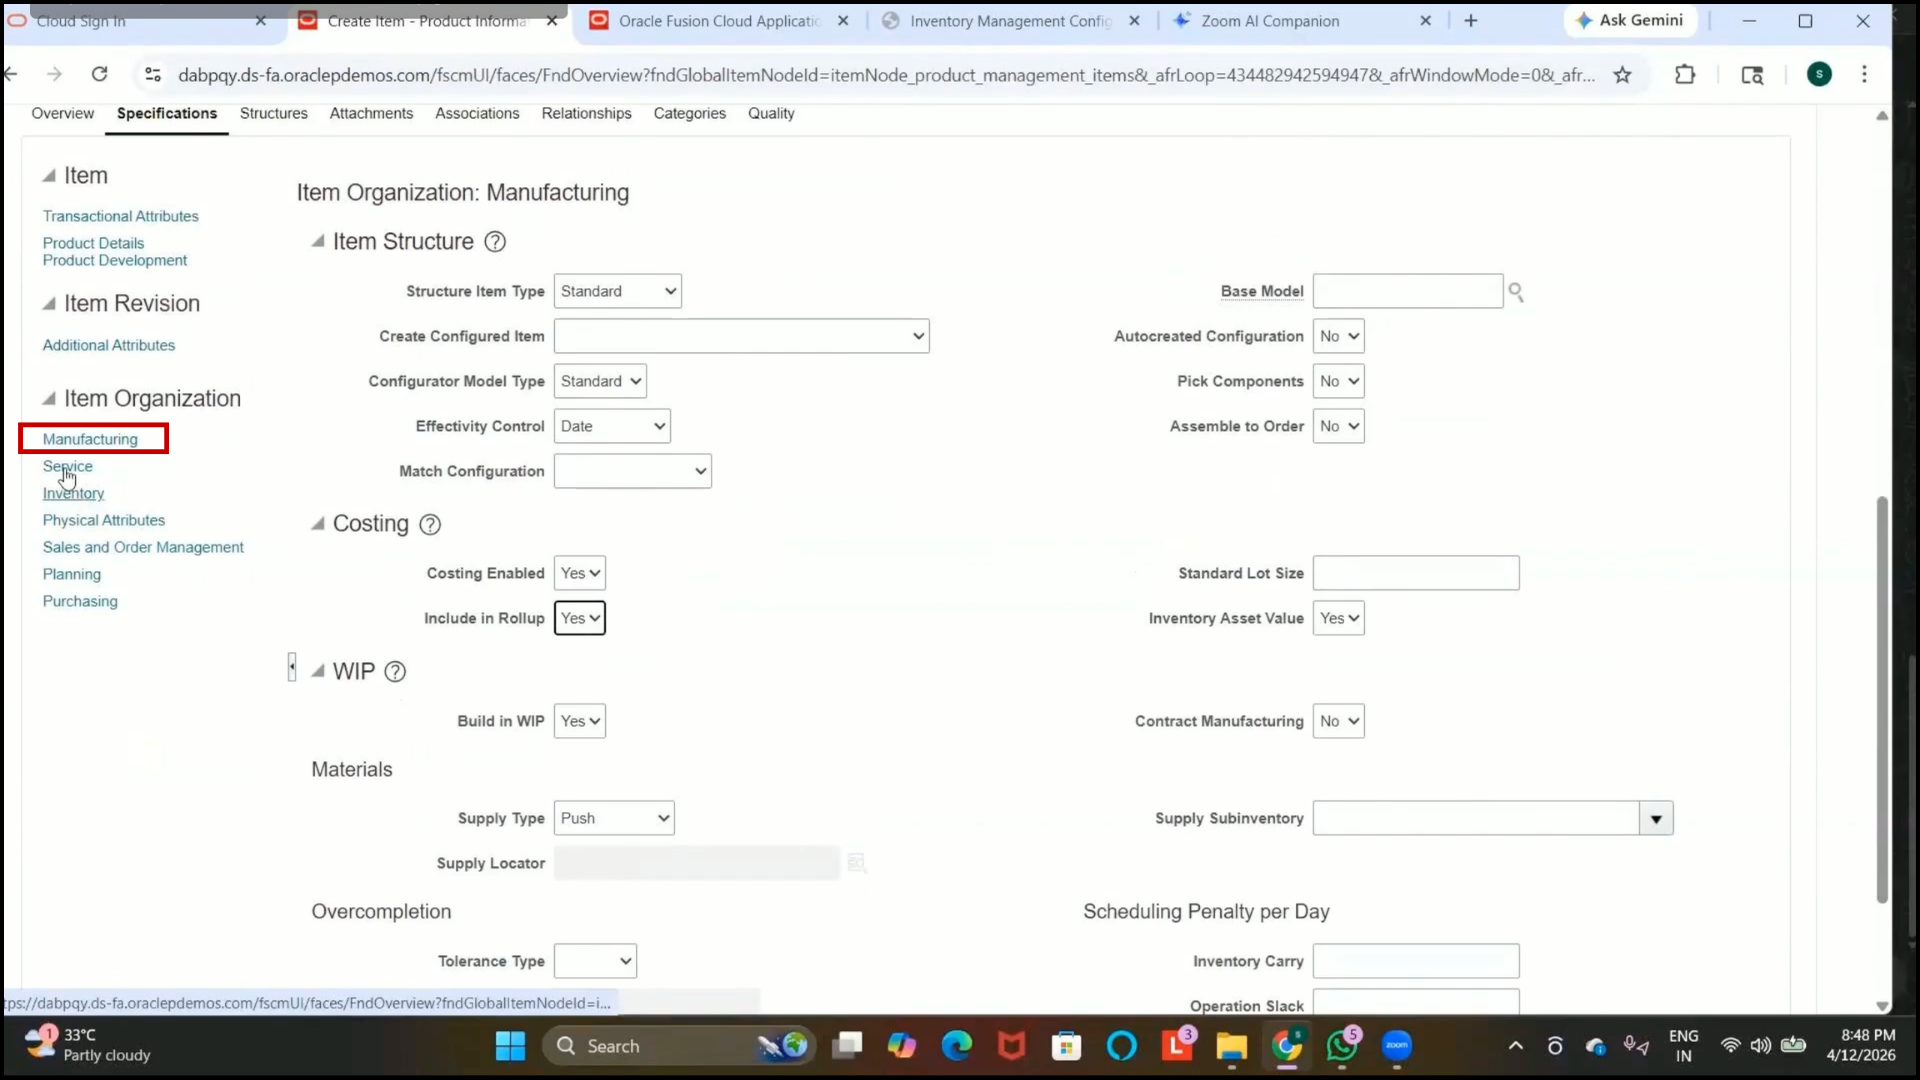
Step 148: Review Item Attribute Sections
1. Navigate through the available item attribute sections.
2. Common sections include
3. Manufacturing
4. Service
5. Inventory
6. Sales and Order Management
Step 149: Configure Manufacturing Attributes
1. Open the Manufacturing section.
2. Configure manufacturing-related item attributes as required.
3. Example configurations may include
4. Costing Enabled
5. Rollup in Manufacturing
manufacturing 6. Rollup in manufacturing helps roll up child item costs to parent items.
Step 150: Review Service Attributes
1. Open the Service section.
2. Review service-related attributes.
3. Example: 3. Example:3.Example:
Enabled for Customer Self-Service
4. Configure 4. Configure the values based on business requirements.
Step 151: Open Inventory Attributes
1. Navigate to the Inventory section.
2. Configure 2. Configure inventory-related item attributes.
Step 152: Enable Inventory Item
Set Inventory 1. Set Inventory Item to:
Yes
2. Enabling this option automatically enables the following:
3. Stocked
4. Transaction Enabled
5. Reservable5.Reservable
Step 153: Configure Stock and Transaction Controls
1. Verify the following attributes are enabled:
2. Stocked = Yes
3. Transaction Enabled = Yes
4. Reservable = Yes
5. These settings allow
6. Inventory tracking
7. Inventory transactions
8. Item 8: Item reservation during demand processing.
Step 154: Review Lot Control Settings
1. Review additional inventory controls such as
2. Lot Control
3. Child Lot Enabled
4. Grade Control
5. Configure them only if required by the business.
6. Leave them disabled if not needed.
Step 155: Configure Sales and Order Management Attributes
1. Navigate to:
Sales and Order Management
2. Configure 2. Configure sales-related item attributes.
Step 156: Enable Customer Order Attributes
1. Set 1: Set the following attributes to:
Yes
2. Customer Ordered
3. Customer Orders Enabled
sales orders. 4. This allows the item to be used in sales orders.
Step 157: Review ATP Configuration
1. Review ATP (Available to Promise) settings.
2. ATP determines whether the item can be promised for delivery within a specified timeline.
3. Set ATP according to business requirements.
4. In this example, select:
None
Step 158: Enable Internal Transfer Attributes
1. Set: 1. Set:
Internally Transferable = Yes
2. This allows the item to be transferred between internal inventory organizations.
Step 159: Enable Transfer Order Processing
1. Set: 1. Set:
Transfer Order Enabled = Yes
2. This enables internal transfer order transactions for the item.
Step 160: Enable Returnable Attribute
1. Set: 1. Set:
Returnable = Yes
2. This allows the item to be returned when required.
Step 161: Verify Shipping and Invoice Controls
1. Verify the following attributes are enabled:
2. Shippable 2. Shippable = Yes
3.Invoice Enabled = Yes
4. These settings allow
5. Shipping 5. Shipping transactions
6. Invoice generation
Step 162: Review Additional Item Attributes
1. Review the remaining item attributes across all modules.
2. Configure the attributes based on business requirements.
3. Oracle Fusion provides many configurable item attributes across
4. Manufacturing
5. Inventory
6. Service
7. Sales 7. Sales and Order Management
Step 163: Save the Item Attributes
1. Review 1. Review all configured item attributes.
2. Click on Save and Done.
Step 164: Add Attachments to the Item
1. Navigate to the Attachments tab.
2. To add attachments:
3. Click on the Plus (+) icon.
4. Upload the required document or PDF.
5. Attachments can include
6. Product documents
7. Technical specifications
8. Reference 8. Reference files
In this example, no attachment is added.
Step 165: Add an Item Image
1. Upload an item image if required.
2. Item images are commonly used by:
3. Sales teams
4. Marketing teams
5. Product catalogs
Include 6. Example item images may include
7. Laptop
8. Keyboard
9. Mouse
Step 166: Open the Associations Tab
1. Navigate to the Associations tab.
2. This section is used to assign the item to child inventory organizations.
Step 167: Understand Item Organization Assignment
1. Items are initially created in the Item Master Organization.
2. From the item master organization, items are assigned to child inventory organizations.
3. Each child organization can maintain organization-level item attributes.
Step 168: Assign the item to the Seattle inventory organization.
1. Click on the Plus (+) icon.
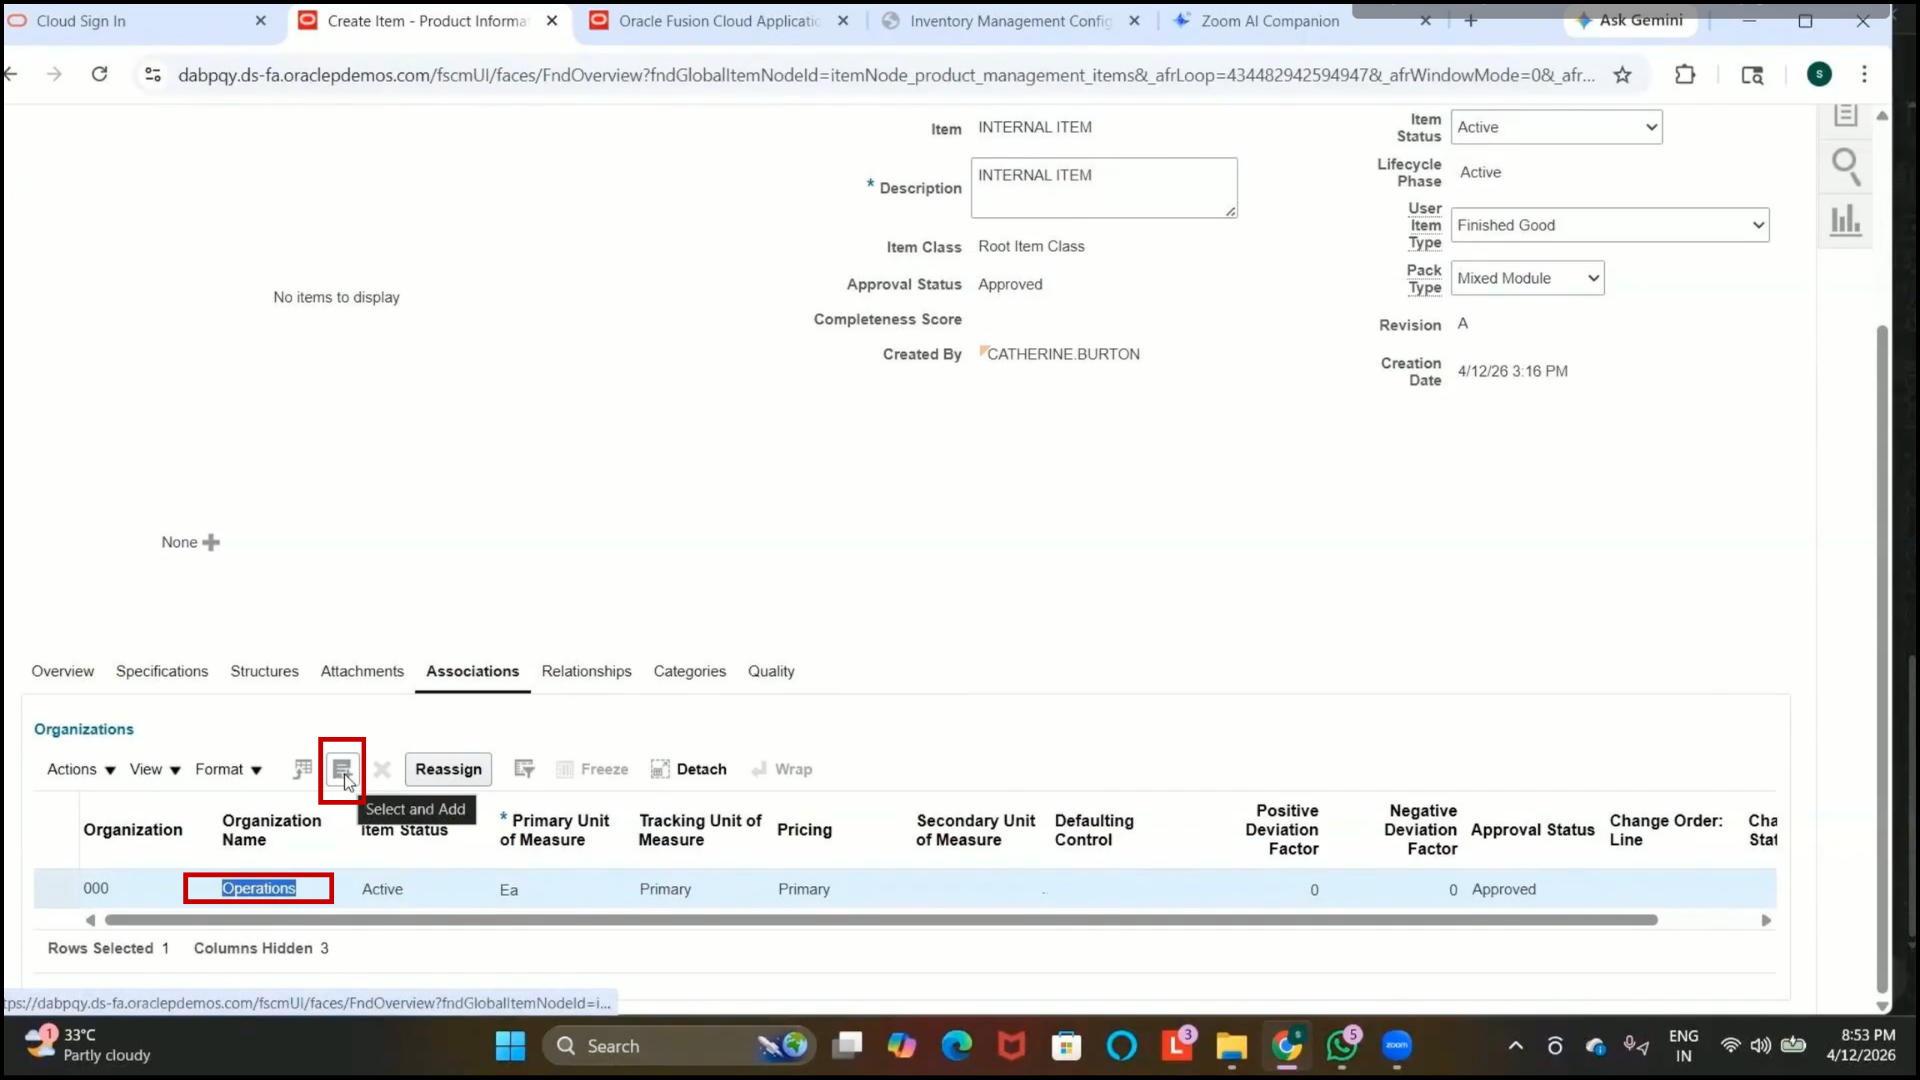
2. Select the Inventory Organization:
Seattle Inventory Organization
3. Example organization code:
001
4. Select the required item template.
Example:
YAGI Design Items
5. Click on Apply.
Step 169: Verify Seattle Organization Assignment
1. Verify that the item is successfully assigned to the Seattle Inventory Organization.
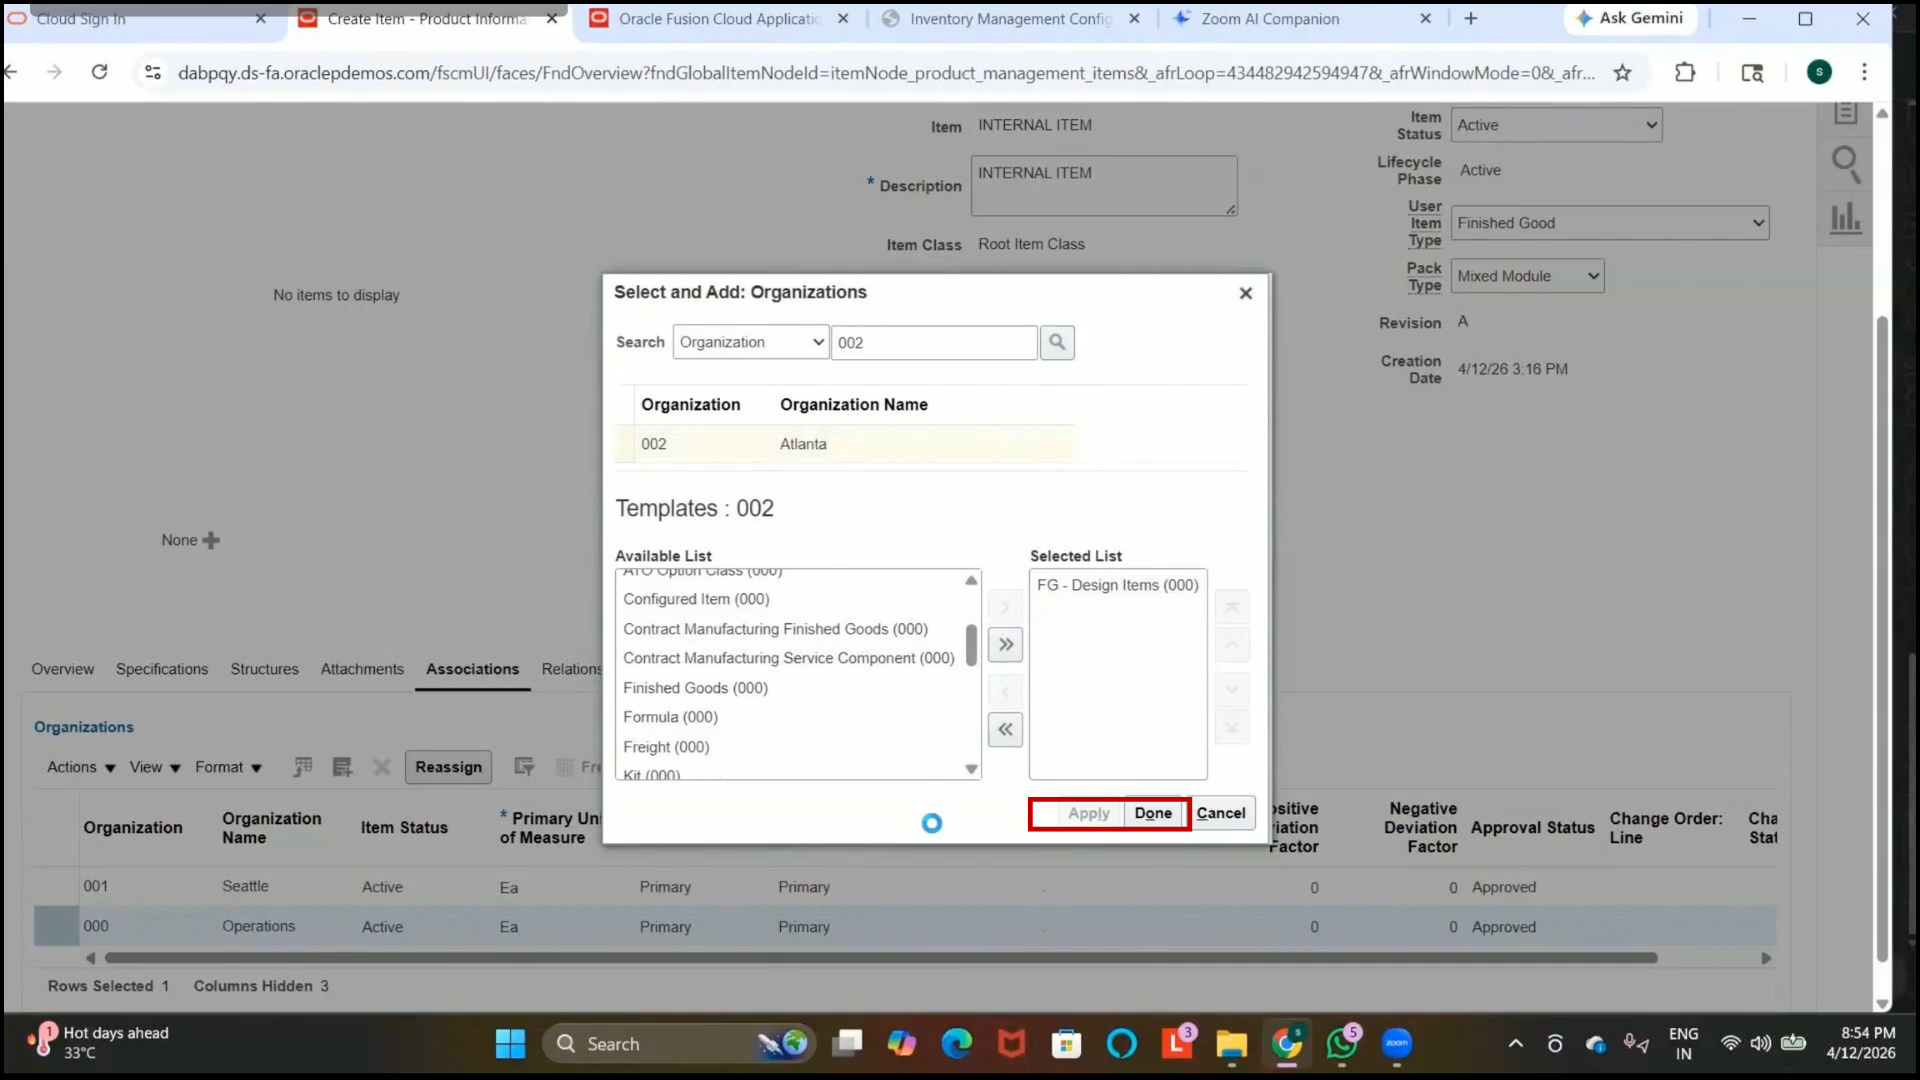
Step 170: Assign the Item to Atlanta Inventory Organization
1. Click on the Plus (+) icon again.
2. Select:
Atlanta Inventory Organization
3. Select the required item template.
4. Click on Apply.
Step 171: Verify Atlanta Organization Assignment
1. Verify that the item is successfully assigned to the Atlanta Inventory Organization.
2. Click on “Done.”
Step 172: Review Item Categories
1. Navigate to the Categories section.
2. Categories may default automatically from the selected item template.
3. Examples of categories include
4. Purchasing Category
5. Inventory Category
6. Additional custom categories can also be created based on business requirements.
Step 173: Save the Item
1. Click on Save.
2. Copy or note the item name if required.
Step 174: Save and Close the Item
1. Click on Save and Close.
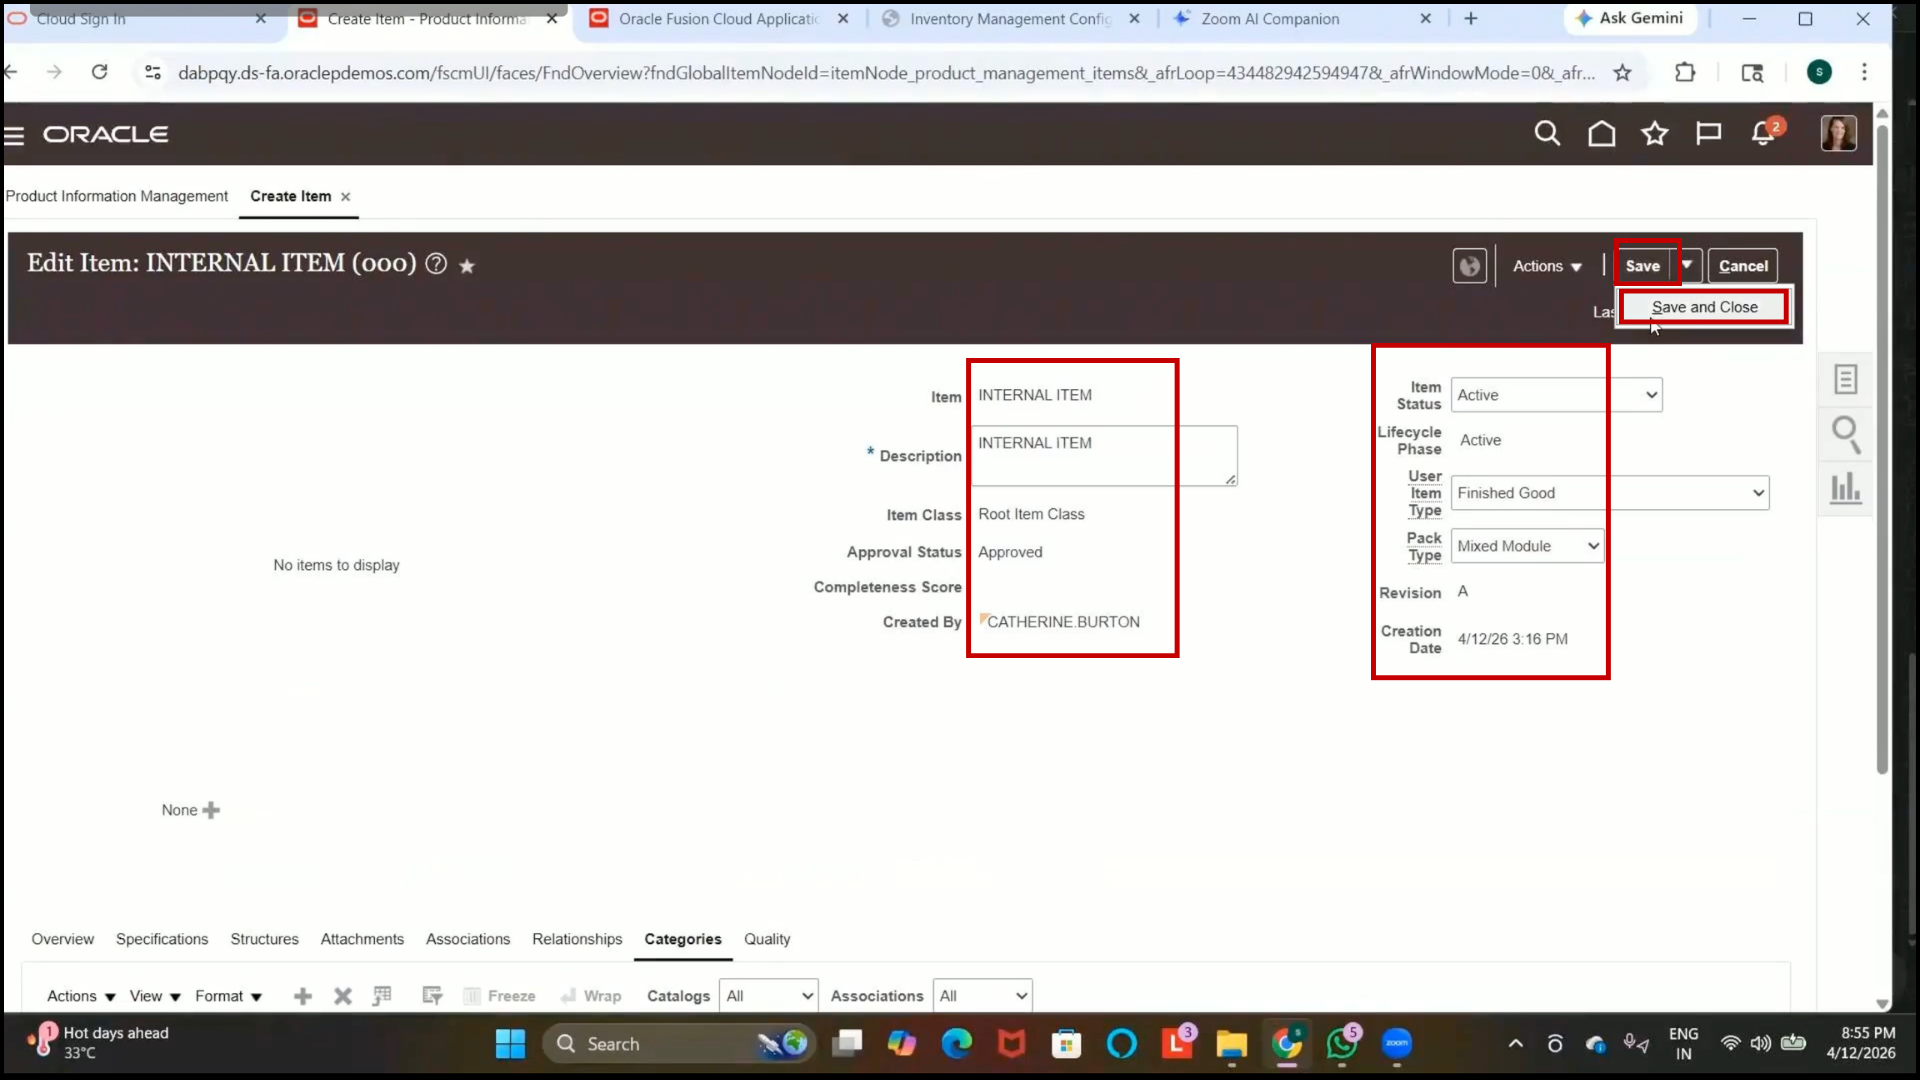
2. The item is now created successfully in Product Information Management.
3. The item is now ready for transactions.
Step 175: Verify Item Creation
1. Navigate to Manage Items
2. Search for the created item.
Example:
3. Internal Item
4.Click on Search.
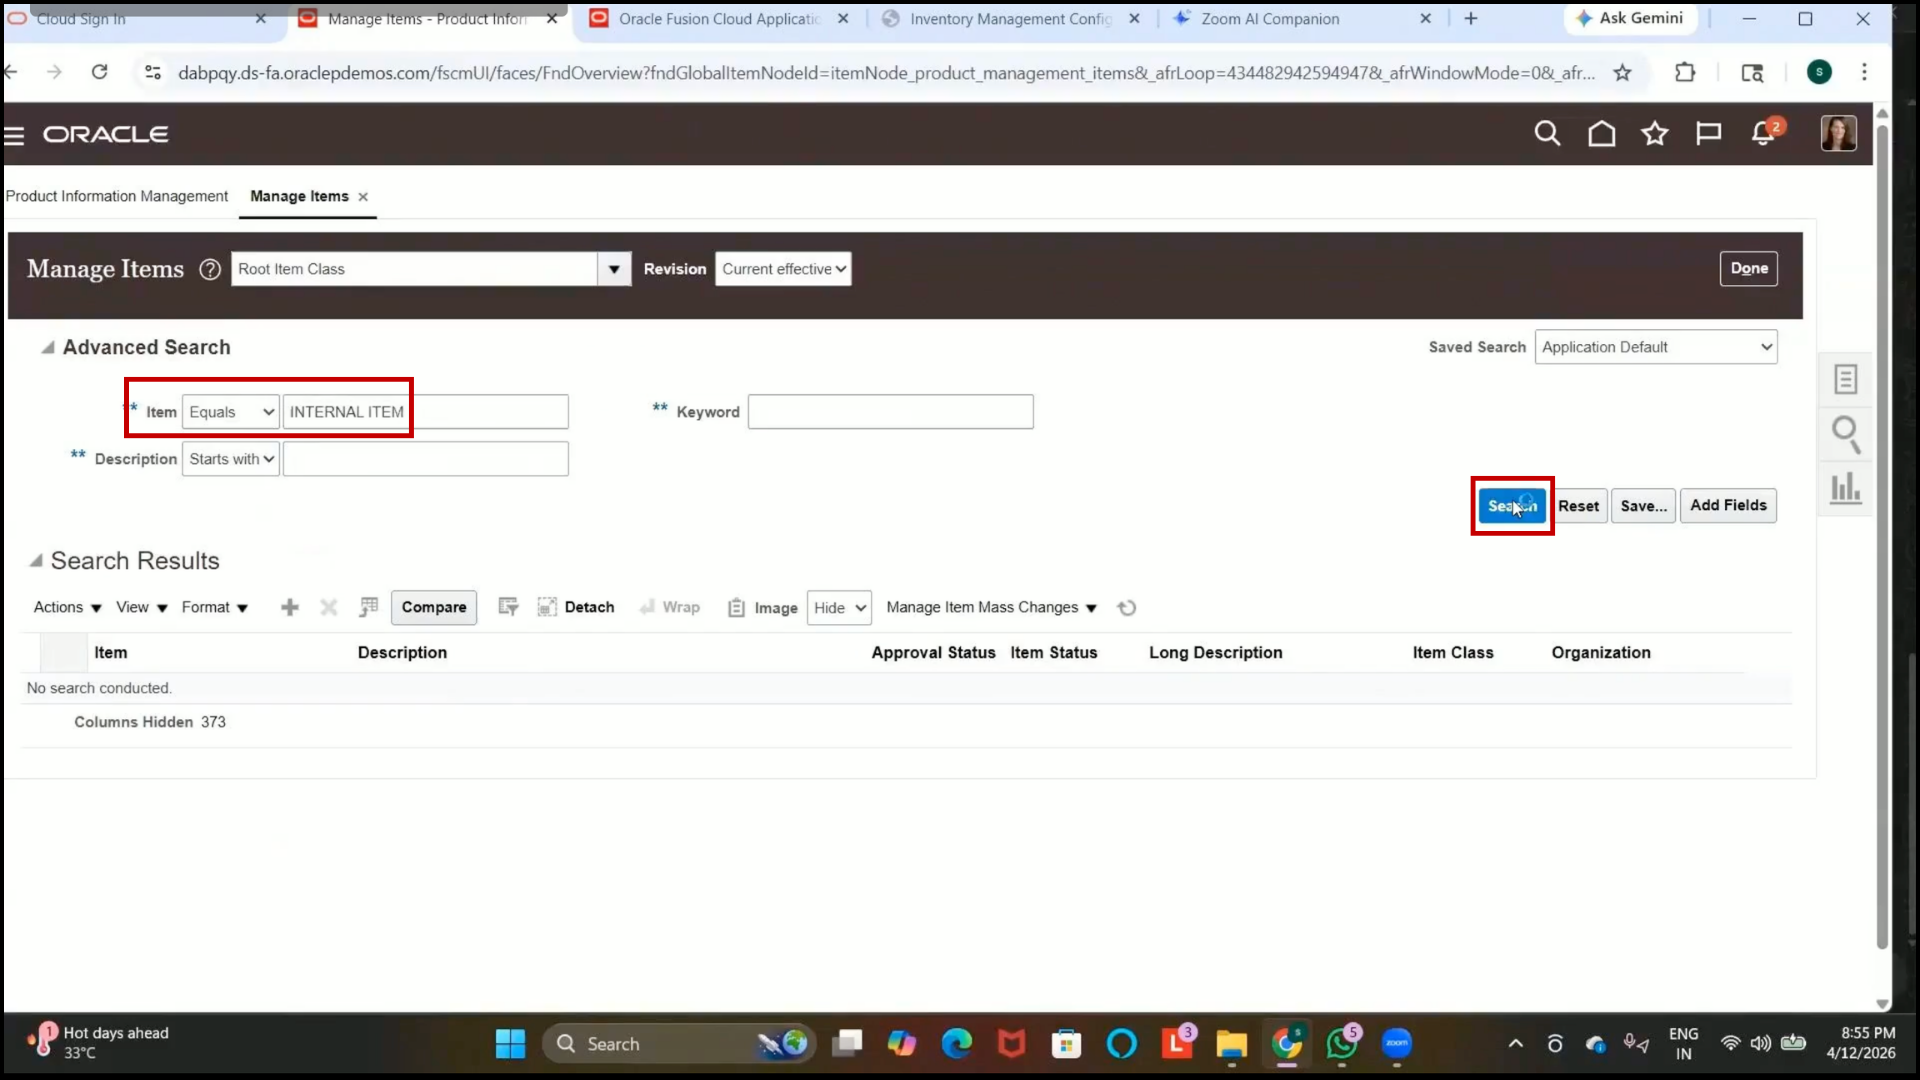
5. Click Done
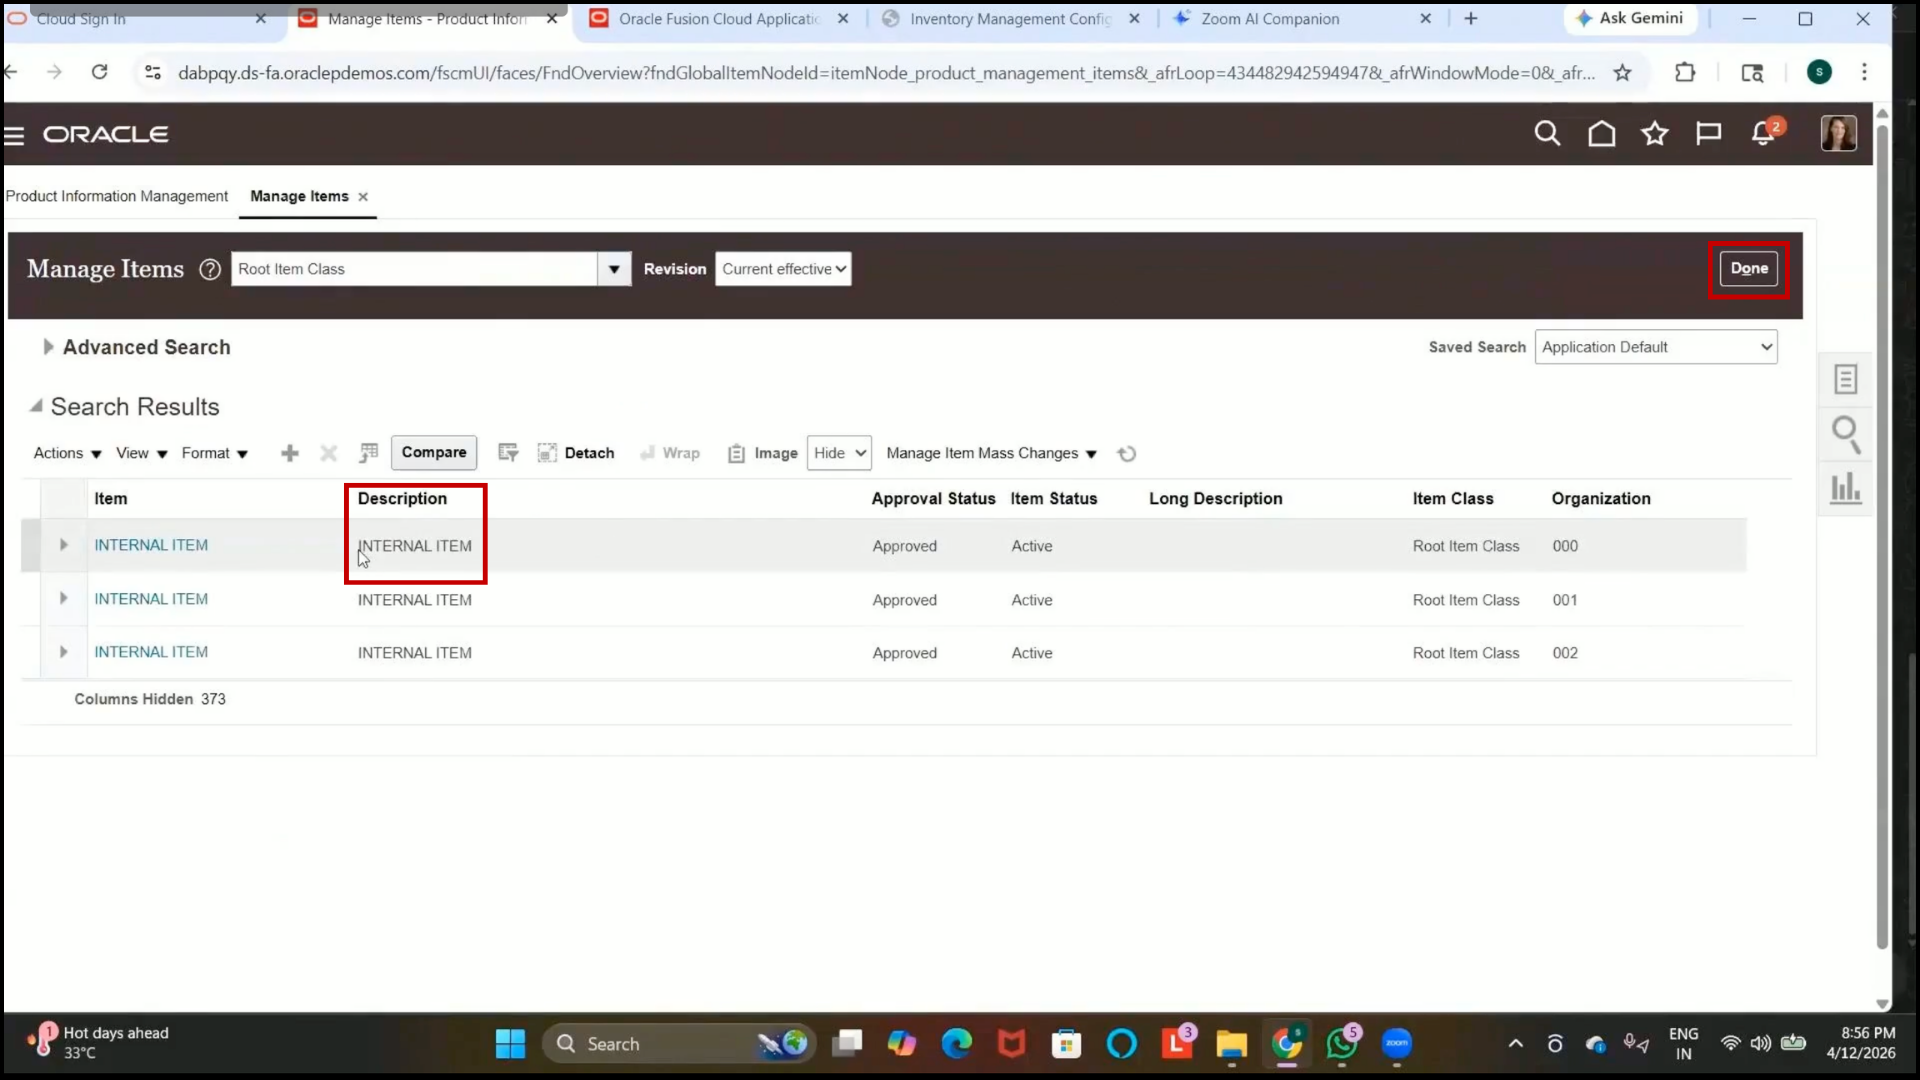
6. Verify:
7. The item was created successfully.
8. The item exists in the Item Master Organization.
9. The item is assigned to the child organizations:
10.Seattle
11. Atlanta
Step 176: Navigate to Manage Operational Attribute Groups
1. Open Setup and Maintenance.
2. Search for:
Manage Operational Attribute Groups
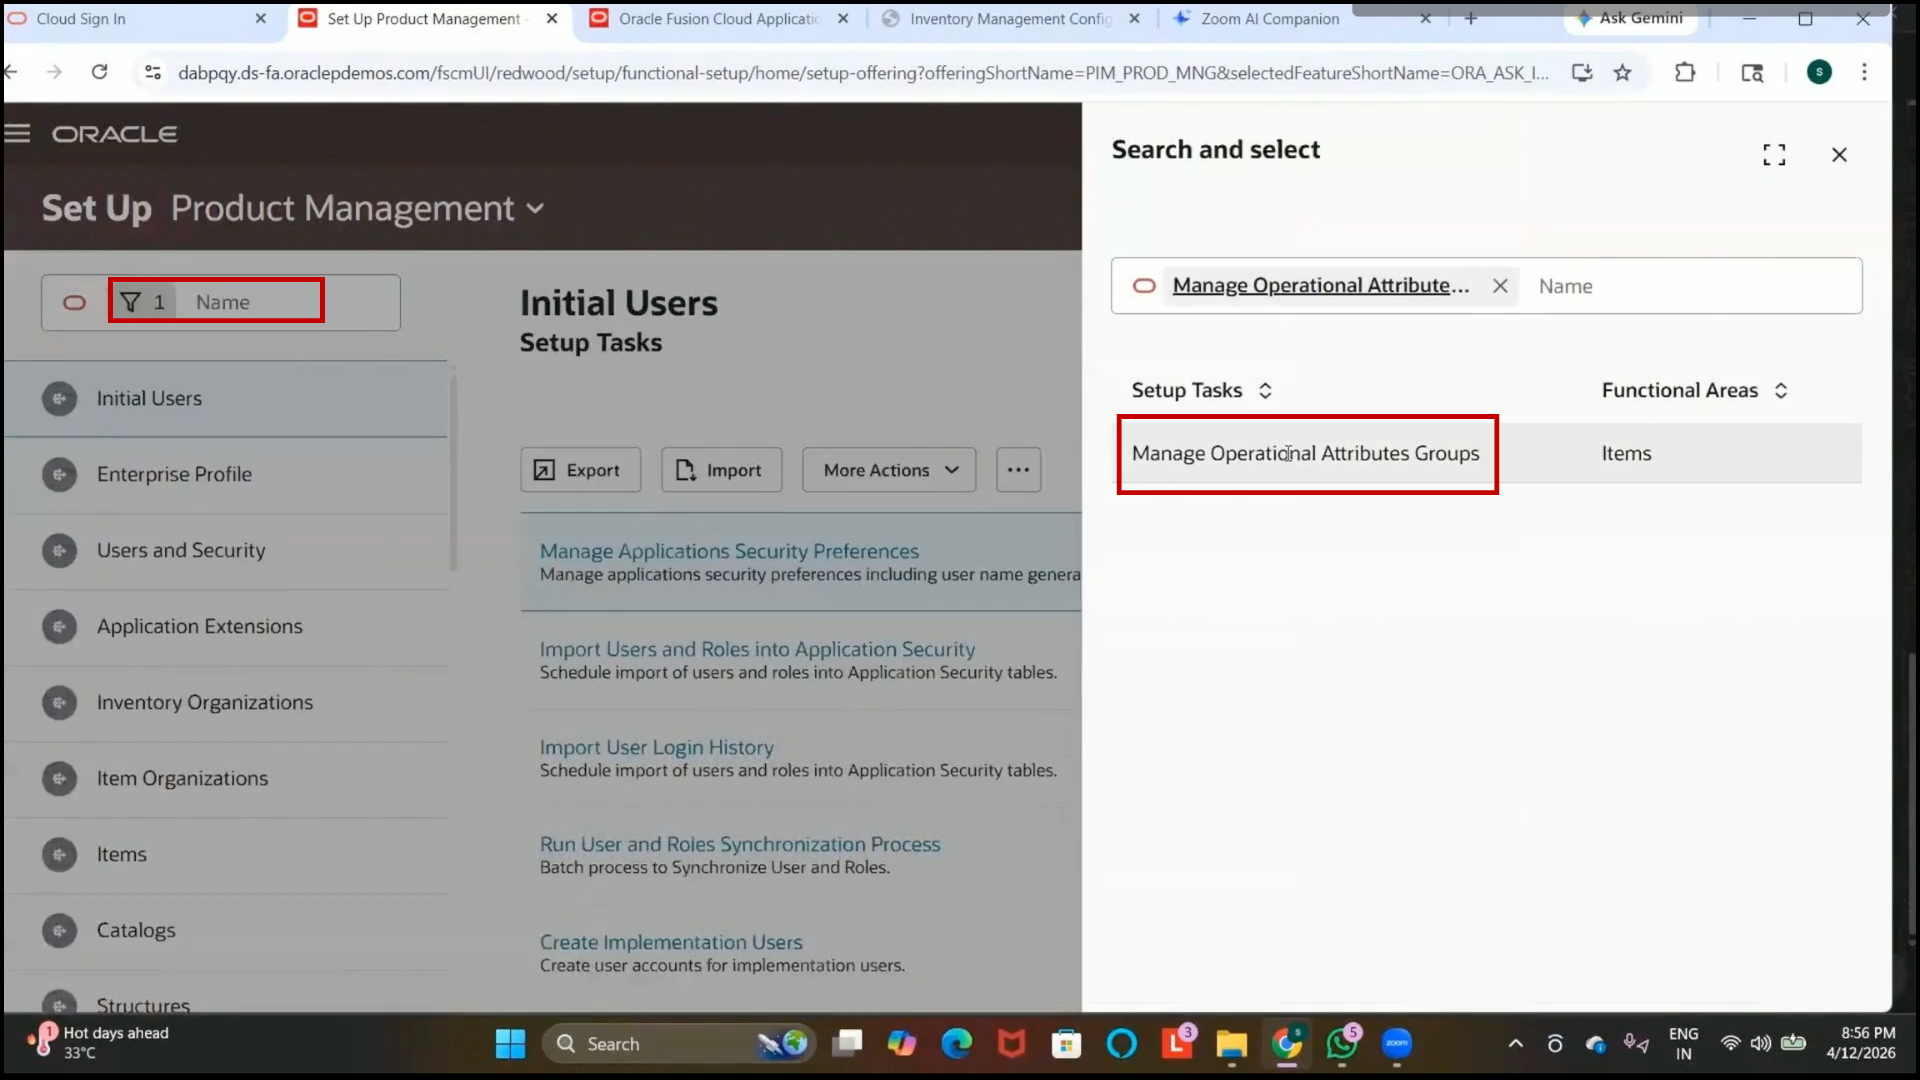
3. Open the setup.
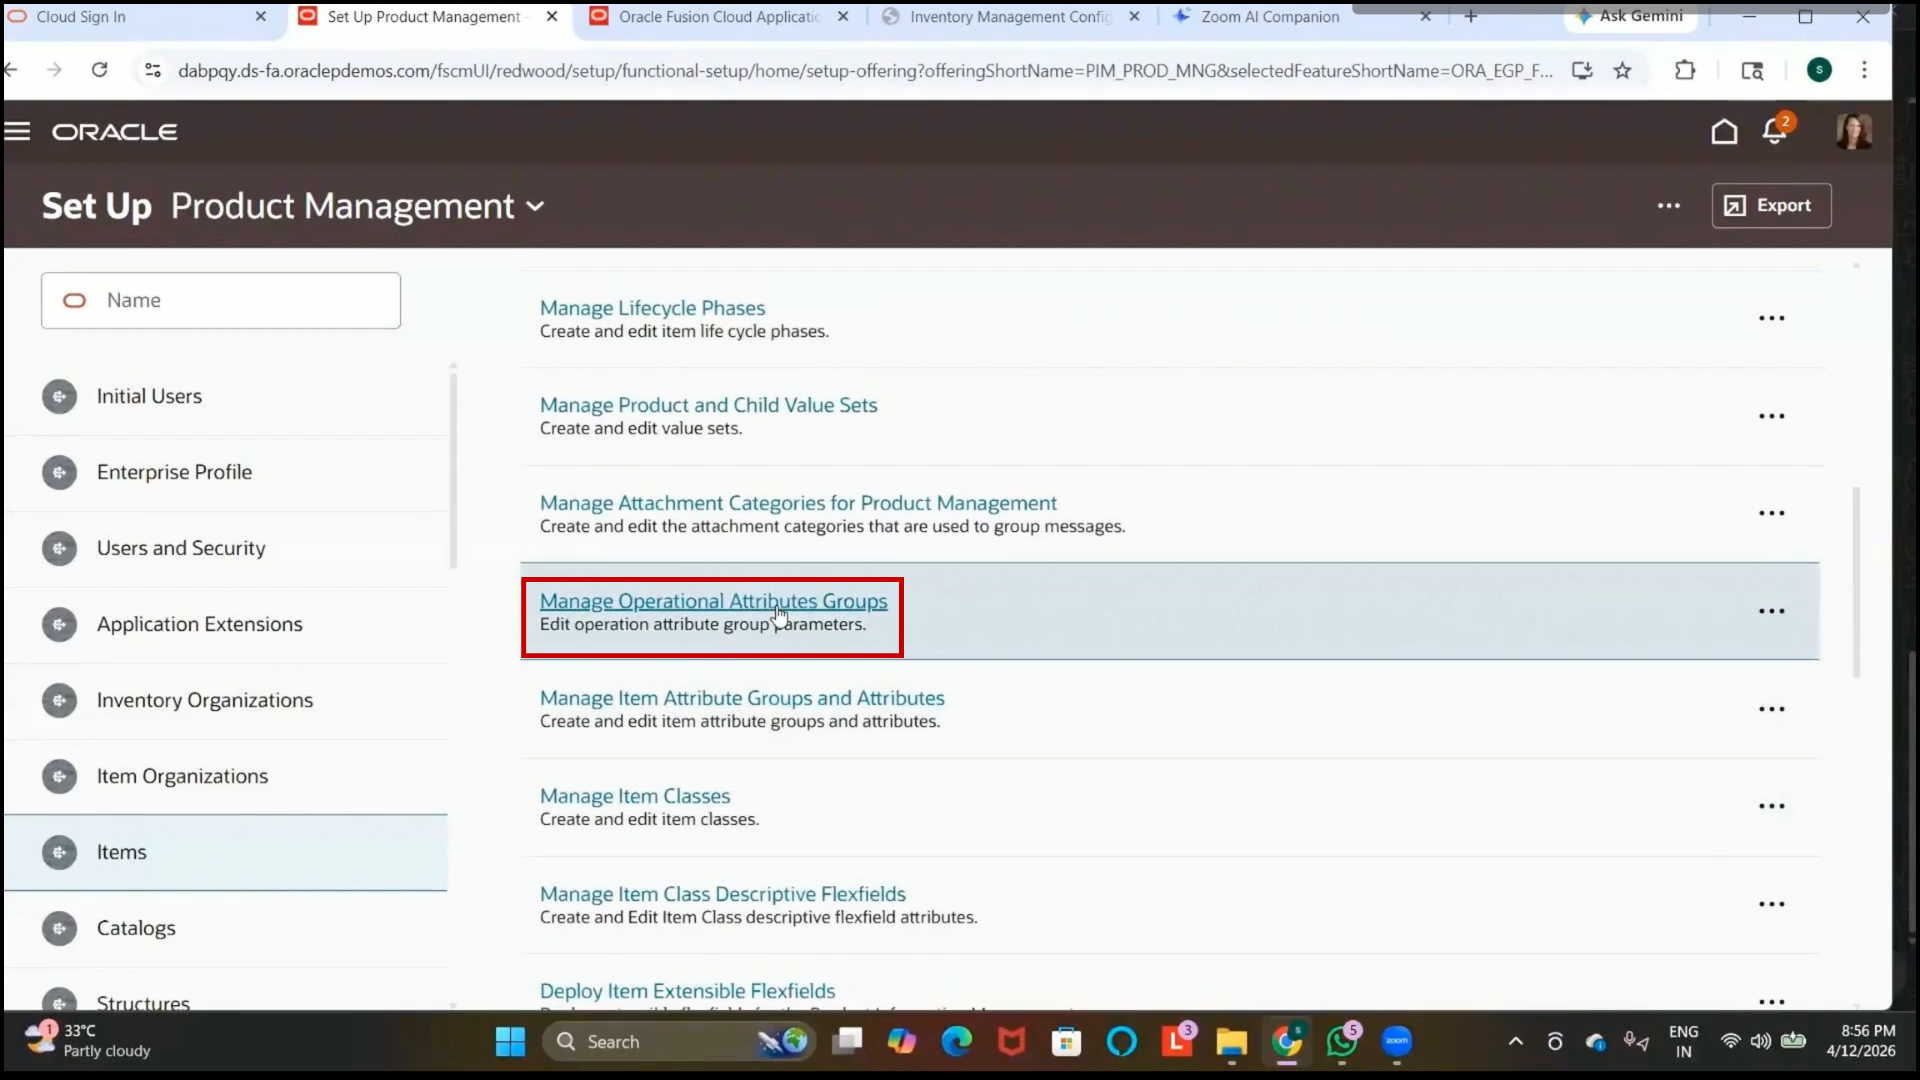
Step 177: Understand Operational Attribute Groups
1. Operational attribute groups are used to control item attributes.
2. These controls determine whether an item attribute is maintained at:
3. Master Organization Level
4. Organization Level
Step 178: Understand Master-Level Attribute Control
1. Master-level attributes are maintained in the Item Master Organization.
2. The same attribute values are automatically carried forward to all child organizations.
3. Changes made at the master level apply to all assigned organizations.
Step 179: Understand Organization-Level Attribute Control
1. Organization-level attributes are maintained separately for each inventory organization.
2. Each organization can maintain different values for the same attribute.
3. Changes made in one organization do not affect other organizations.
Step 180: Review Existing Attribute Controls
1. Review the available item attributes.
2. Example:
Costing Attributes
3. Verify whether the control level is
4. Master Level
5. Organization Level
Step 181: Review the Internally Transferable Attribute
1. Search for:
Internally Transferable
2. Review the attribute under
Sales and Order Management
3. Verify that the control level is set to:
Organization Level
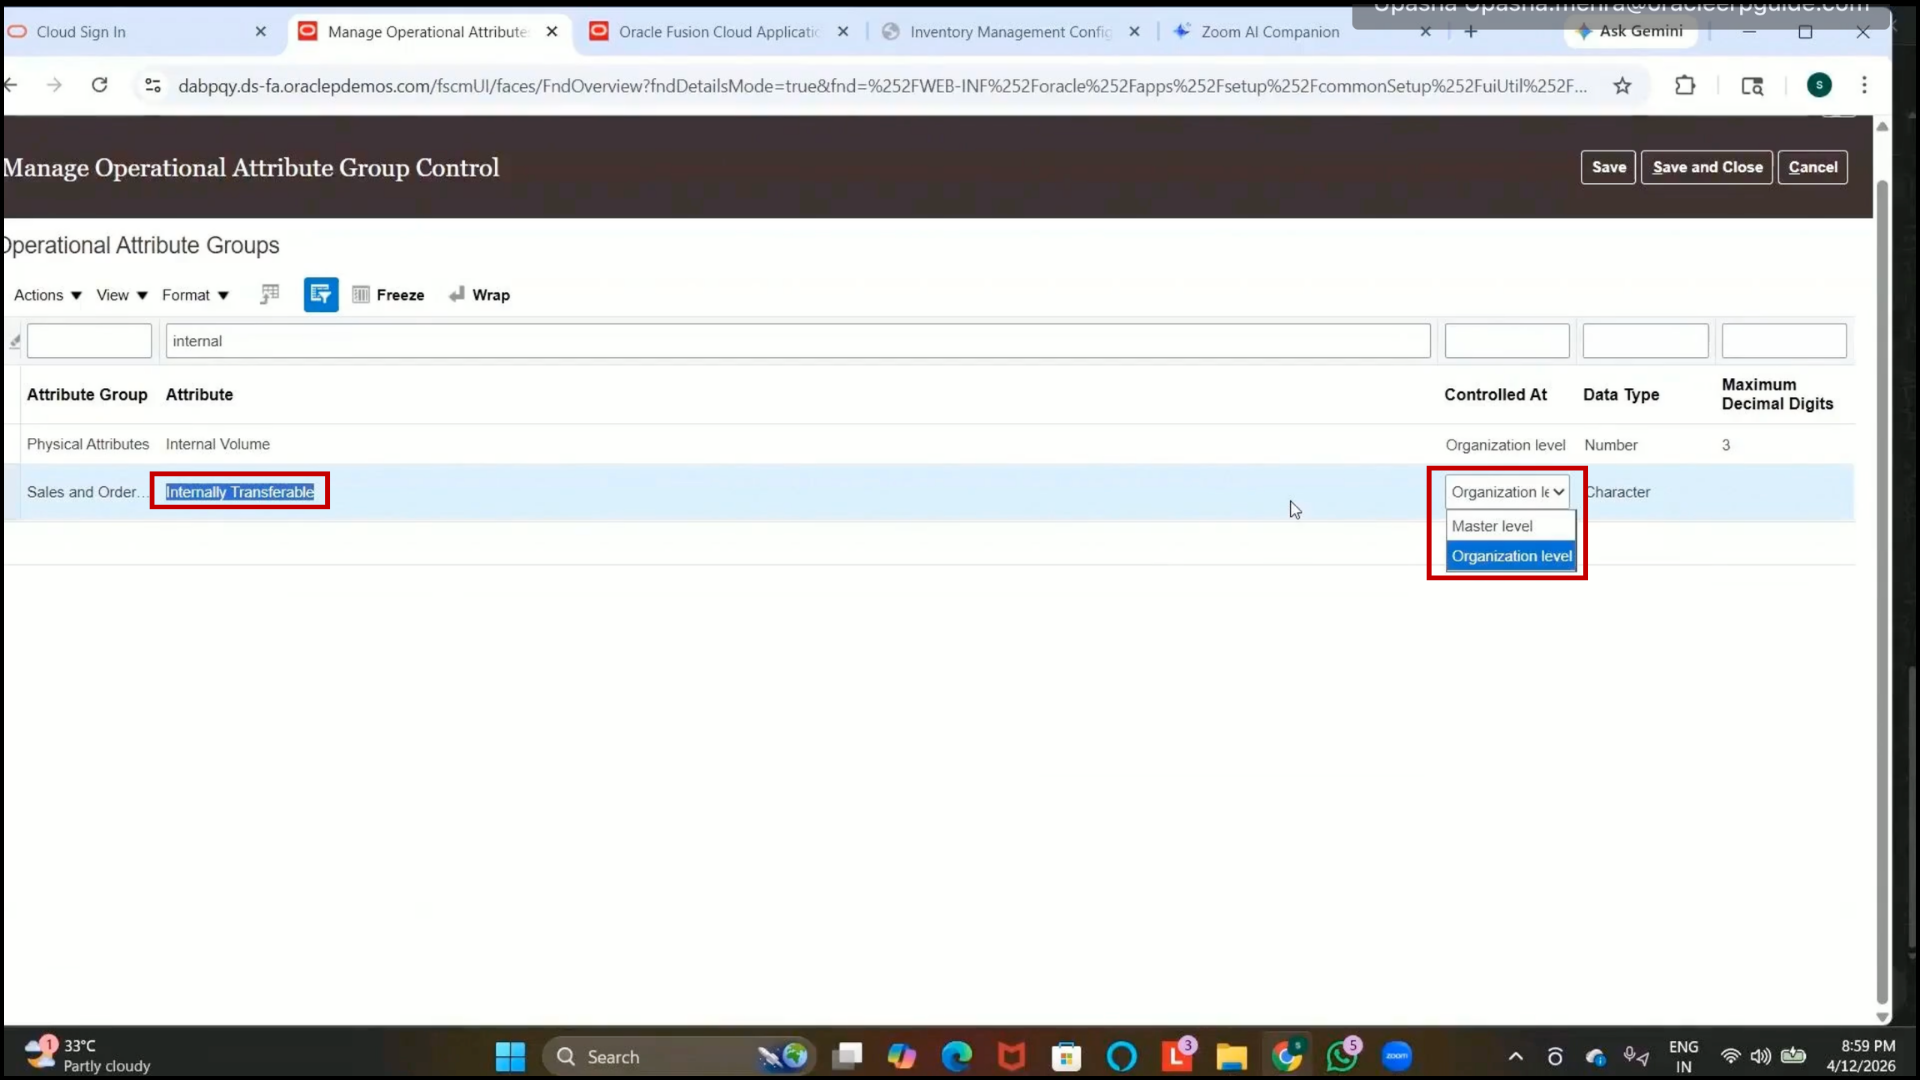
Step 182: Understand Internally Transferable Attribute Behavior
1. Organization-level control allows specific organizations to enable or disable internal transfers independently.
2. Not all inventory organizations may transfer the item internally.
3. Each organization can configure this attribute separately.
Step 183: Understand the Impact of Master-Level Control
1. If an attribute is controlled at the master level:
2. The value is maintained only in the Item Master Organization.
3. The value is automatically copied to all child organizations.
4. Child organizations cannot edit the attribute separately.
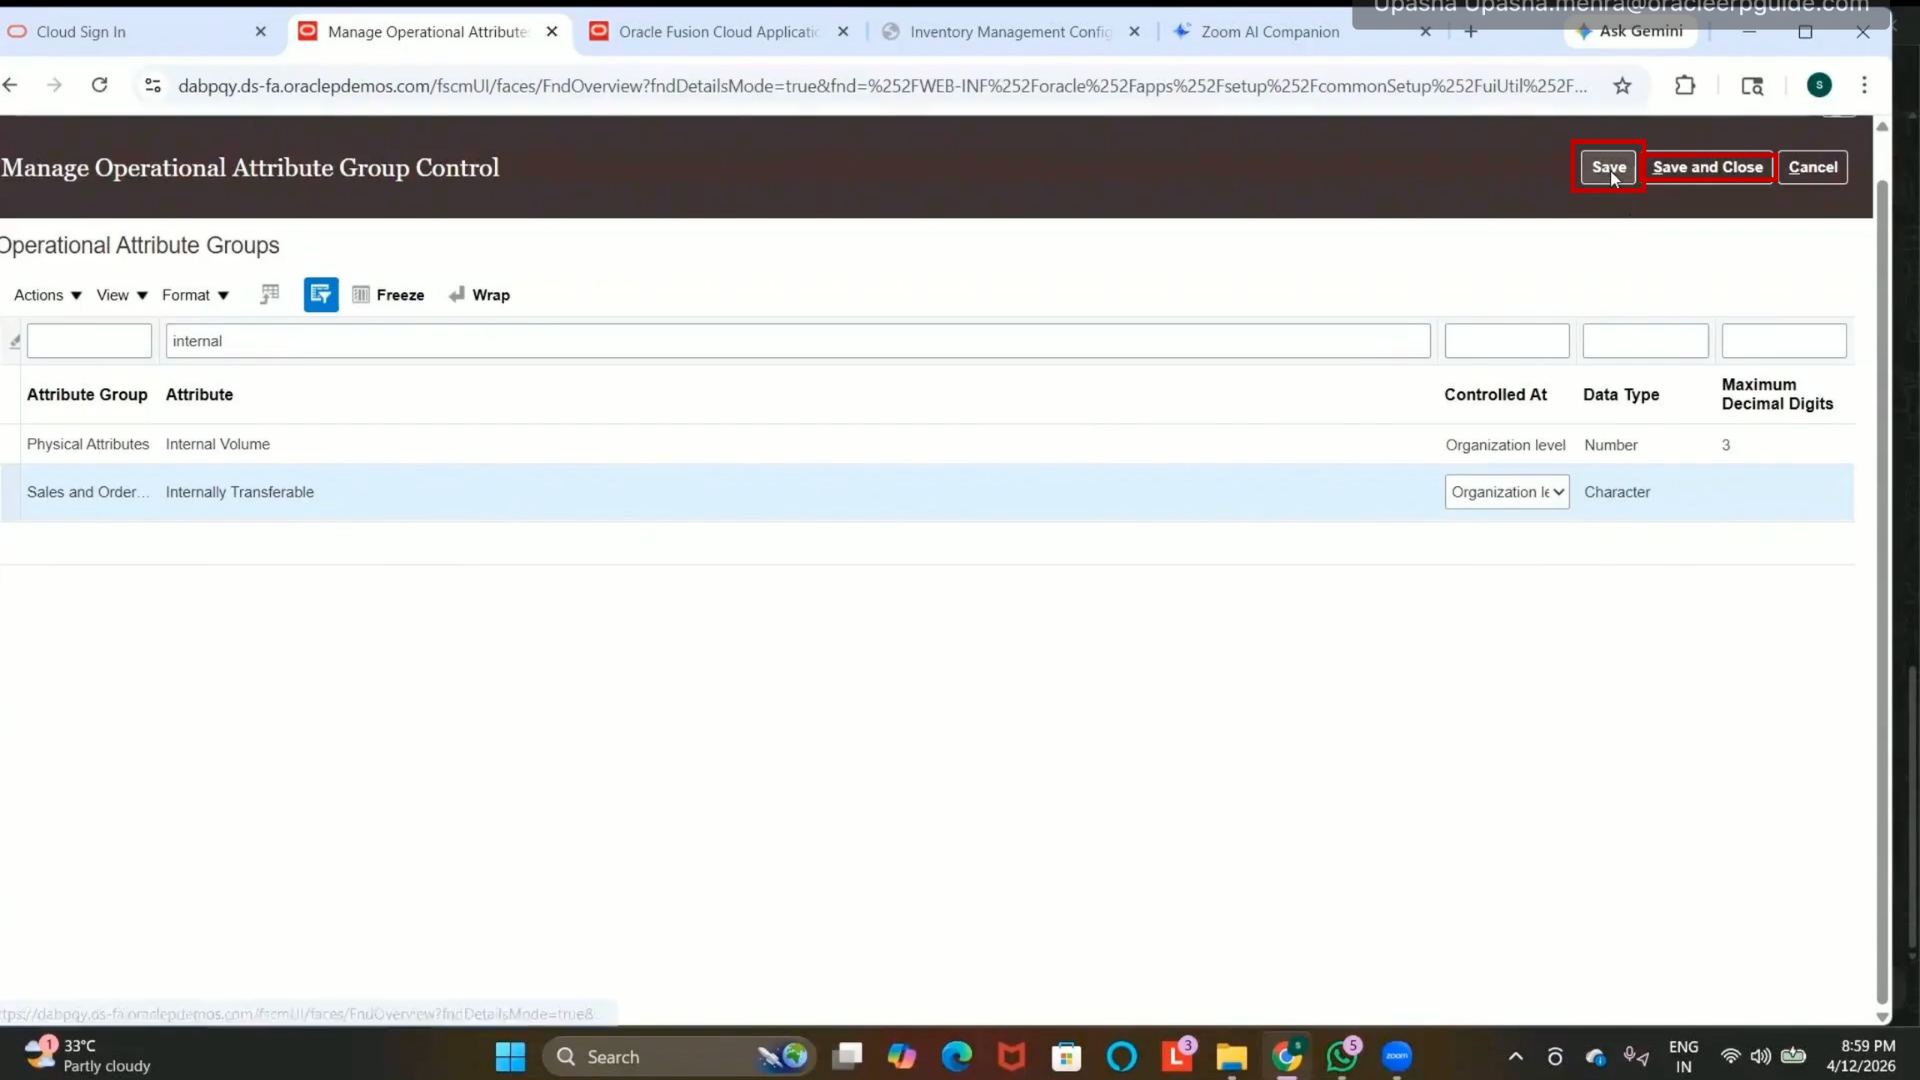
Step 184: Save Operational Attribute Group Changes
1. Click on Save.
2.Click on Save and Close.
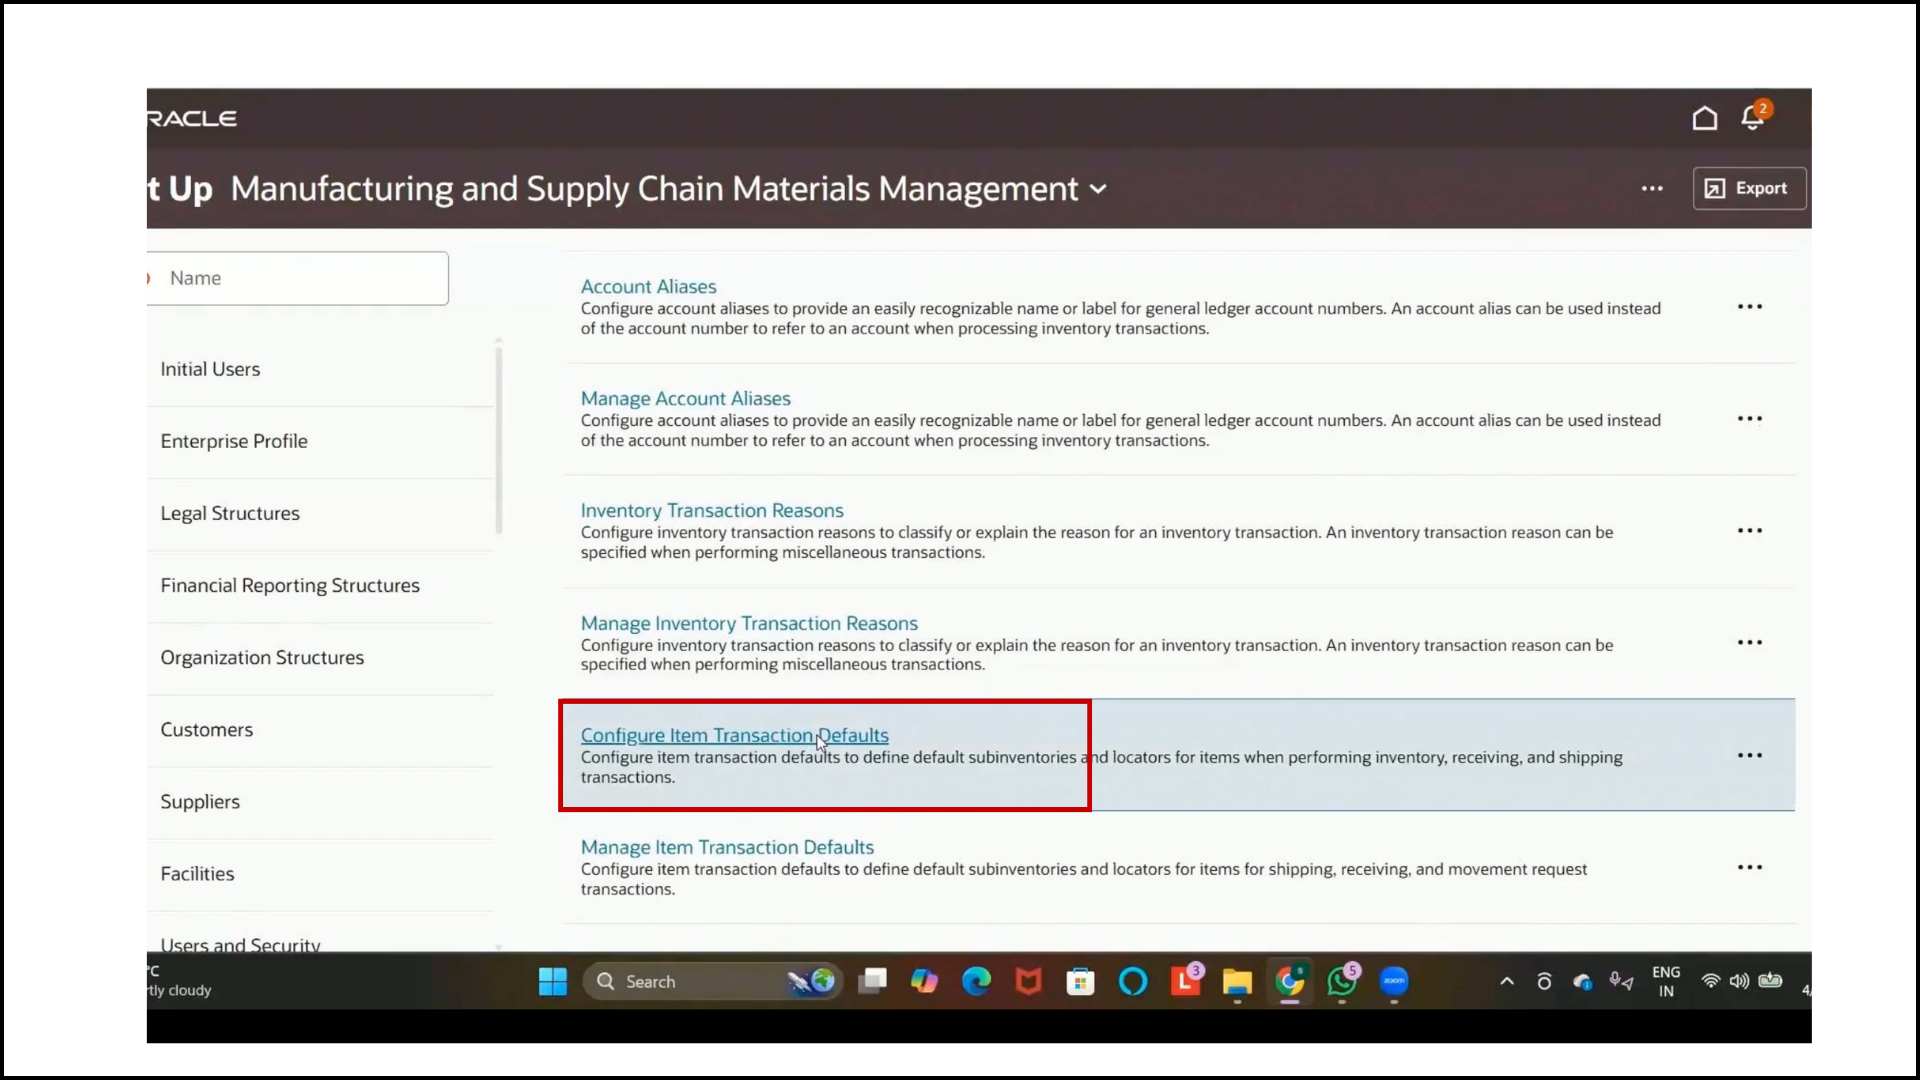
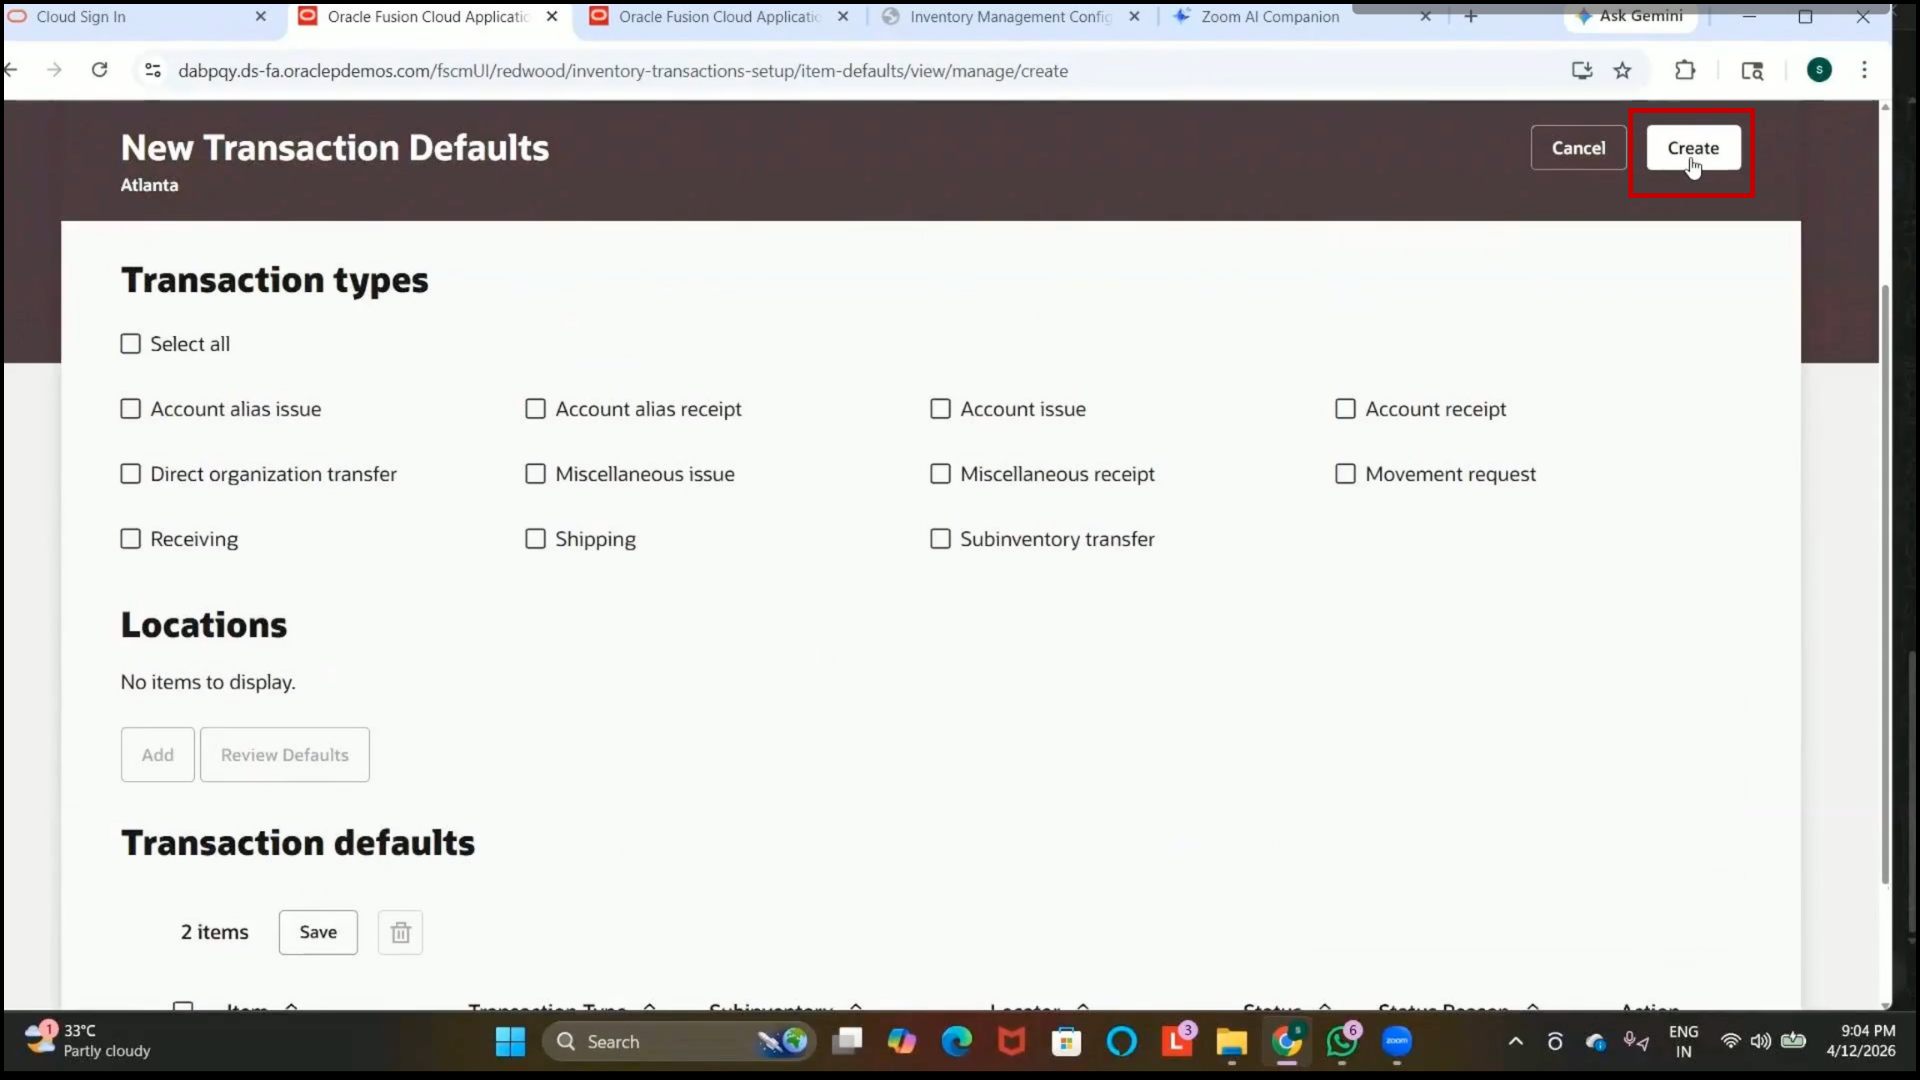
Step 185: Navigate to Configure Item Transaction Defaults
1. Open the next setup:
Configure Item Transaction Defaults
2. Navigate through:
Manufacturing and Supply Chain Management
3. Open:
Configure Item Transaction Defaults
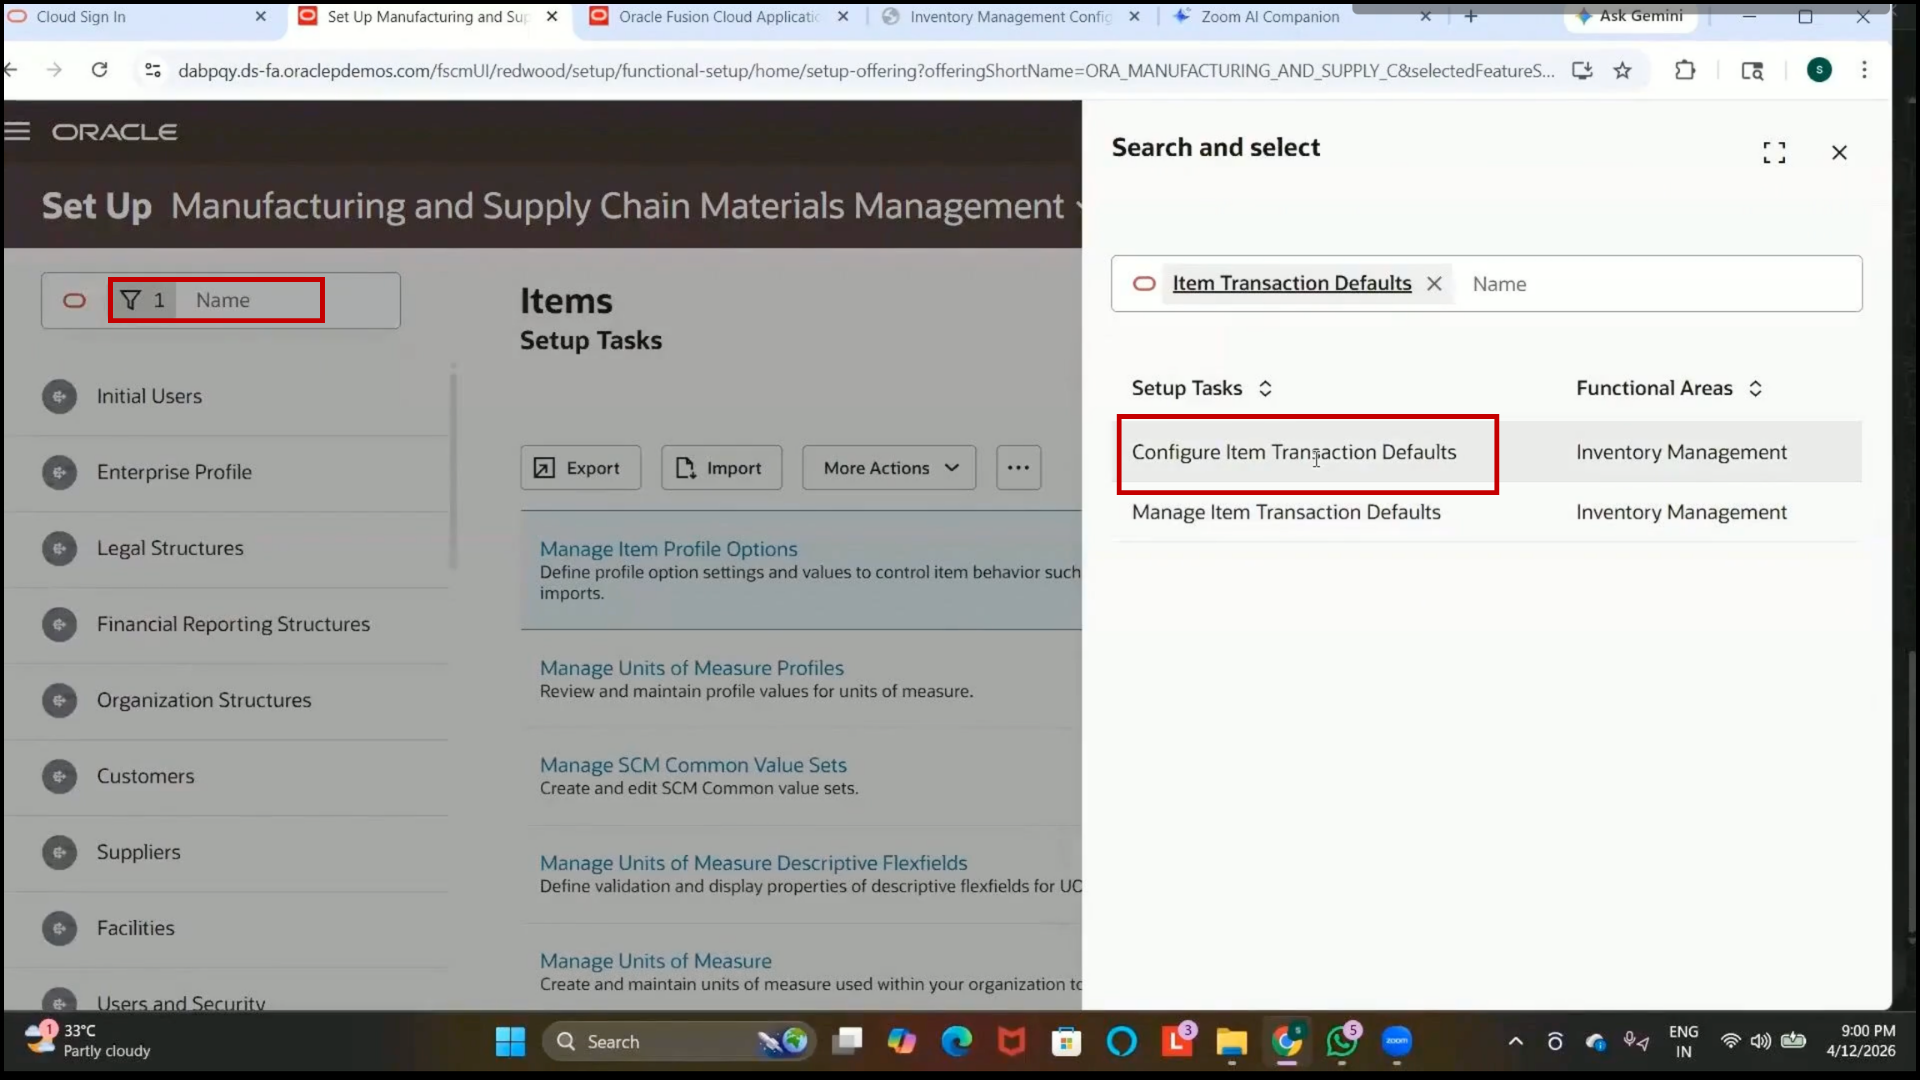
Step 186: Navigate to Configure Item Transaction Defaults
1. Open the Configure Item Transaction Defaults setup.
2. Navigate to the required setup page.
Step 187: Understand Item Transaction Defaults
1. Item transaction defaults are used to default specific subinventories during inventory transactions.
2. An inventory organization can contain multiple subinventories such as
3. Completed
4. Inspection
5. Store
6. Staging
These defaults reduce manual selection during transactions.
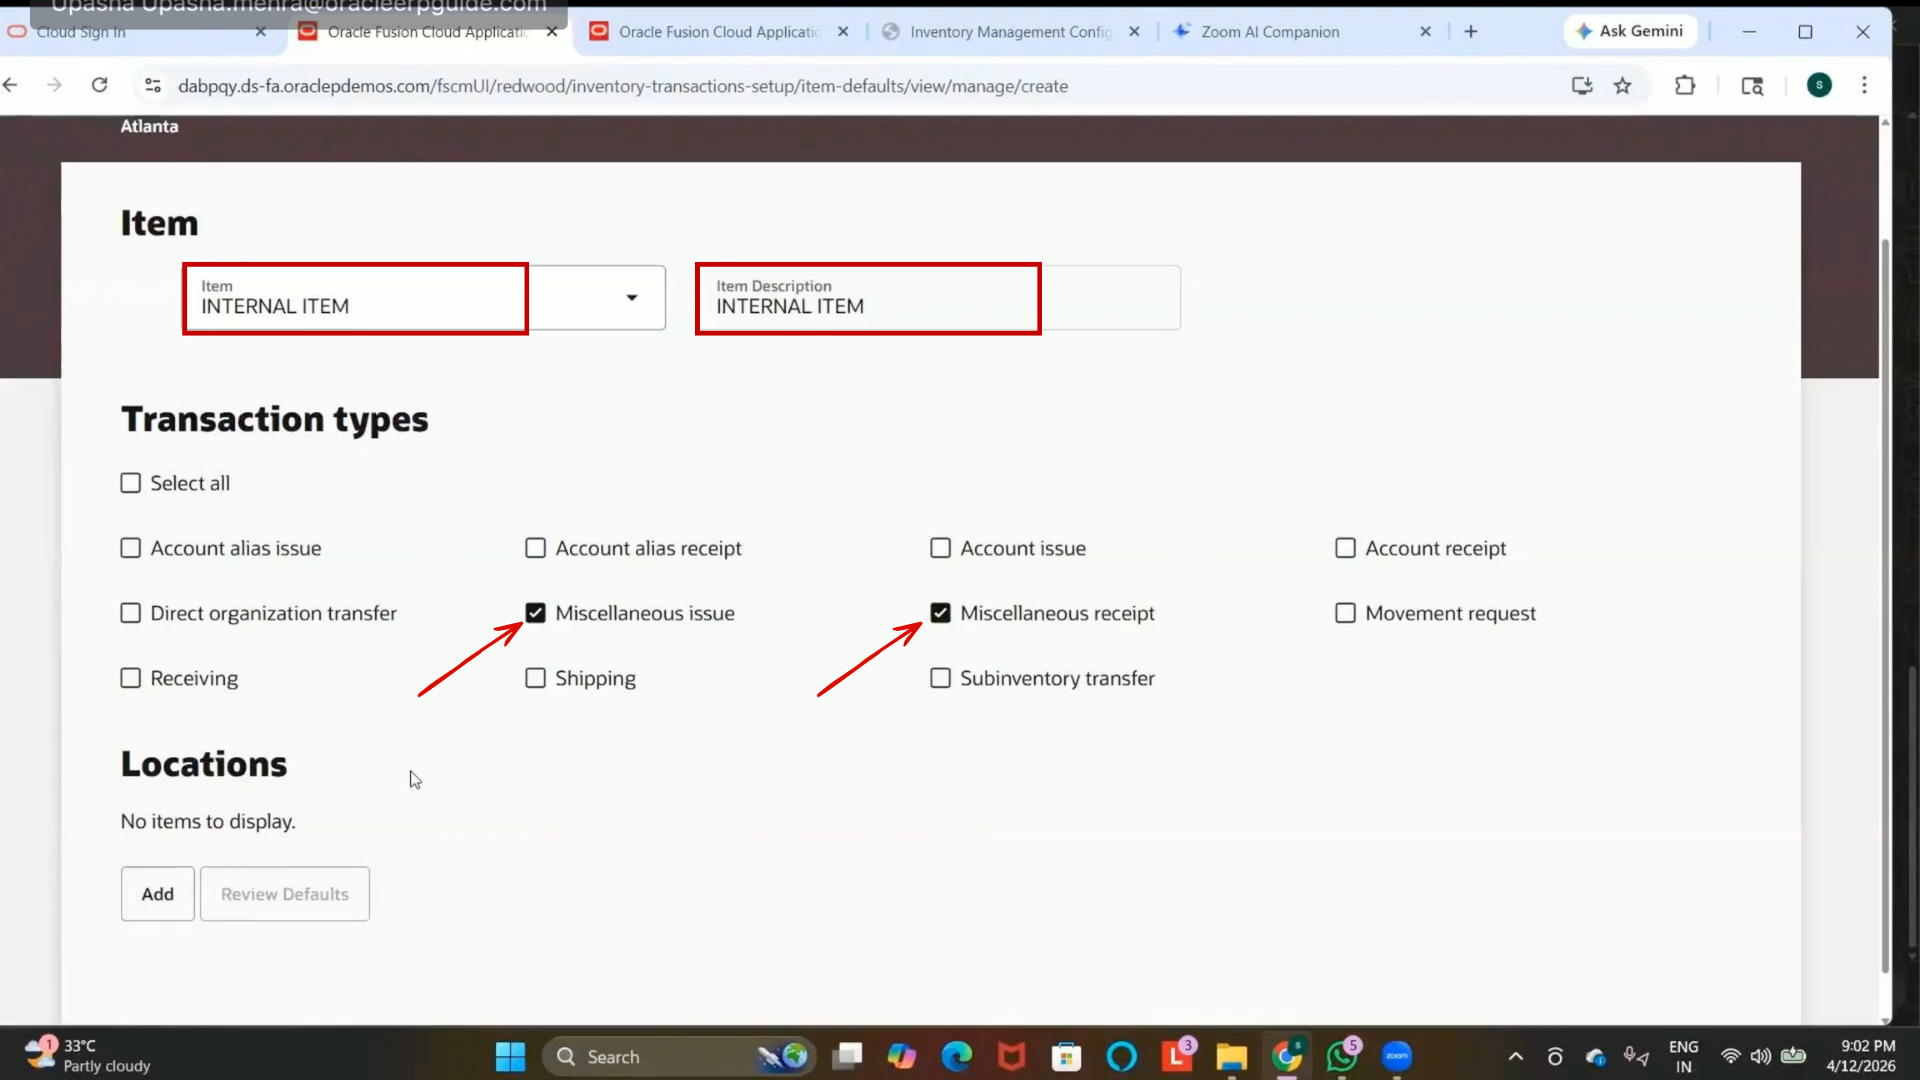
Step 188: Create Transaction Defaults by Item
1. Select:
Create by Item
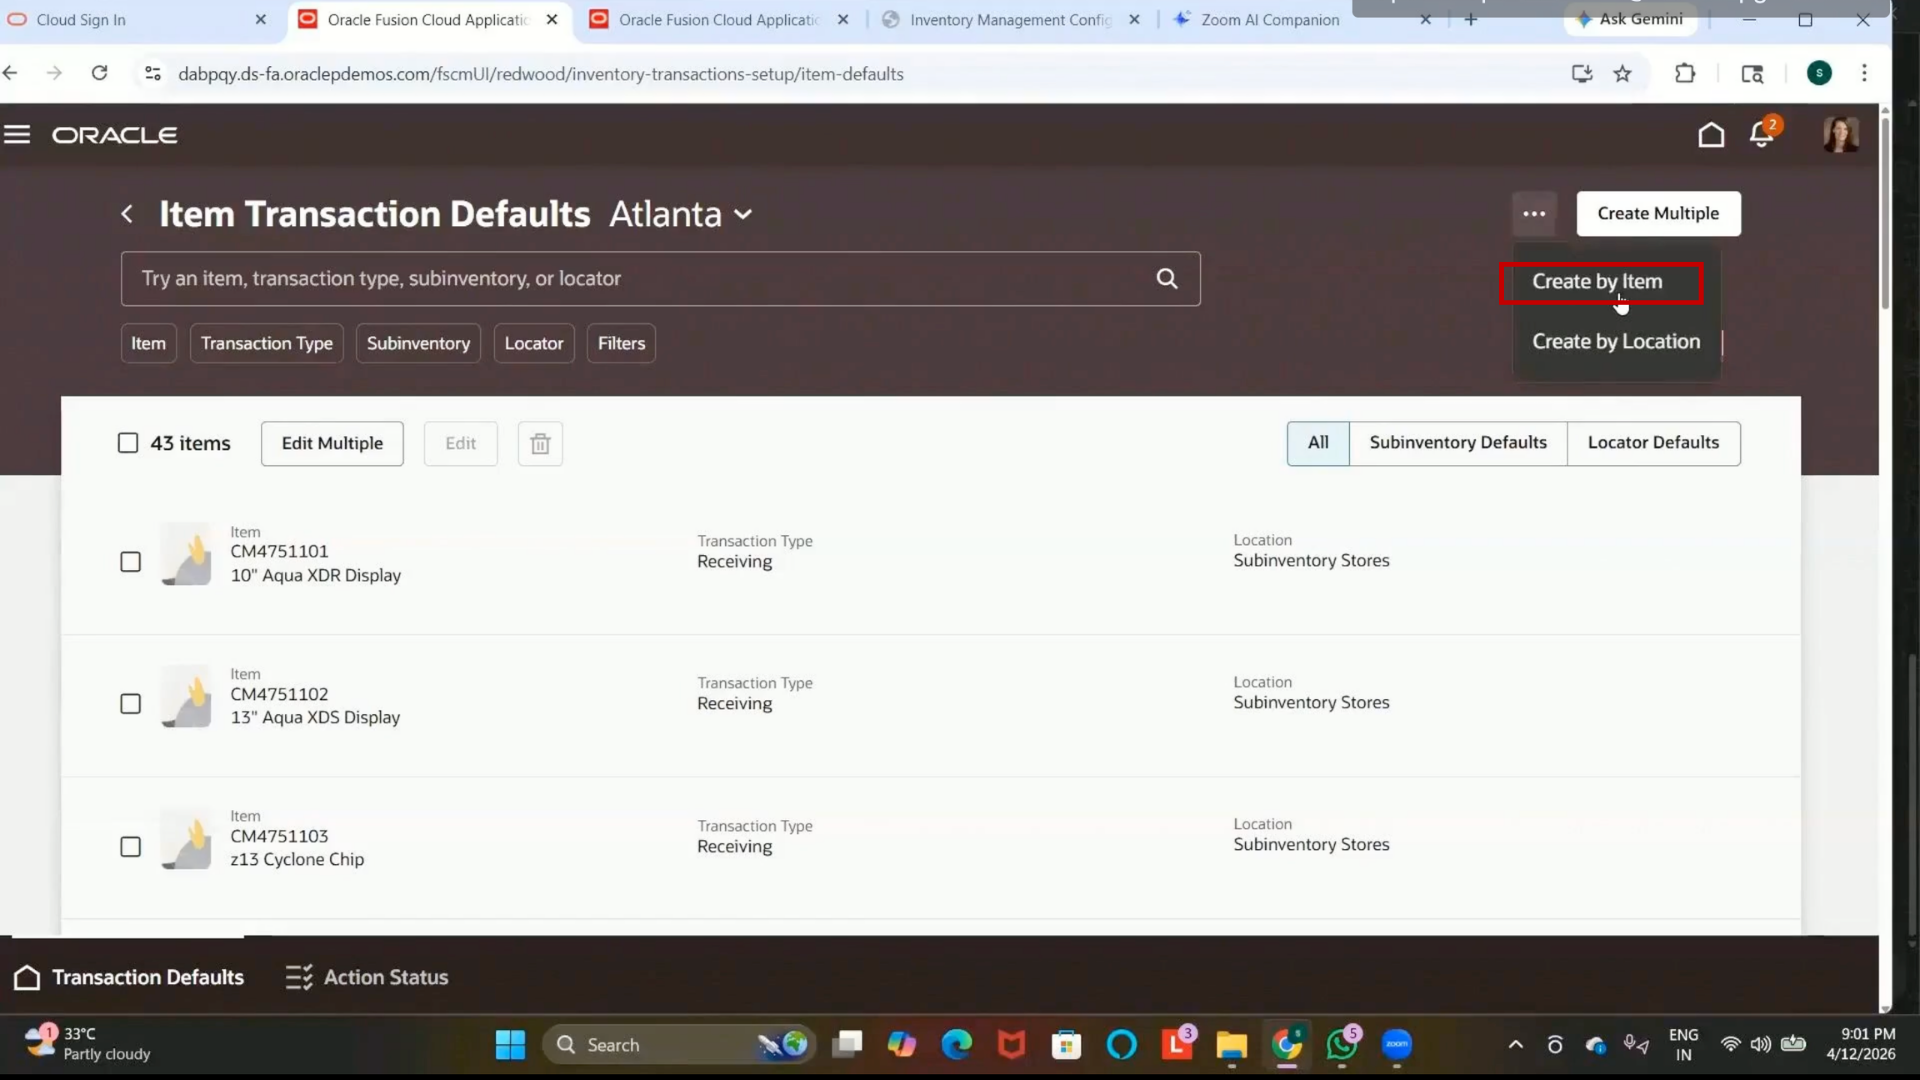
This setup links an item to specific subinventories for selected transaction types.
Step 189: Select the Item
1. Search for and select the item created earlier.
2. Example:
Internal Item
Step 190: Select Transaction Types
1. Select the required transaction types.
2. Example transaction types:
3. Miscellaneous Receipt
4. Miscellaneous Issue
5. The selected subinventory will automatically default during these transactions.
Step 191: Select the Default Subinventory
1. Select the required subinventory.
2. Example:
Completed Subinventory
3. Since locator control is not enabled, no locator selection is required.
Step 192: Understand Subinventory Defaulting
1. During the selected inventory transactions:
2. The configured subinventory automatically defaults.
3. Users do not need to manually select the subinventory each time.
Step 193: Add Additional Subinventories
1. Additional subinventories can also be added if required.
2. Example subinventories:
3. Staging
4. Receiving
5. Multiple subinventories can be configured for the item.
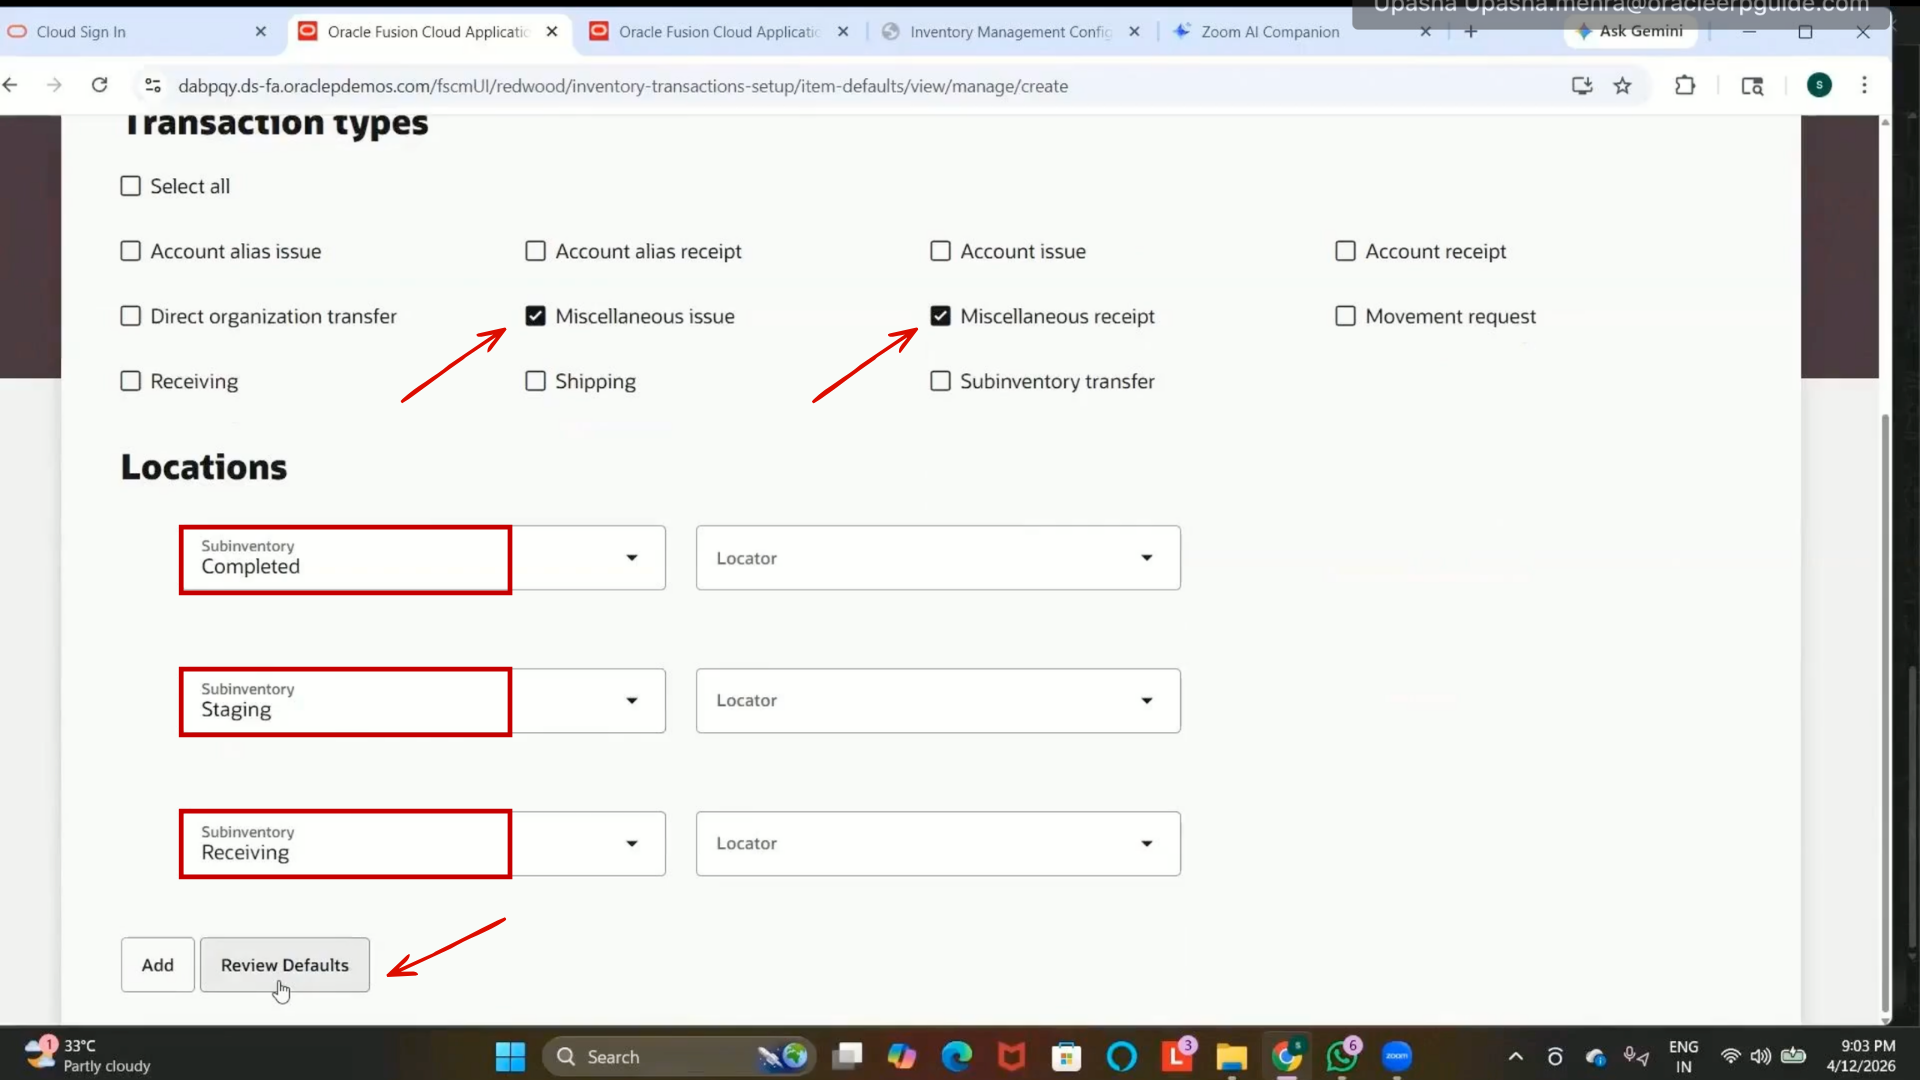
Step 194: Review Default Subinventory Assignments
1. Click on:
Review Default
2. Verify that the selected item is linked to the configured subinventories.
Step 195: Keep Only the Required Subinventory
1. Delete unnecessary subinventories if only one default subinventory is required.
2. Keep:
Completed Subinventory
3. Remove the remaining subinventories.
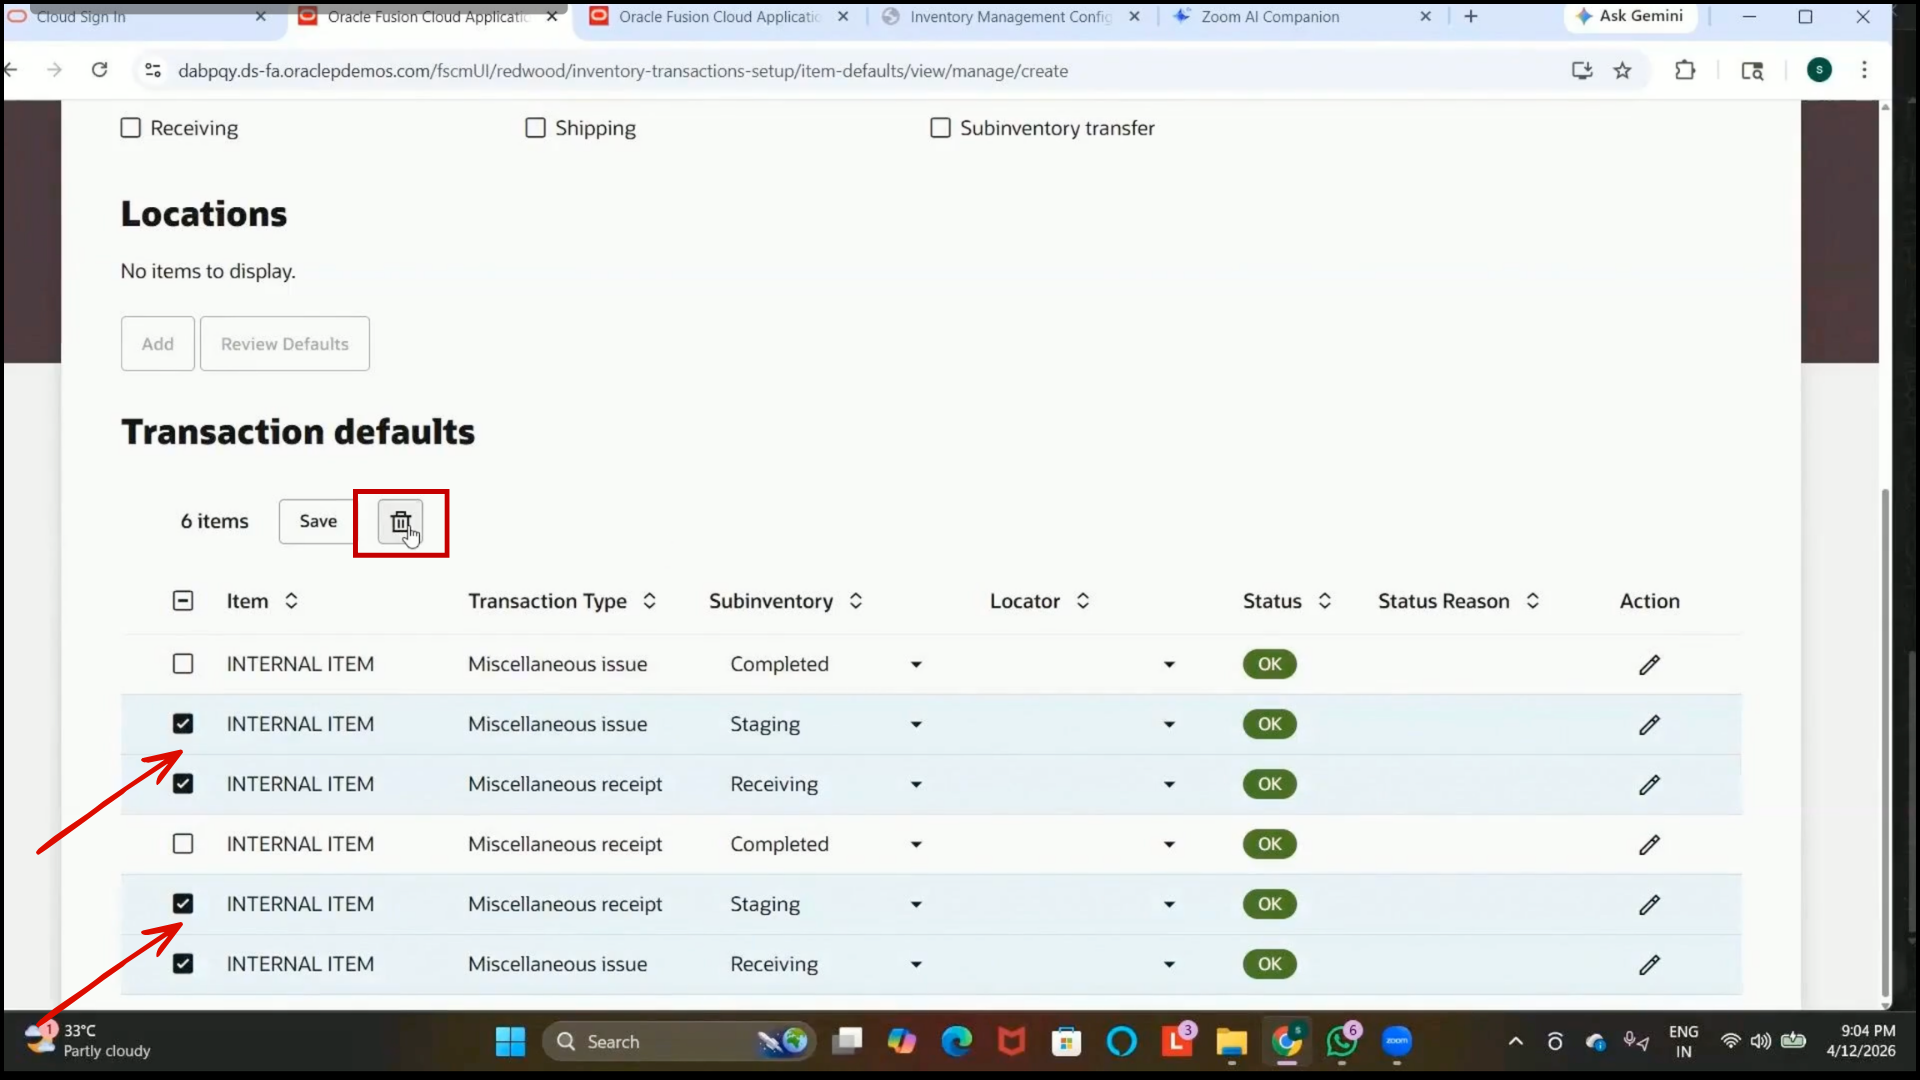
Step 196: Save the Item Transaction Defaults
1. Click on Save.
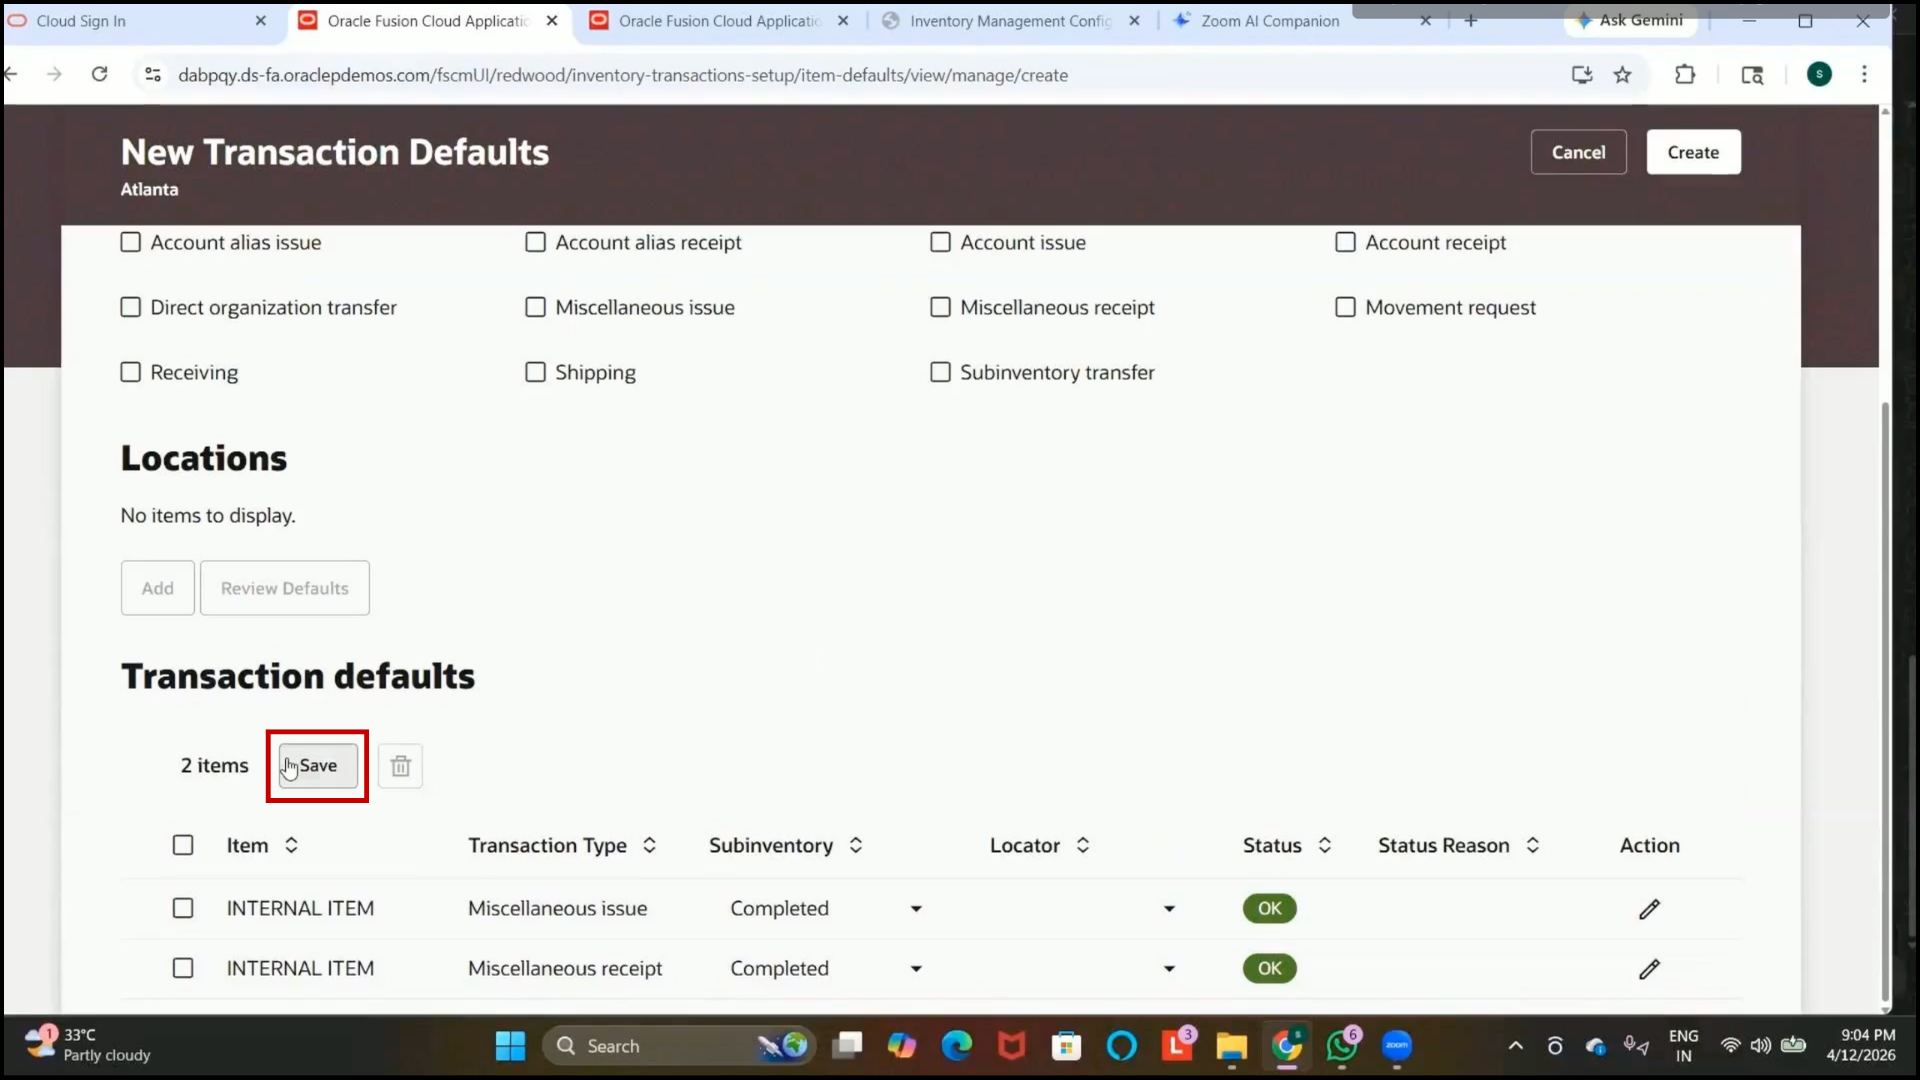
2. Click on Create.
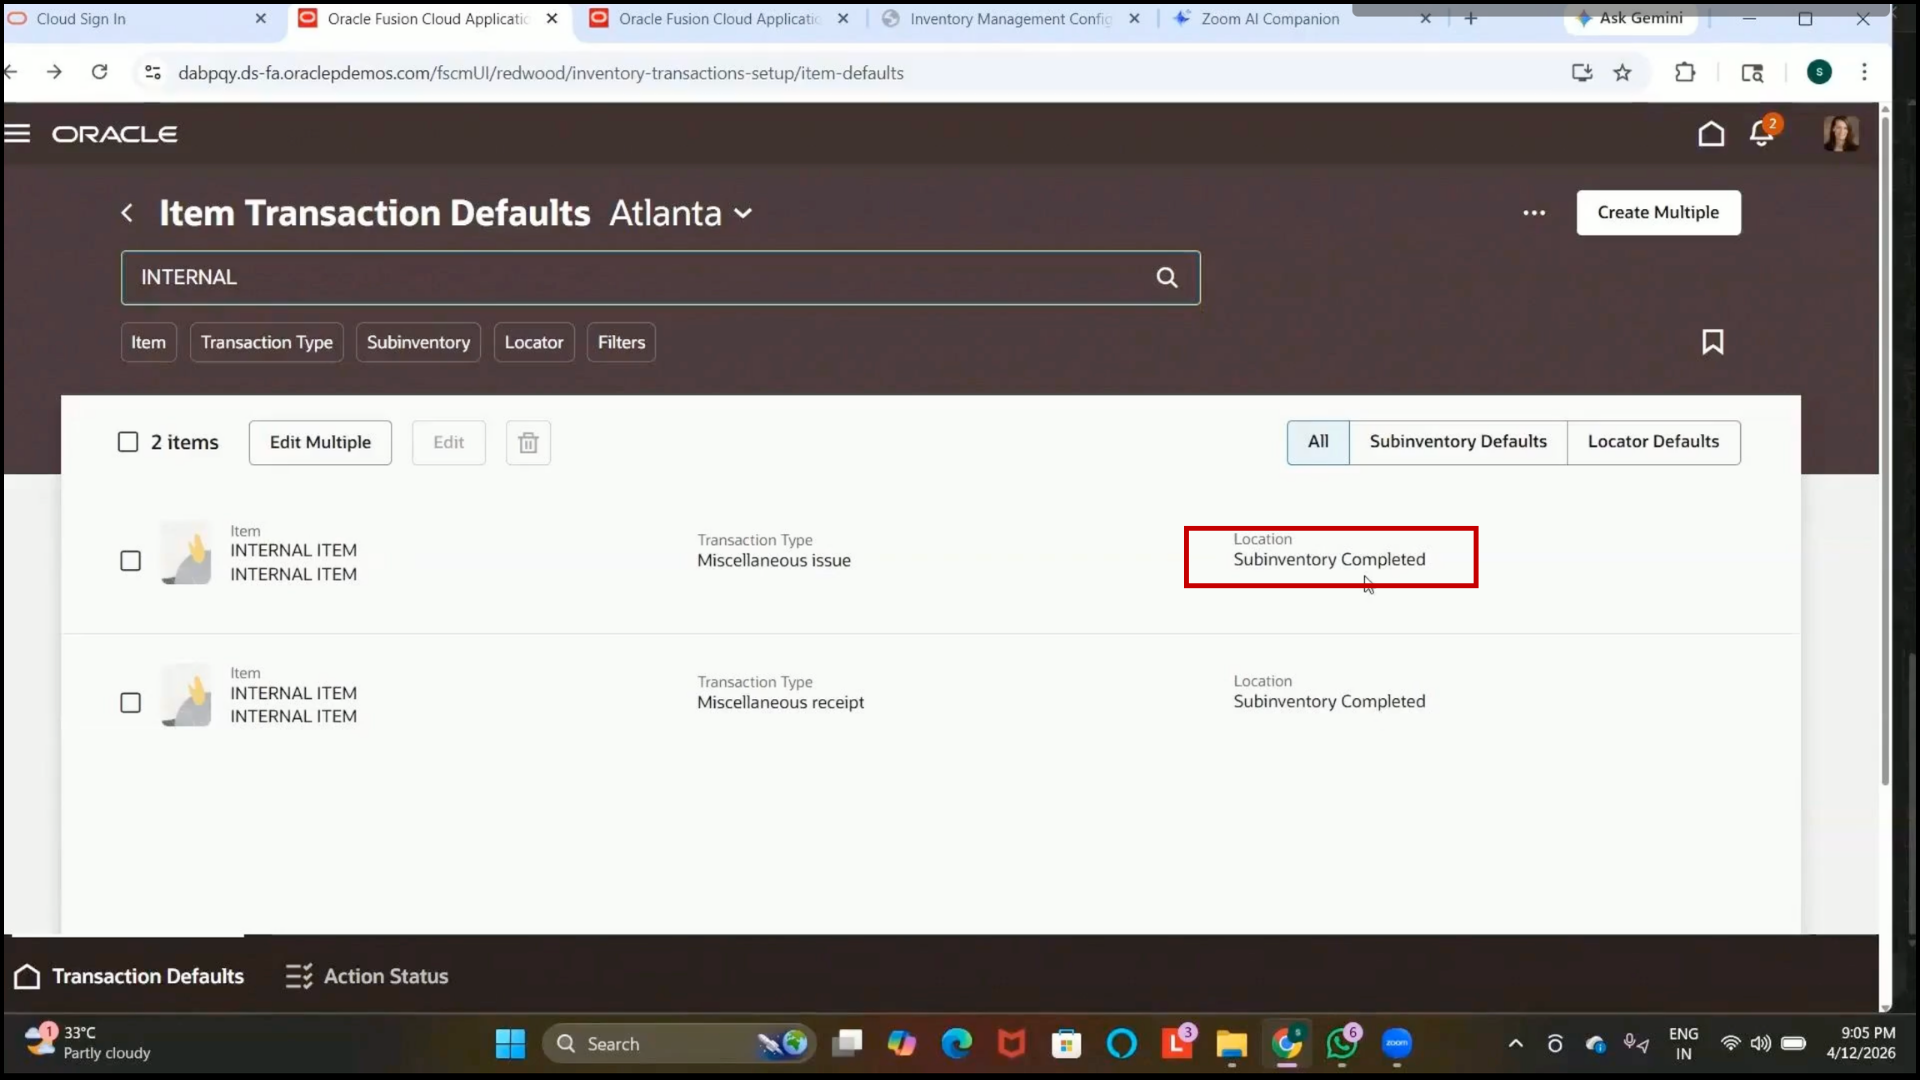
Step 197: Verify Item Transaction Defaults
1. Search for the item:
Internal Item
2. Verify:
3. Miscellaneous receipt transactions default to the completed subinventory.
4. Miscellaneous issue transactions default to the completed subinventory.
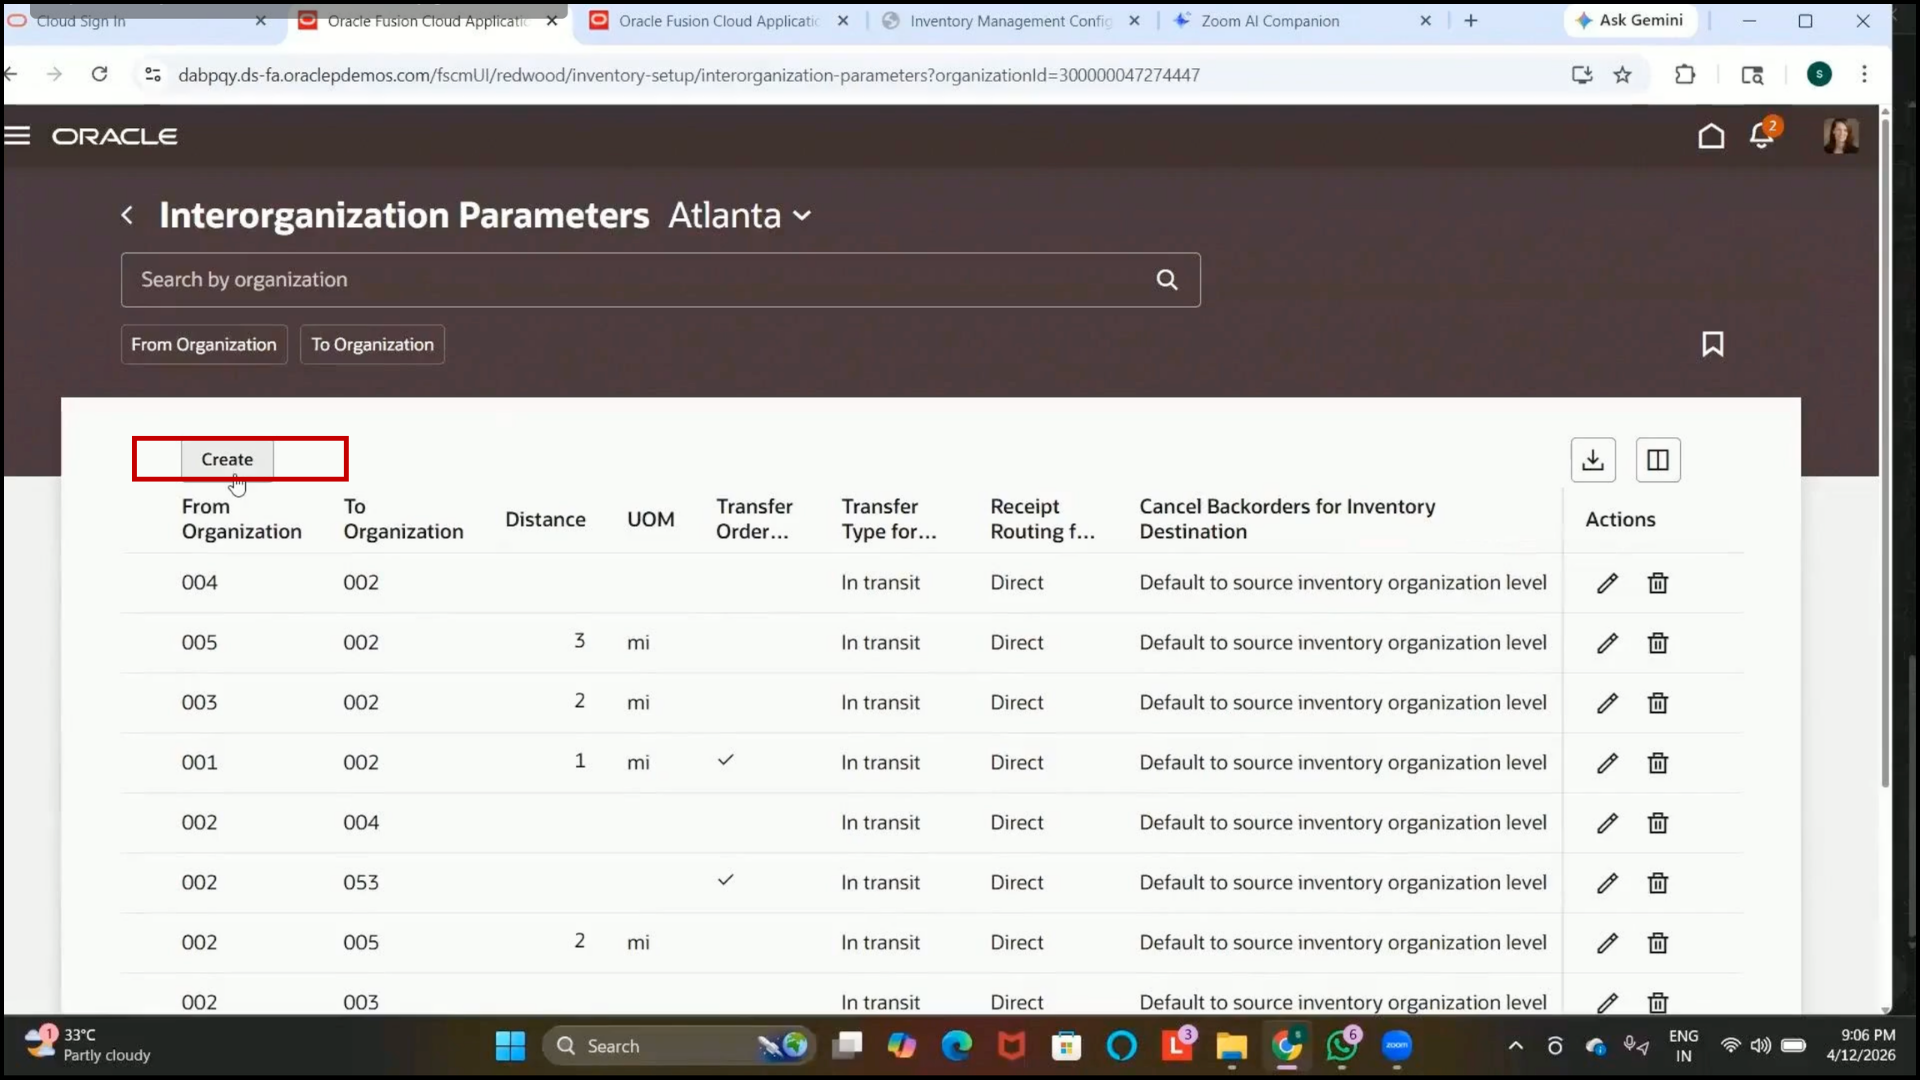
Step 198: Navigate to Interorganization Parameters
1. Open Setup and Maintenance.
2. Search for:
Interorganization Parameters
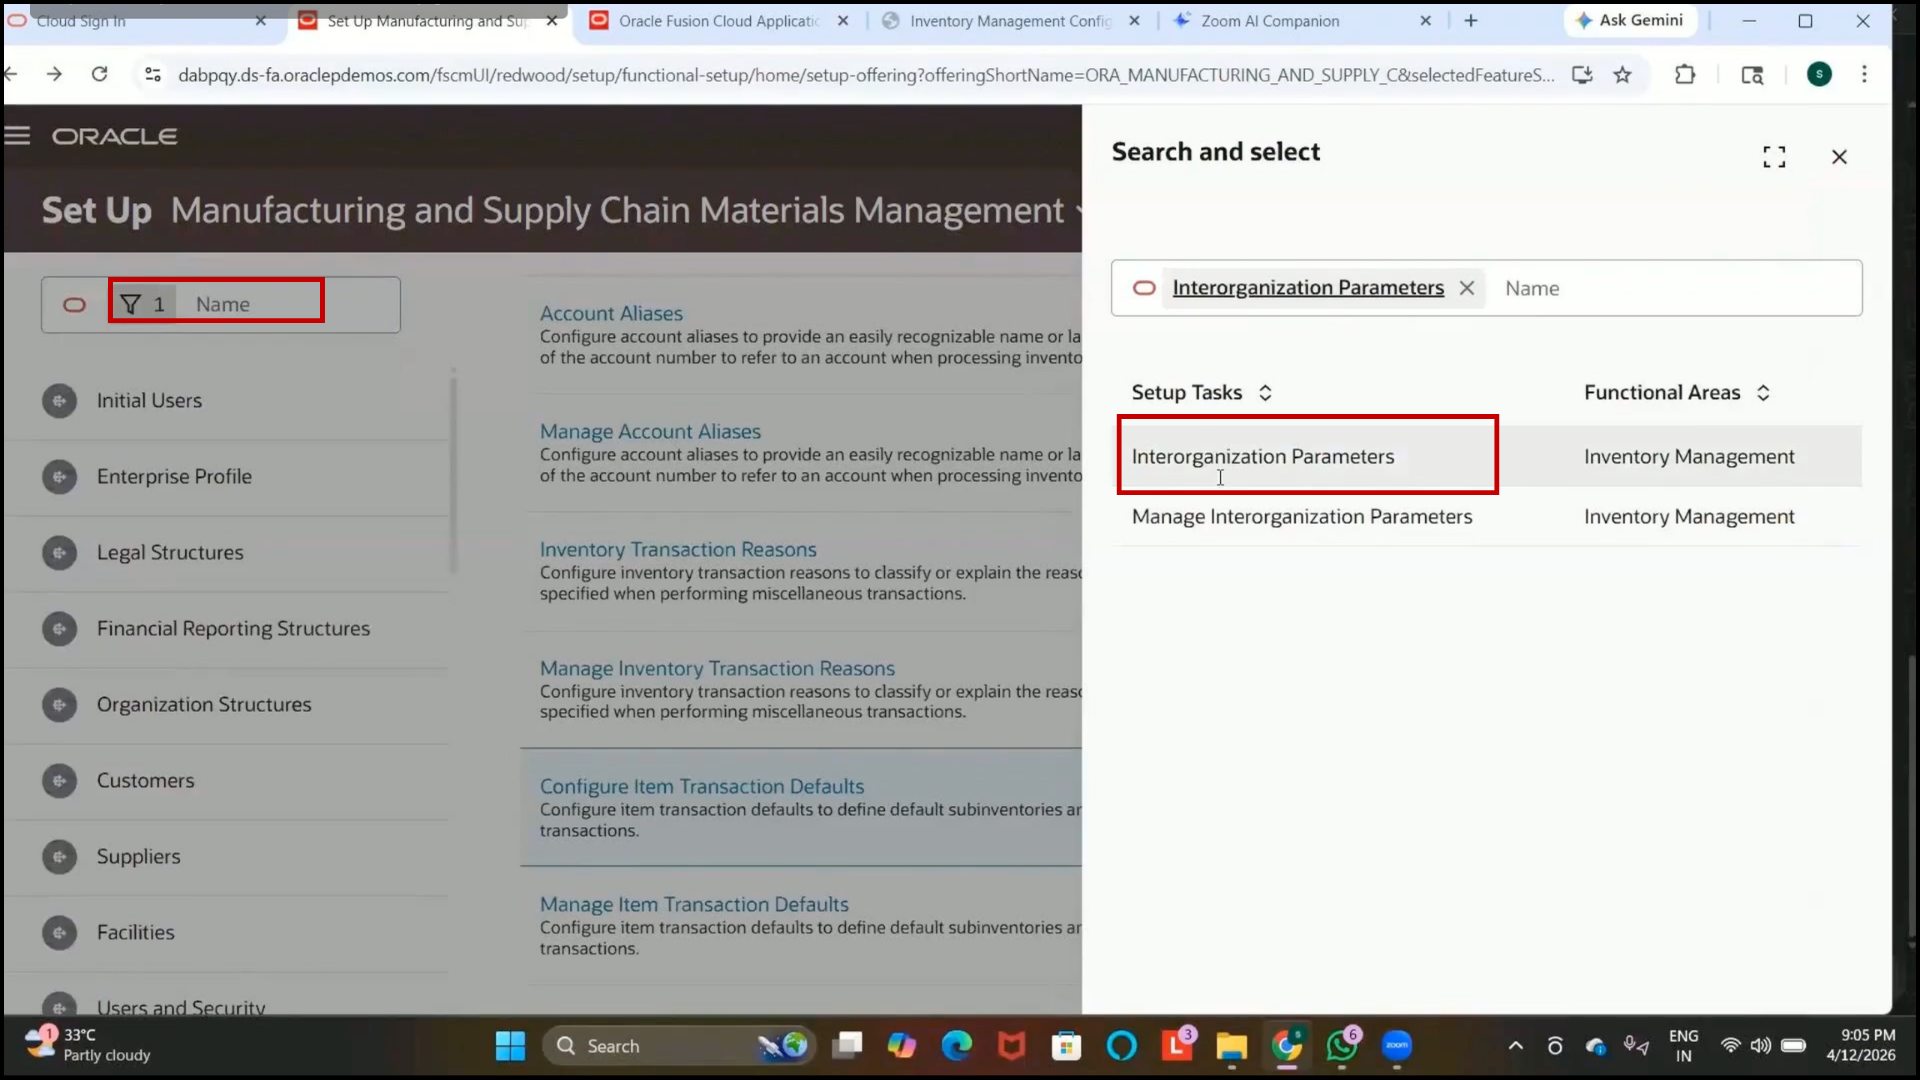
3. Open the setup.
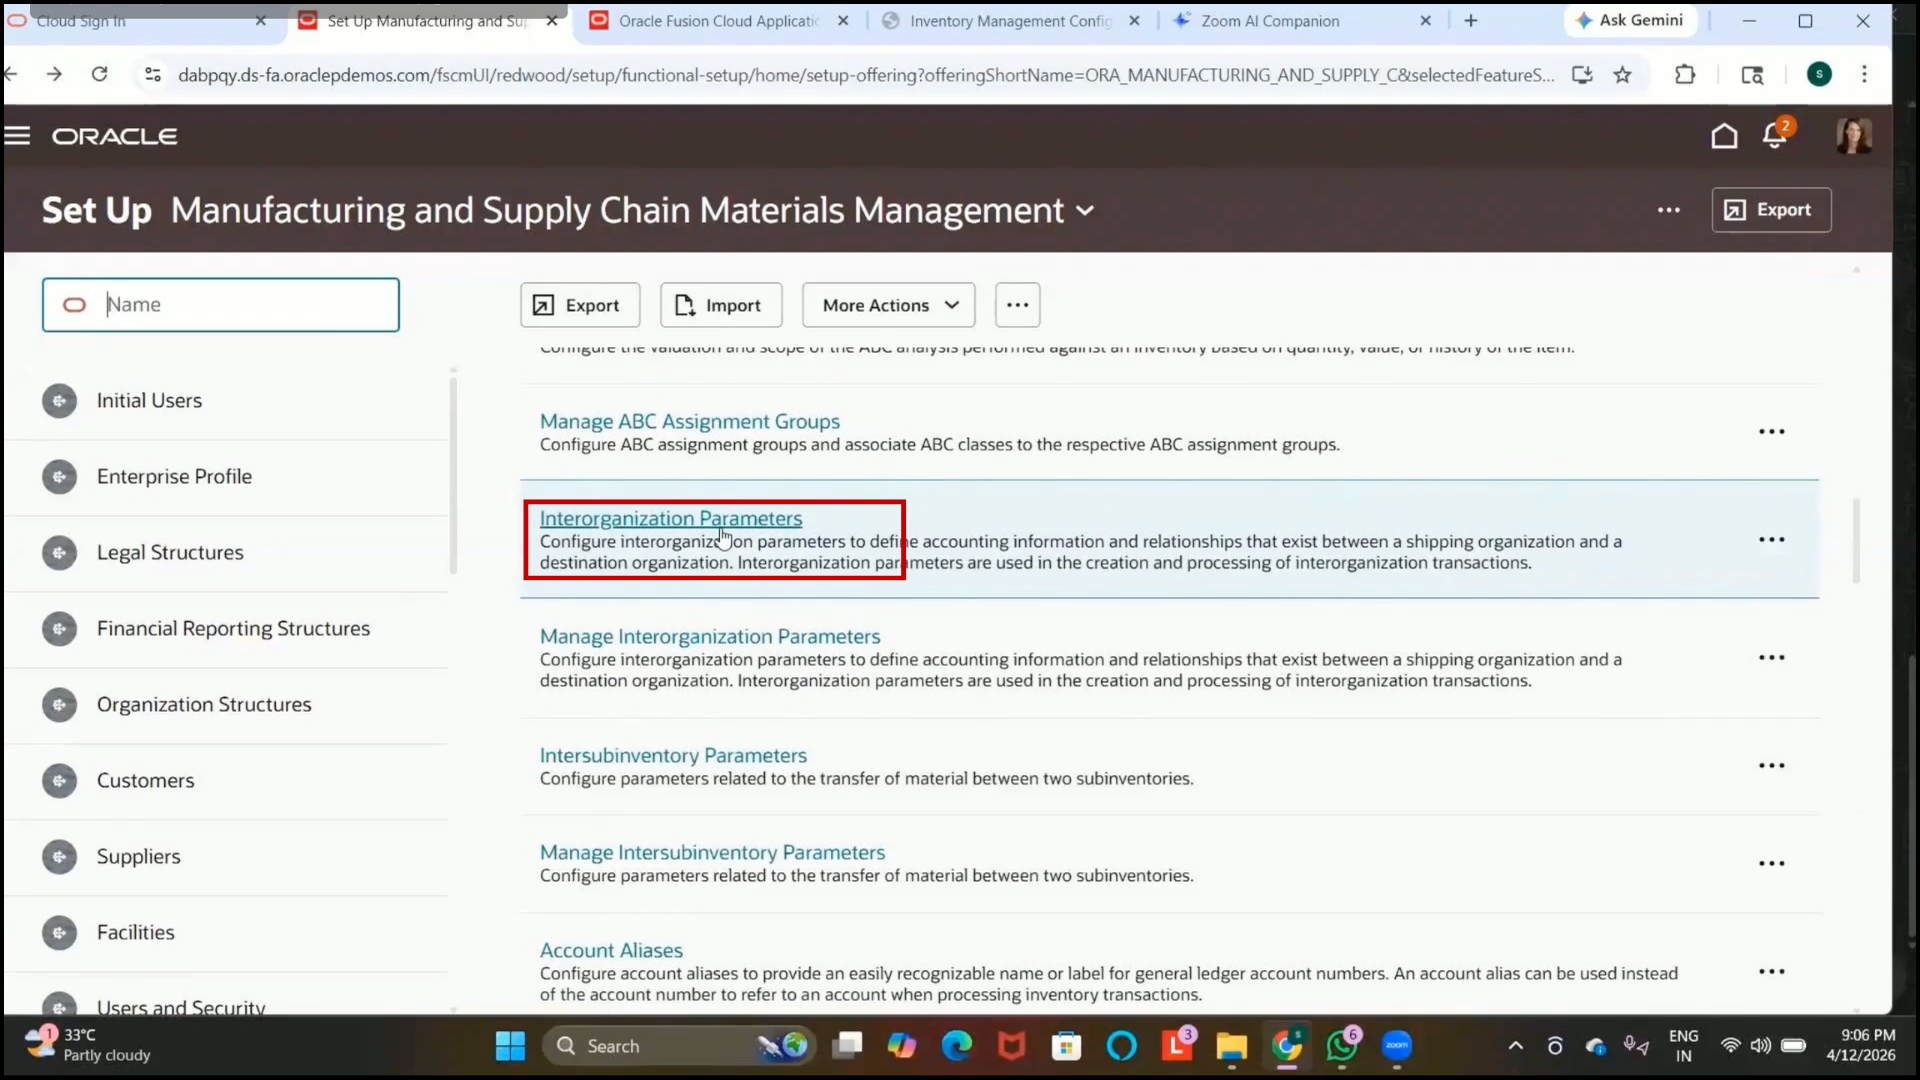
Step 199: Understand Interorganization Parameters
1. Interorganization parameters are used to define internal item movement between inventory organizations.
2. This setup acts as a prerequisite for transfer orders.
3. It defines:
4. Source Organization
5. Destination Organization
6. Transfer behavior
Step 200: Create Interorganization Parameters
1. Click on Create.
Step 201: Select the From Organization
1. Select the source inventory organization.
2. Example:
Seattle Inventory Organization
3. Example organization code:
001
Step 202: Select the To Organization
1. Select the destination inventory organization.
2. Example:
Organizations created previously with codes:
3. 1122
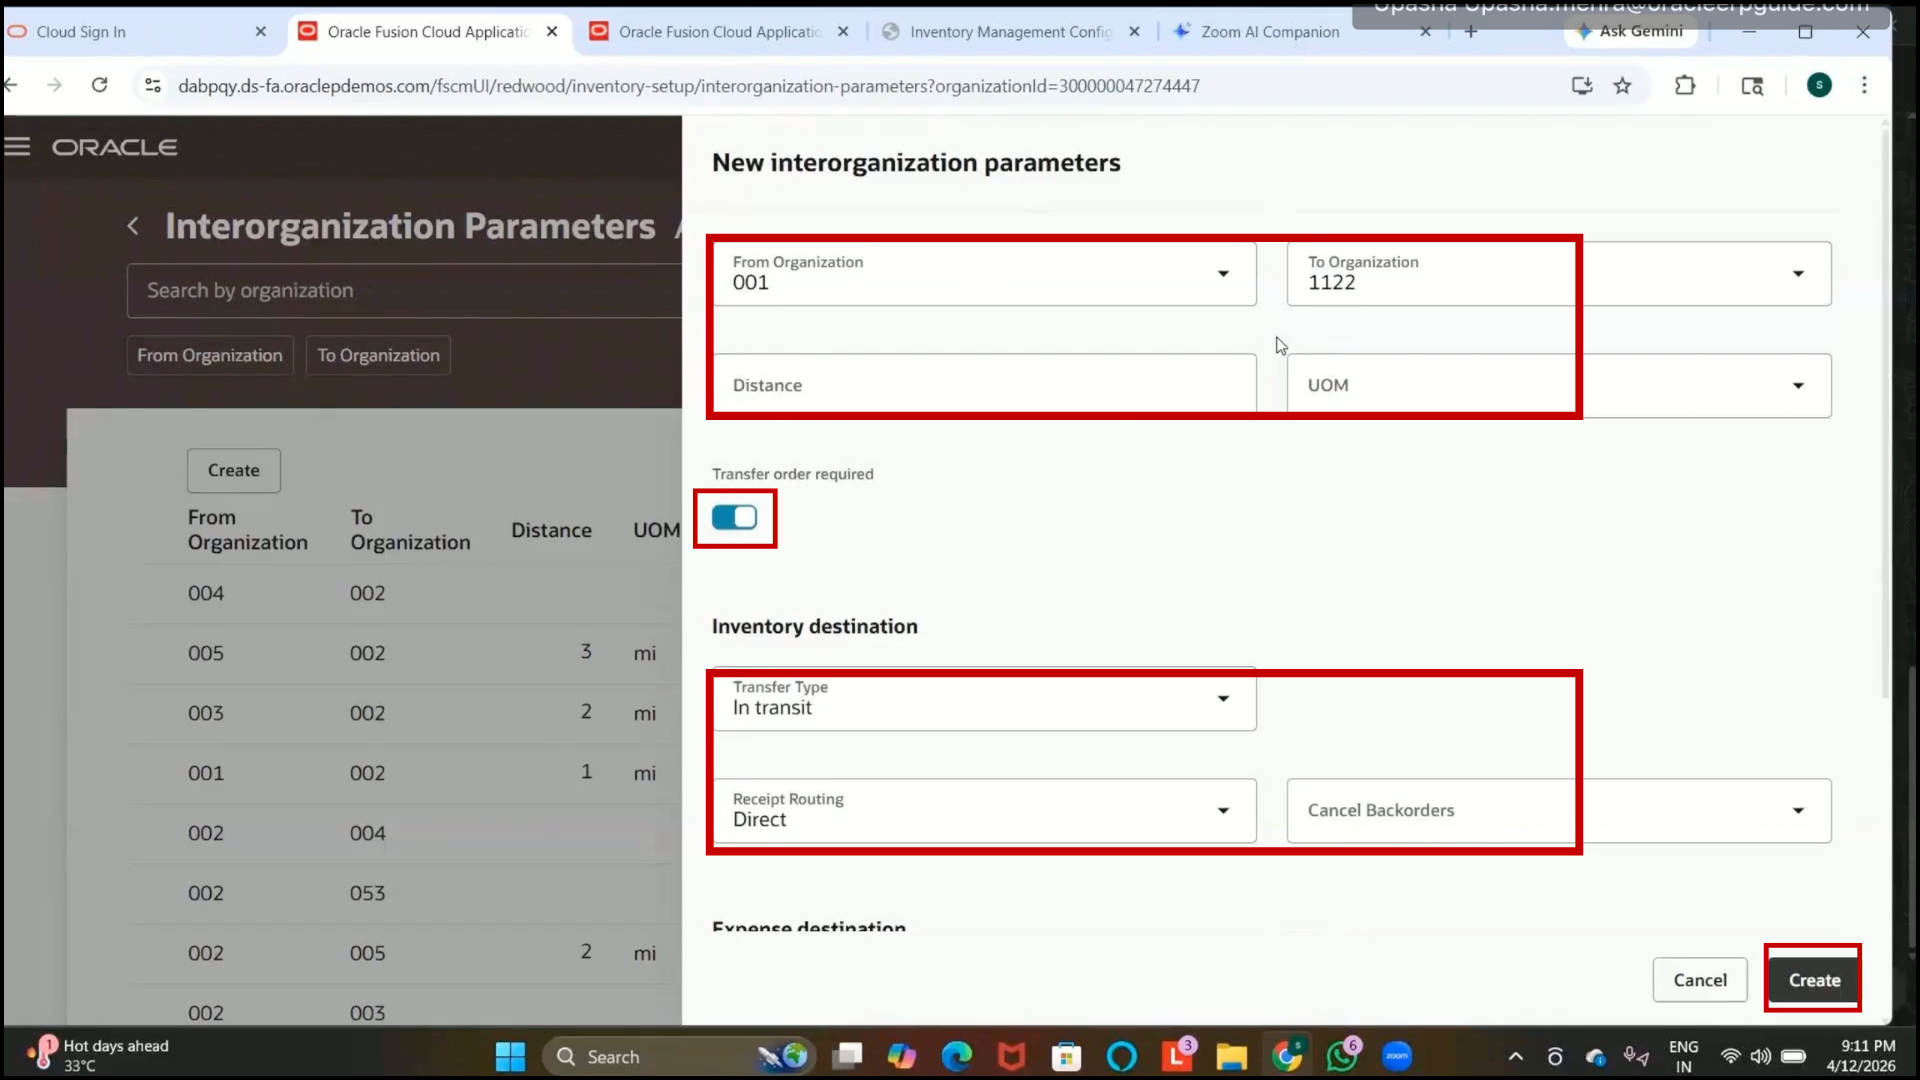
Step 203: Understand Internal Transfer Configuration
1. This setup informs the system that items can be transferred internally between the selected organizations.
2. Only items assigned to both organizations can participate in internal transfers.
Step 204: Navigate to Interorganization Parameters
1. Open Setup and Maintenance.
2. Search for:
3. Interorganization Parameters
4. Open the setup.
Step 205: Understand Interorganization Parameters
1. Interorganization parameters are used to define internal item movement between inventory organizations.
2. This setup acts as a prerequisite for transfer orders.
3. It defines:
4. Source Organization
5. Destination Organization
6. Transfer behavior
Step 206: Create Interorganization Parameters
1. Click on Create.
Step 207: Select the From Organization
1. Select the source inventory organization.
Example:
2.Seattle Inventory Organization
Example organization code:
3. 001
Step 208: Select the To Organization
1. Select the destination inventory organization.
2. Example:
3. Organizations created previously with codes:
4. 1122
Step 209: Understand Internal Transfer Configuration
1. This setup informs the system that items can be transferred internally between the selected organizations.
2. Only items assigned to both organizations can participate in internal transfers.
Step 210: Configure Transfer Distance
1. Enter the distance between organizations if required.
2. This step is optional.
Step 211: Enable Transfer Order Requirement
1. Enable:
2. Transfer Order Required
3. This ensures transfer orders are mandatory for internal transfers.
Step 212: Select the Transfer Type
1. Choose the required transfer type.
2. Available options include:
3. Direct
4. In-Transit
5. Click Create
Step 213: Understand Direct Transfer Type
1. Direct transfers are generally used for small or nearby item movements.
2. Characteristics of Direct Transfer:
3. No in-transit tracking required
4. No separate receiving process required
5. Items are automatically received in the destination organization
Step 214: Understand In-Transit Transfer Type
1. In-transit transfers are used for larger or distance-based item movements.
2. Characteristics of In-Transit Transfer:
3. Shipment tracking is required
4. Transit tracking is enabled
5. A receiving process is required at destination organization
Step 215: Configure Receipt Routing
1. Select the required receipt routing method.
2. Available options may include:
3. Direct
4. Inspection
5. Standard
Step 216: Understand Direct Receipt Routing
1. Direct routing receives items directly into the subinventory.
2. No inspection or counting process is required.
3. Commonly used for low-priority or less critical items.
Step 217: Understand Inspection Receipt Routing
1. Inspection routing sends items to the receiving area first.
2. Items are inspected before moving to subinventory.
3. Quality validation is performed before acceptance.
Step 218: Understand Standard Receipt Routing
1. Standard routing performs quantity verification before receipt.
2. Items are first received into the receiving area.
3. Quantity counting is completed before moving items to subinventory.
4. Commonly used for moderately important items.
Step 219: Review Advanced Transfer Configurations
1. Review all transfer-related configurations.
2. Select the appropriate routing and transfer options based on business requirements.
3. Businesses commonly use inspection routing for quality-sensitive items.
Step 220: Open Configure Item Transaction Defaults
1. Navigate to Manufacturing and Supply Chain Management.
2. Search for “Configure Item Transaction Defaults.”
3. Open the setup page.
Step 221: Understand Item Transaction Defaults
1. Item transaction defaults are used to default a specific subinventory during inventory transactions.
2. This helps users avoid selecting the subinventory manually every time.
3. These defaults can be configured for different transaction types.
Step 222: Create Transaction Defaults by Item
1. Click on Create by Item.
2. Search and select the item:
3. Internal Item
Step 223: Select Transaction Types
1. Select the required transaction types:
2. Miscellaneous Receipt
3. Miscellaneous Issue
4. These transaction types will use the defaulted subinventory.
Step 224: Assign Default Subinventory
1. Select the Subinventory:
2. Completed Subinventory
3. Leave the locator blank because the locator control is not enabled.
Step 225: Add Additional Subinventories (Optional)
1. Additional subinventories can also be added if required:
2. Staging
3. Receiving
4. Click on Review Default to verify the assigned subinventories.
Step 226: Keep Only Required Subinventory
1. Delete unnecessary subinventories.
2. Keep only:
3. Completed Subinventory
Step 227: Save Item Transaction Defaults
1. Click on Save.
2. Click on Create.
3. Verify that the transaction default has been created successfully.
Step 228: Verify Item Transaction Defaults
1. Search for:
2. Internal Item
3. Confirm that:
4. Miscellaneous Issue
5. Miscellaneous Receipt
6. are defaulted with a completed subinventory
Step 229: Open Inter-Organization Parameters
1. Navigate to Setup and Maintenance.
2. Search for:
3. Inter-Organization Parameters
4. Open the setup page.
Step 230: Understand Inter-Organization Parameters
1. These parameters define item movement between inventory organizations.
2. This setup is mandatory before creating transfer orders.
3. It specifies:
4. Source Organization
5. Destination Organization
6. Transfer Type
7.Receipt Routing
Step 231: Create Inter-Organization Parameter
1. Click on Create.
2. Select From Organization:
3. Seattle Inventory Organization (001)
4. Select To Organization:
5. Destination Organization created earlier (011/012)
Step 232: Enable Transfer Order
1. Enable:
2. Transfer Order Required
Step 233: Select Transfer Type
1. Choose Transfer Type:
2. In Transit
3. In-transit transfer is used when shipment tracking is required.
Step 234: Select Receipt Routing
1. Choose Receipt Routing:
2. Direct
3. Direct routing receives goods directly into the destination subinventory without inspection.
Step 235: Configure Expense Destination Receipt
1. Disable the receipt requirement for expense items if not needed.
2. This is generally used for service-based items that are not stored in inventory.
Step 236: Save Inter-Organization Parameter
1. Click on Create.
2. Verify that the parameter record is created successfully.
Step 237: Verify Existing Record
1. Search using:
2. From Organization: 001
3. To Organization: 011/012
4. Confirm that the previously created record exists.
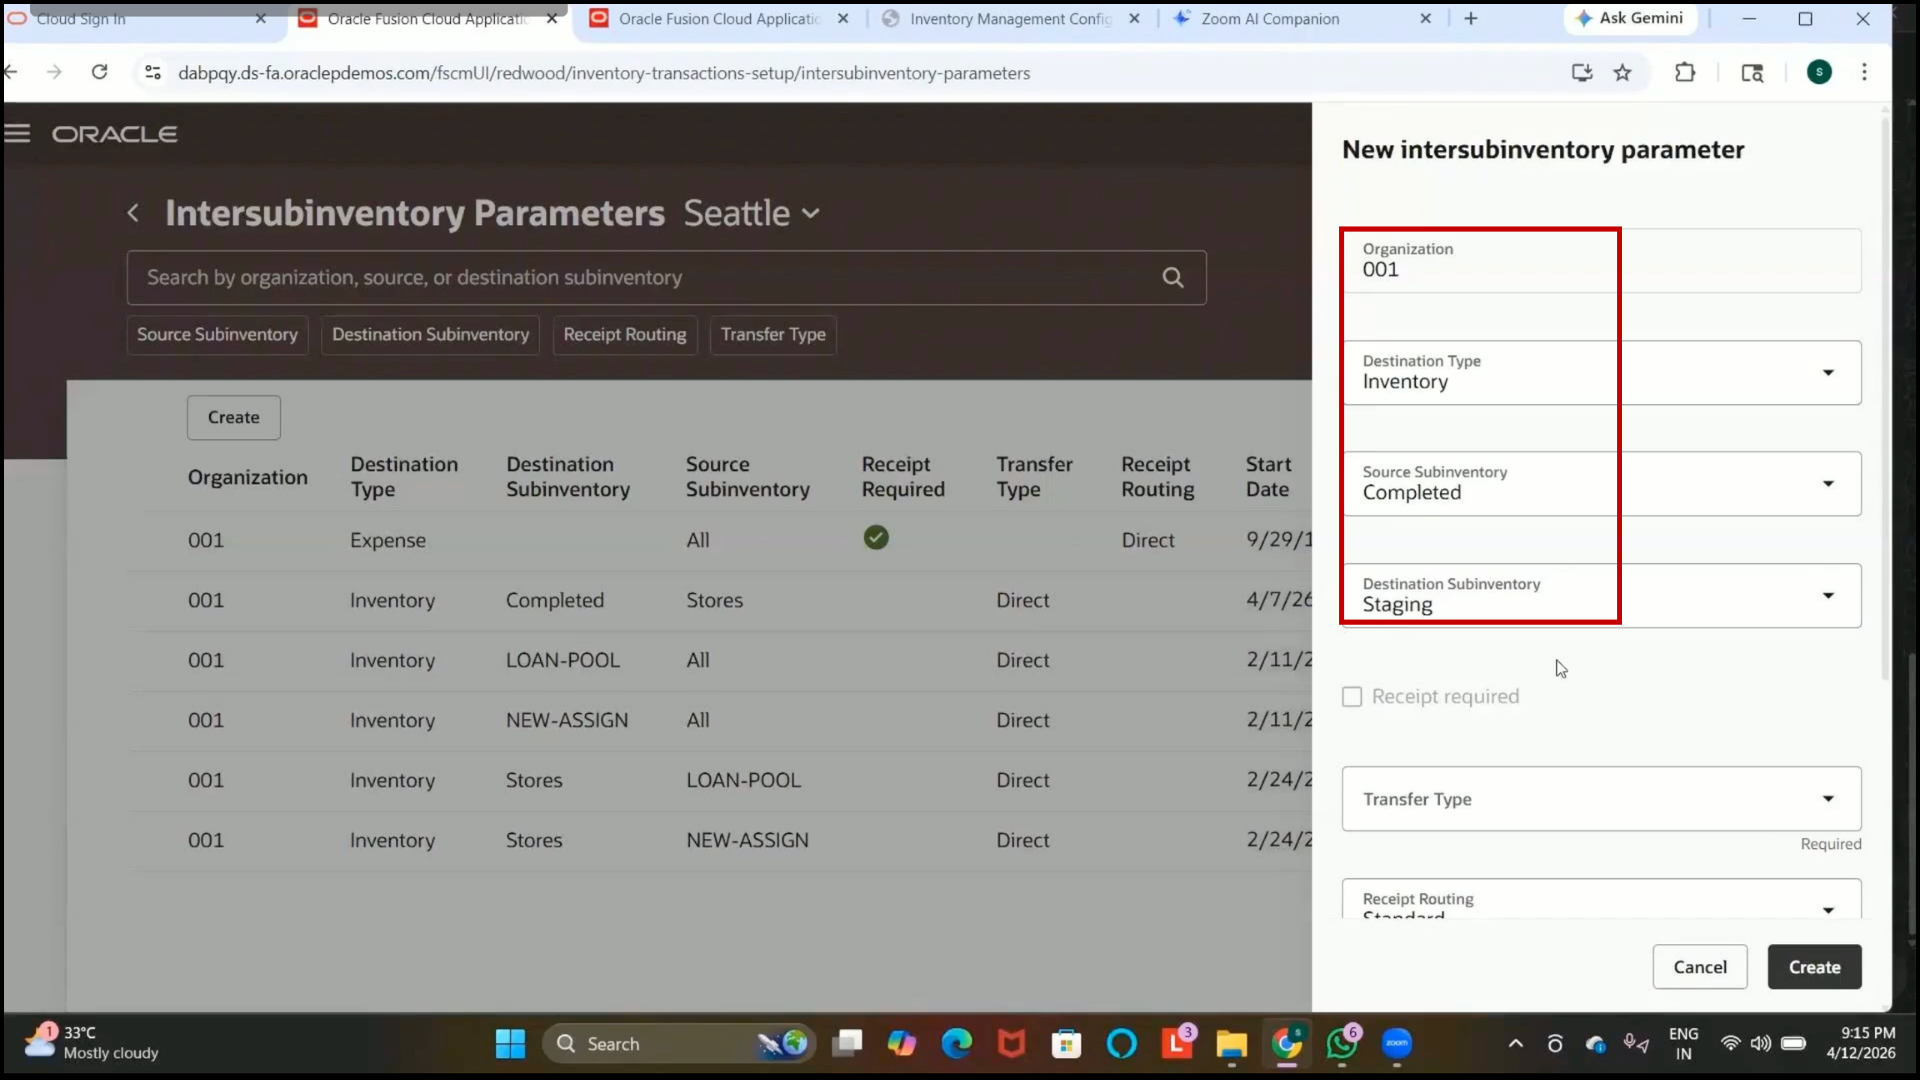
Step 238: Open Inter-Subinventory Parameters
1. Navigate to Setup and Maintenance.
2. Search for:
3. Inter-Subinventory Parameters

4. Open the setup page.

Step 239: Understand Inter-Subinventory Parameters
1. These parameters define item movement between subinventories within the same inventory organization.
2. This setup is required before transferring items between subinventories.
Step 240: Create Inter-Subinventory Parameter
1. Click on Create.
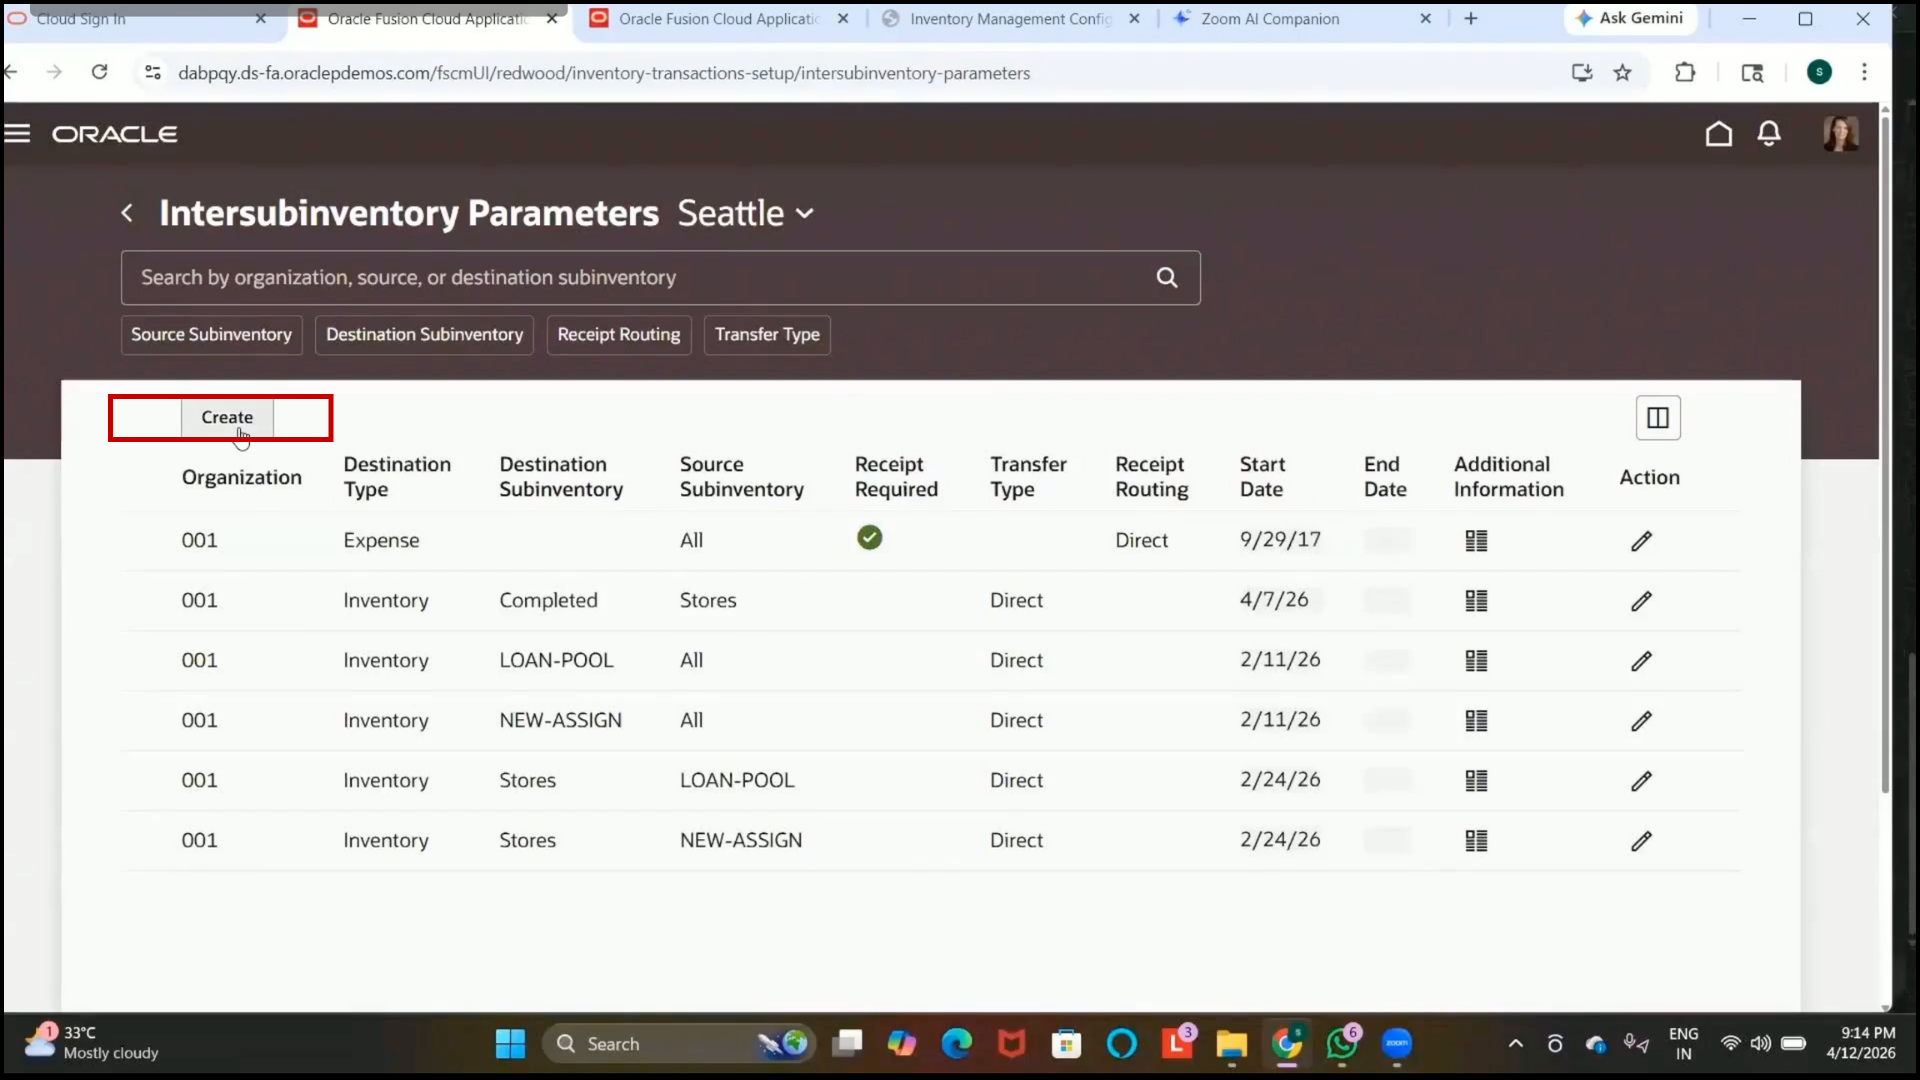
2. Select Organization:
3.Seattle Inventory Organization
Step 241: Select Destination Type
1. Set Destination Type:
2. Inventory
Step 242: Select Source Subinventory
1. Select Source Subinventory:
2. Completed Subinventory
Step 243: Select Destination Subinventory
1. Select Destination Subinventory:
2. Staging Subinventory
3. Click Create
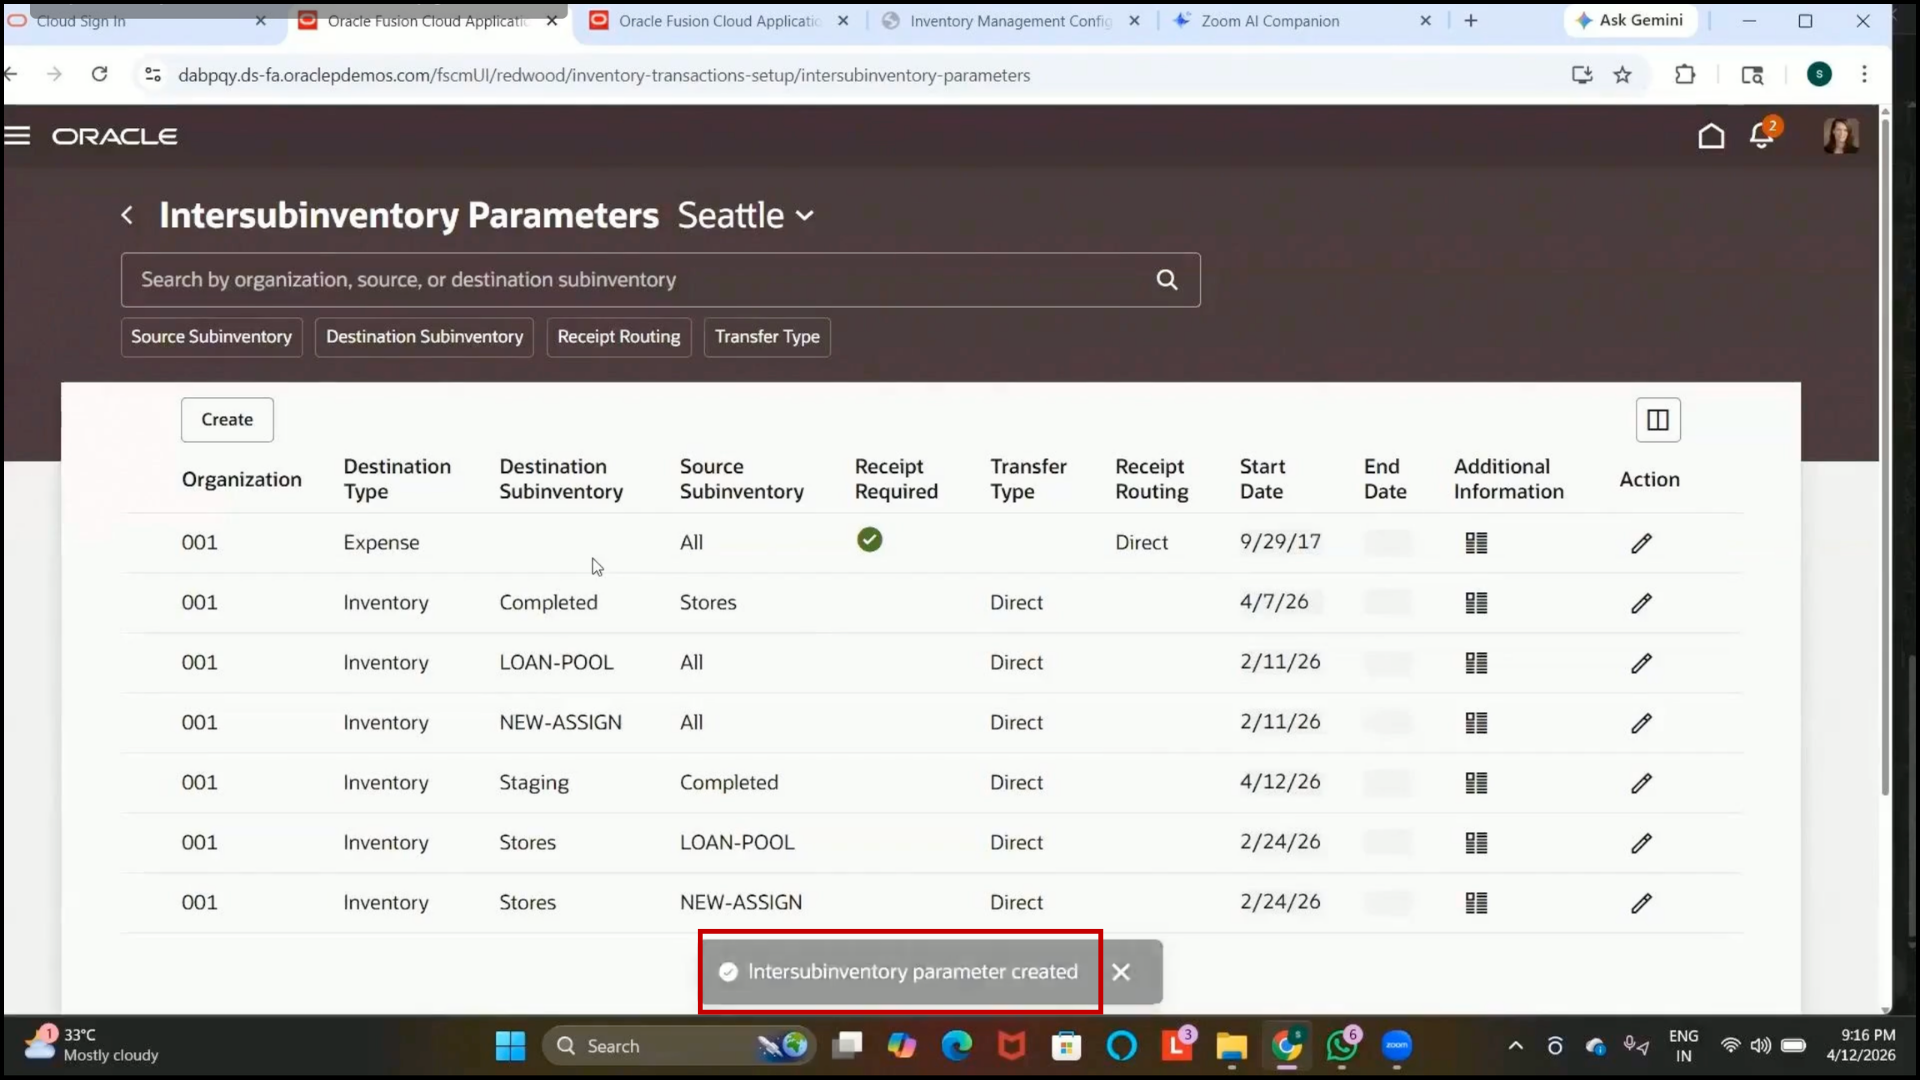
Step 244: Understand Inter-Subinventory Parameters
1. Inter-subinventory parameters are used to transfer items between subinventories within the same inventory organization.
2. This setup is required before performing subinventory transfer transactions.
3. It helps define valid source and destination subinventories.
Step 245: Purpose of Inter-Subinventory Transfer
1. Items can be moved between different subinventories such as:
2. Inventory
3. Staging
4. Completed
5. Manufacturing organizations commonly use this process after inspection of activities.
Step 246: Configure Expense Item Option
1. Leave the expense item option disabled if it is not required.
Step 247: Select Transfer Type
1. Choose Transfer Type:
2. Direct
3. Direct transfer is used because both subinventories exist within the same organization and do not require in-transit shipment tracking.
Step 248: Select Start Date
1. Enter the start date as the current date.
Step 249: Create Inter-Subinventory Parameter
1. Click on Create.
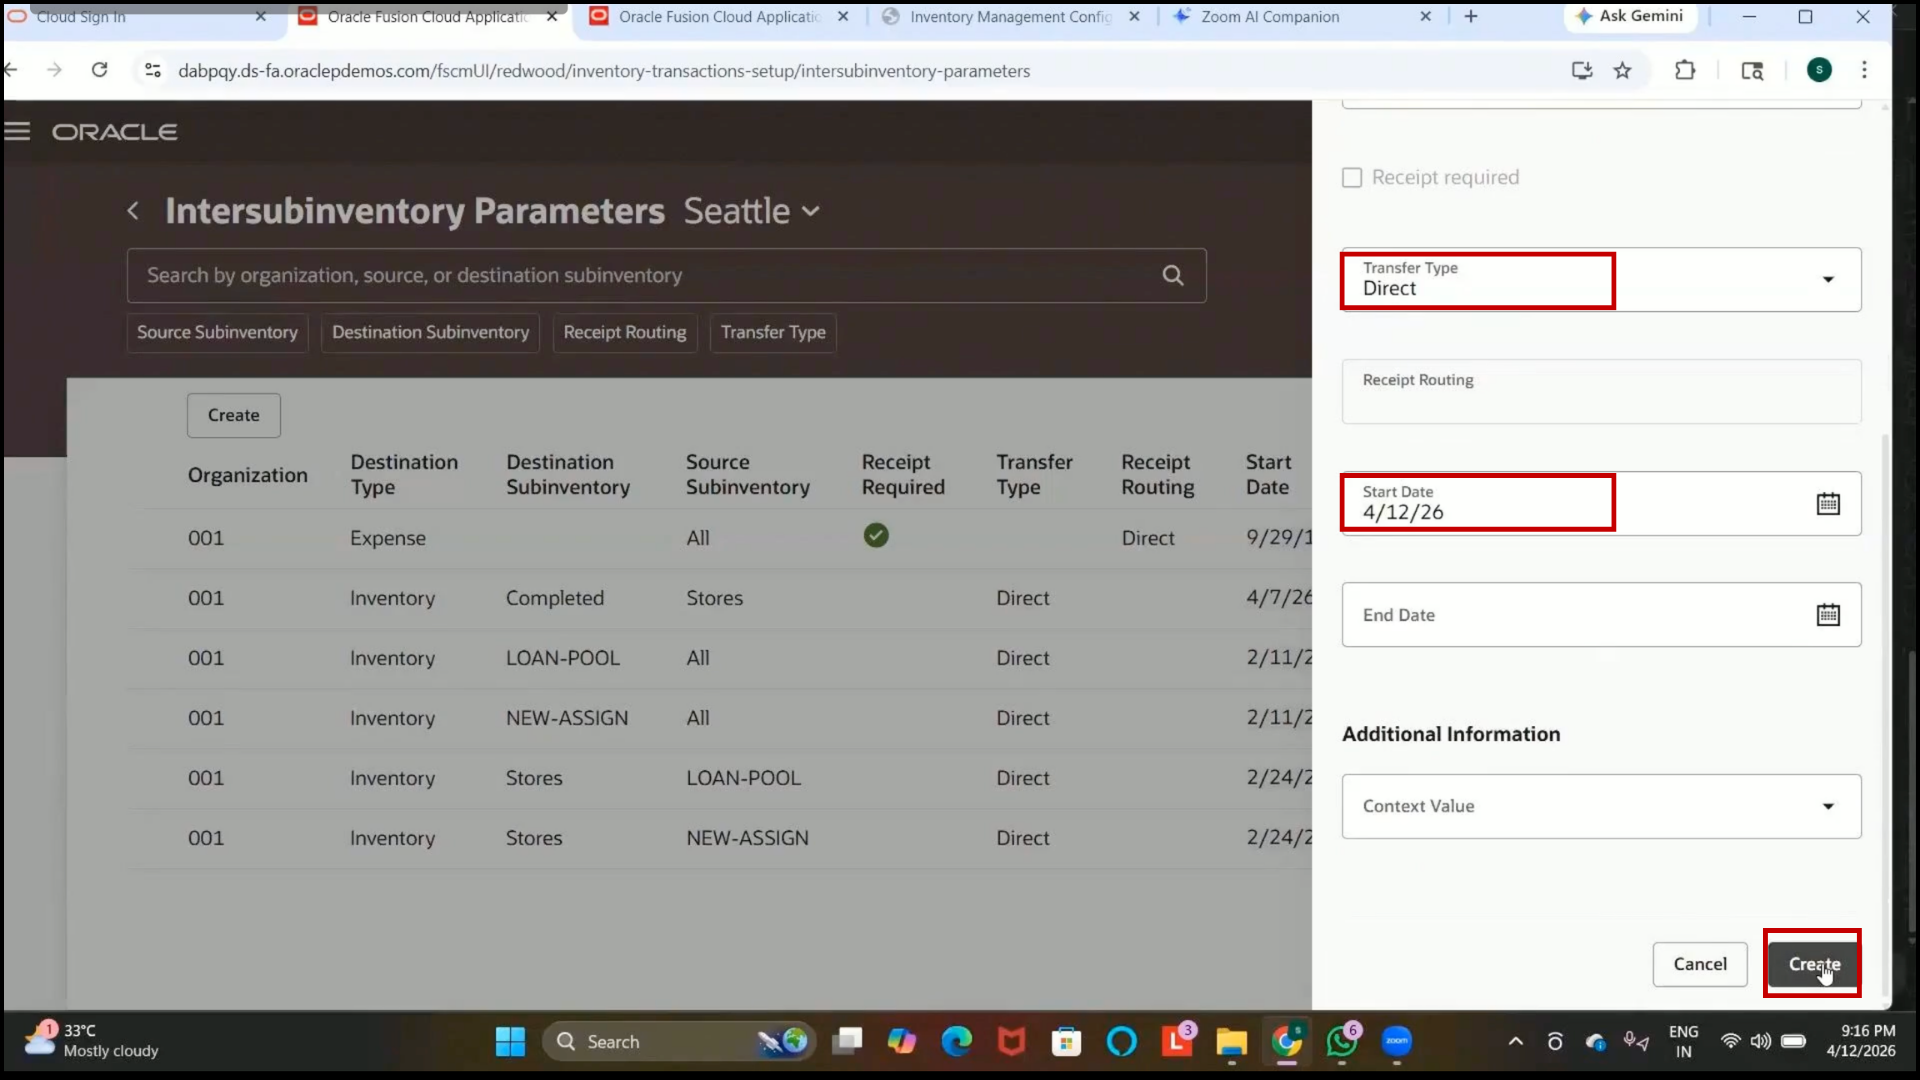
2. Verify that the inter-subinventory parameter is created successfully.